Nvim LSP (Neovim Language Server Protocol) enables you to code efficiently by predicting what you are going to type, early diagnosis, etc. In this article, I will explain what is LSP, what are language servers, how to configure them in nvim, highlight symbols under the cursor, keybindings for code actions, rename, hover info, implementations, definition and declaration, workspace, and many more.
If have not set up basic configuration in Neovim, do that over here. This article is part of my series on setting up Nvim Lsp (Neovim Language Server Protocol):
-
Nvim lsp: configure language servers, shortcuts for listing your symbols, rename, code actions, get definition/declaration, workspace, highlights (this article)
-
Nvim lsp: diagnostics - keybindings, error/warning signs, floating and virtual texts
-
Nvim lsp: autocompletion - mapping, snippets, fuzzy search, and icons
I recommend you to follow all three articles in the above order.
What are Language Server and LSP
Language Servers, like any other servers, run in the background of your computer and they serve their services such as autocompletion, diagnostics (linting), formatting, hover information, renaming, etc. to any 'client' such as neovim/vscode/atom/sublime. These services are served by following a special communication protocol called Language Server Protocol.
LSP is a rather new protocol and most modern editors are starting to support this. As of 10 June 2022, Vim still does not support this natively. You need to install special plugins in vim for this feature. But neovim, starting from version 0.5, has started to support this in its core version itself (use the command nvim --version to find your version of neovim). You don't have to install any plugin in neovim for this. At the same time, there are some related plug-ins in neovim which makes configuring and using language servers easy. I will be recommending such plug-ins in the upcoming paras.
For each famous programming language, we have at least one language server. For example, bash-language-server (sometimes also called bashls) is for bash language, pyright is for python language, lua-language-server (also known as sumneko_lua) for lua language.
Before language servers came into existence, each editor needed to provide dedicated support for each language in its own unique way. It was a cumbersome process. But now, language developers only need to develop the language and the corresponding server. And editors supporting LSP can connect with these servers without having any dedicated support for the language itself.
Install useful plug-ins for nvim lsp
Use your favorite plug-in managers to install these plug-ins:
-
collection of configurations for builtin neovim-lsp:
neovim/nvim-lspconfig -
Plug-in
hrsh7th/nvim-cmpprovides additional completion capabilities.
Install necessary language servers
In this article, I will explain everything using the lua-language-server, pyright (python-language-server) and bash-language-server. For others, the procedure is exactly similar. To get a list of available servers, visit the neovim site for server configuration.
There are many ways to install the servers:
-
Using your distributions' official package managers (ex -
aptfor Debian,pacmanfor Arch Linux). This is best of all because now, the packages will be upgraded by your package managers and you don't have to do that manually. -
However, If you cannot install it using the above method, just search on Google, head over to the official sites of these servers, and follow the recommended methods.
Arch Linux:
pacman -S bash-language-server lua-language-server pyrightOther distributions/OSes:
pip install pyright
npm i -g bash-language-server
brew install lua-language-server
port install lua-language-server
After installing the servers, you need to set up Key Bindings and Highlights and then server configurations.
Set up key bindings in neovim-lsp
First, you need to create a file ~/.config/nvim/plug-config/lspconfig.lua. Now, you need to populate it with configuration. In the very end, I will show you how to 'source' it in your init.vim. Only after that, you will see any result.
In the file ~/.config/nvim/plug-config/lspconfig.lua, first, create an on_attach function, then put your keybindings into it:
local on_attach = function(client, bufnr)
  local opts = { noremap = true, silent = true }
  KEY_BINDING_1
  KEY_BINDING_2
end
Where,
-
KEY_BINDING_1, 2, ... will be replaced by your keybindings.
-
optvariable will be used in setting up your keybindings. -
Putting the key-bindings inside the
on_attachfunction makes sure that these key-bindings are only created when there is any Language Server attached to the neovim. In our example, we will be configuring the servers only for lua, bash, and python. So, when you open any file with filetypes other than lua, bash and python, these key-bindings will not take any action. -
You can refer to neovim's help page using
:help nvim_buf_set_keymap()for more information.
Now, I will help you populate your on_attach function with the necessary key bindings.
Symbols in nvim-lsp
Symbols are special keywords in your code such as variables, functions, etc. To get a list of the symbols, execute the command :lua vim.lsp.buf.document_symbol().
To bind the command with the key <leader>ls, put the following code inside your on_attach function:
vim.api.nvim_buf_set_keymap(bufnr, 'n', '<leader>ls', '<cmd>lua vim.lsp.buf.document_symbol()<CR>', opts)
Definition and Declaration in nvim lsp
Definition: When you put your cursor on any 'symbol' and execute the vim command lua vim.lsp.buf.definition(), your cursor will move to the definition of the symbol. This is quite handy for big projects spread over a large number of files and lines.
Declaration (:lua vim.lsp.buf.declaration()): many servers do not support the Declaration. Most of the time, Definition is enough.
To bind the above definition and declaration command with the keys <leader>ld and <leader>lD, put the following code inside your on_attach function:
vim.api.nvim_buf_set_keymap(bufnr, 'n', '<leader>lD', '<cmd>lua vim.lsp.buf.declaration()<CR>', opts)
vim.api.nvim_buf_set_keymap(bufnr, 'n', '<leader>ld', '<cmd>lua vim.lsp.buf.definition()<CR>', opts)
Hover information in nvim lsp
Hover information gives you a help document in a floating window when you 'hover' your cursor on any special keyword. For example, in bash language, hovering on find command will give you find's man page, in python language, hovering on print() will give you short information about the print function.
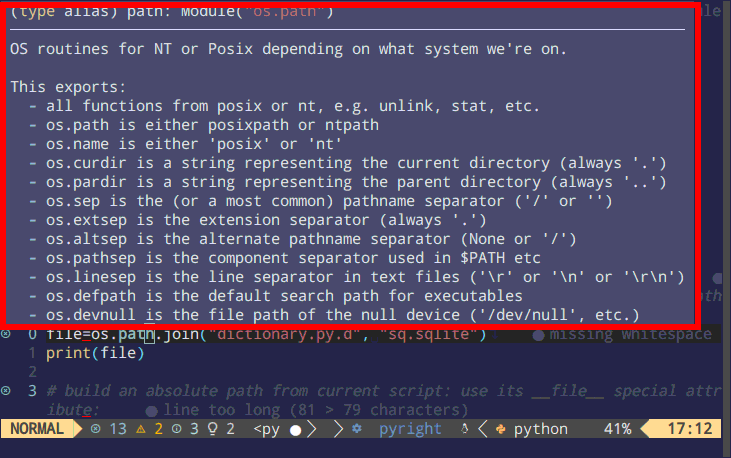
fig 1: hover in nvim lsp: just put your cursor on any symbol (here path) and execute the hover command to get the hover information.
To bind the hover command :lua vim.lsp.buf.hover() with the key <leader>lk, put the following code in your on_attach function:
vim.api.nvim_buf_set_keymap(bufnr, 'n', '<leader>lk', '<cmd>lua vim.lsp.buf.hover()<CR>', opts)
Please note that "hovering" in neovim is slightly different. Here, you first need to put your cursor instead of just hover on the symbol and then press <leader>lk. Press this shortcut key again and you will reach into the floating 'window'. To get out of the floating window, quit (:q) as usual.
Implementation in nvim lsp
Executing the neovim command :lua vim.lsp.buf.implementation() on any symbol will list all the implementations for the symbol under the cursor in the quickfix window.
However, if your language server does not support this you might see the message method textDocument/implementation is not supported by any of the servers registered for the current buffer at the bottom of your neovim. For your information, the bash-language-server, lua-language-server, and pyright do not support implementations.
To bind this command with the key <leader>lI, put the following code in your attach_function:
vim.api.nvim_buf_set_keymap(bufnr, 'n', '<leader>lI', '<cmd>lua vim.lsp.buf.implementation()<CR>', opts)
Signature help in nvim lsp
Signature help shows information about the parameters of your function/method in a floating window. For example, suppose you have defined a function with a list of parameters (or variables). When you start to type the parameters' values one after another, some helpful information will be shown in a floating window.
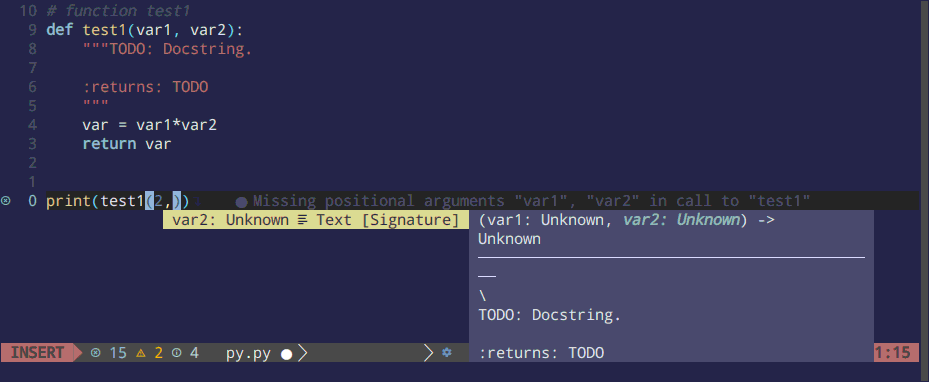
fig 2: signature help in nvim lsp
To bind the signature help command :lua vim.lsp.buf.signature_help() with the key <leader>lsh, use the following code in your on_attach function:
vim.api.nvim_buf_set_keymap(bufnr, 'n', '<leader>lsh', '<cmd>lua vim.lsp.buf.signature_help()<CR>', opts)
However, personally, I find it less useful than using another plug-in hrsh7th/cmp-nvim-lsp-signature-help. The plug-in gives the signature-help in the floating window without using any shortcut key. On top of that, the plug-in also boaldens the variable under consideration (in figure 2, var2 is shown in bold in the floating window as I am about to write its value). I will cover more about signature-help in the next article on nvim-lsp autocompletion.
Workspace in nvim lsp
A "workspace" is the collection of one or more folders that are opened in your window (source: Workspace in vscode).
To have keybindings for add, remove, and list workspaces, use the following code in your on_attach function:
vim.api.nvim_buf_set_keymap(bufnr, 'n', '<leader>lwa', '<cmd>lua vim.lsp.buf.add_workspace_folder()<CR>', opts)
vim.api.nvim_buf_set_keymap(bufnr, 'n', '<leader>lwr', '<cmd>lua vim.lsp.buf.remove_workspace_folder()<CR>', opts)
vim.api.nvim_buf_set_keymap(bufnr, 'n', '<leader>lwl', '<cmd>lua print(vim.inspect(vim.lsp.buf.list_workspace_folders()))<CR>', opts)
Rename symbols in nvim lsp
The command :lua vim.lsp.buf.rename() only renames all references to the symbol under the cursor. It does not rename the string in other places such as comments.
To bind this command with the key <leader>lr, put the following code in your on_attach function:
vim.api.nvim_buf_set_keymap(bufnr, 'n', '<leader>lr', '<cmd>lua vim.lsp.buf.rename()<CR>', opts)
Code actions in nvim lsp
When you write your projects, you might encounter errors/warnings. Code actions in that case are available suggestions to fix/remove these errors and warnings. Not all language servers provide this service.
To bind the key <leader>lc with the command :lua vim.lsp.buf.code_action(), use the following code in your on_attach function:
vim.api.nvim_buf_set_keymap(bufnr, 'n', '<leader>lc', '<cmd>lua vim.lsp.buf.code_action()<CR>', opts)
Now press <leader>lc on any symbol/line with an error/warning, it would show you possible code actions (like how to solve/remove the error/warning) you can do. It gives a list of actions in command line mode and you have to enter a number to choose the action.
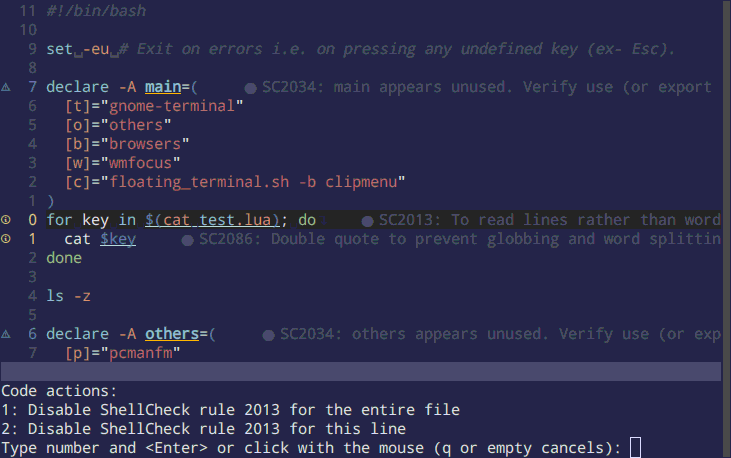
fig 3: code actions in nvim-lsp (shown at the bottom)
Sometimes, code actions are available even if there is no error/warning/information/hint. In that case, you can show a lightbulb using kosayoda/nvim-lightbulb plug-in.
List all references to the symbol using nvim lsp
Nvim lsp command :lua vim.lsp.buf.references() on any symbol under the cursor lists all the references to the symbol in a quickfix window.
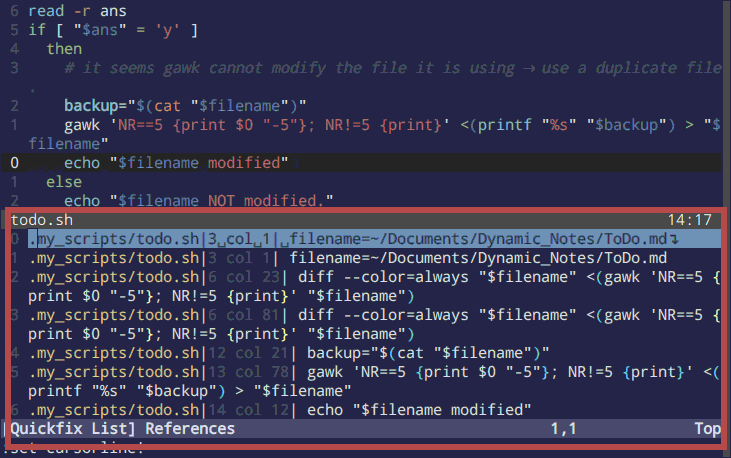
fig 4: references to the symbol filename in the quickfix window shown in red.
To bind this command with <leader>lR, put the following code in your on_attach function:
vim.api.nvim_buf_set_keymap(bufnr, 'n', '<leader>lR', '<cmd>lua vim.lsp.buf.references()<CR>', opts)
Formatting in nvim lsp
Formatting removes/enters unnecessary spaces, newline characters, etc., and thus makes your code look soothing to the eyes.
To bind the formatting command :lua vim.lsp.buf.formatting() with the key <leader>lf, use the following code in your on_attach function:
vim.api.nvim_buf_set_keymap(bufnr, 'n', '<leader>lf', '<cmd>lua vim.lsp.buf.formatting()<CR>', opts)
However, only a few language servers (ex - lua-language-server) provide formatting but others (ex - bash-language-server) don't. So, use a plug-in called null-ls which kind of merges formatters with language servers. For example, bash-language-server does not provide formatting. Therefore by using null-ls, you can "bring" the formatting ability into this from a separate formatter shfmt. To use it, head over to my in-depth article on null-ls.
Note 1: Please note that the formatting command is a little different in nvim v 0.8:
-- 0.7
vim.lsp.buf.formatting_sync(nil, 2000) -- 2 seconds

-- 0.8
vim.lsp.buf.format({ timeout_ms = 2000 }) -- 2 seconds
Get information about language servers attached to neovim
The neovim command LspInfo prints detected filetype, attached language servers, root directory, etc. in a floating window.
To bind this command with the key <leader>li, put the following code in your on_attach function:
vim.api.nvim_buf_set_keymap(bufnr, 'n', '<leader>li', '<cmd>LspInfo<CR>', opts)
Highlight symbol under the cursor using nvim lsp
When you put your cursor on any one symbol, the symbol is highlighted everywhere.
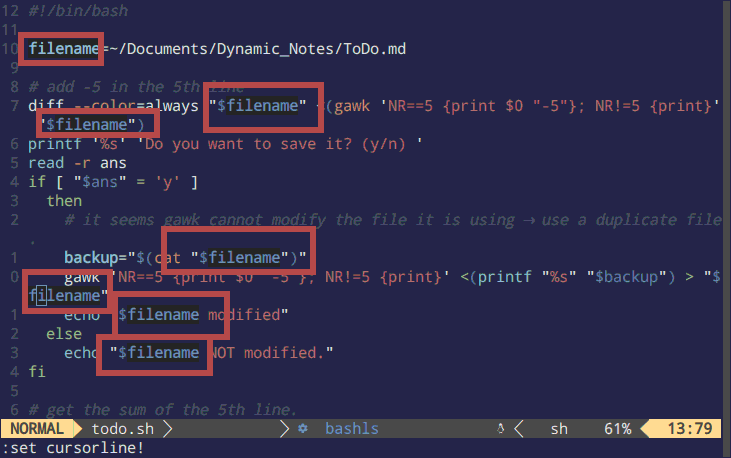
fig 5: highlight your symbol filename under the cursor
To highlight the symbol under the cursor, put the following code in the same file ~/.config/nvim/plug-config/lspconfig.lua. Please note that these lines should go into the on_attach function.
  if client.resolved_capabilities.document_highlight then
    vim.cmd [[
      hi! LspReferenceRead cterm=bold ctermbg=235 guibg=LightYellow
      hi! LspReferenceText cterm=bold ctermbg=235 guibg=LightYellow
      hi! LspReferenceWrite cterm=bold ctermbg=235 guibg=LightYellow
    ]]
    vim.api.nvim_create_augroup('lsp_document_highlight', {})
    vim.api.nvim_create_autocmd({ 'CursorHold', 'CursorHoldI' }, {
      group = 'lsp_document_highlight',
      buffer = 0,
      callback = vim.lsp.buf.document_highlight,
    })
    vim.api.nvim_create_autocmd('CursorMoved', {
      group = 'lsp_document_highlight',
      buffer = 0,
      callback = vim.lsp.buf.clear_references,
    })
  end
As you can see I am using the if..end condition for highlighting. This prevents neovim from asking the language server to highlight your symbol if the server does not have this ability.
Edit 15/11/2022: For Neovim 0.8 or above, use client.server_capabilities.documentHighlightProvider instead of client.resolved_capabilities.document_highlight.
📓Note: You can change the ctermbg and/or guibg to get the appropriate highlighting color. Similarly, you can also use italics instead of bold, provided your terminal supports it.
I also recommend you to look at this article on Neovim colorscheme, highlighting various components, etc.
Language Server Configurations
The nvim-cmp supports additional completion 'capabilities'. To use these capabilities as well, put the following code in your file ~/.config/nvim/plug-config/lspconfig.lua:
local capabilities = require('cmp_nvim_lsp').update_capabilities(vim.lsp.protocol.make_client_capabilities())For Neovim v0.8 or above, use default_capabilities() instead of update_capabilities(vim.lsp.protocol.make_client_capabilities()).
I will talk more about nvim-cmp in my next article on neovim lsp autocompletion.
Configure several language servers at once in nvim
Now, you can use a loop to call 'setup' on multiple servers and map key-bindings only after the language server attaches. For this, use the following code in your file ~/.config/nvim/plug-config/lspconfig.lua:
local servers = { 'pyright', }
for _, lsp in ipairs(servers) do
  require('lspconfig')[lsp].setup {
    on_attach = on_attach,
    capabilities = capabilities,
  }
end
In the above code, you can see that the variable servers is an array whose elements are the servers you want to loop into. For example, if you use local servers = { 'bashls', 'pyright', 'sumneko_lua', }, you can configure the servers bash-language-server, pyright, and lua-language-server at once.
Configure each server separately in nvim lsp
For example, the following code in the file ~/.config/nvim/plug-config/lspconfig.lua attaches only the bash-language-server with the file-types zsh, bash and sh.
-- bashls
require 'lspconfig'.bashls.setup {
  on_attach = on_attach,
  capabilities = capabilities,
  filetypes = { 'zsh', 'bash', 'sh' },
}
Similarly, you can also configure the lua-language-server server in its own unique way:
local runtime_path = vim.split(package.path, ';')
table.insert(runtime_path, "lua/?.lua")
table.insert(runtime_path, "lua/?/init.lua")
require 'lspconfig'.sumneko_lua.setup {
  on_attach = on_attach,
  capabilities = capabilities,
  settings = {
    Lua = {
      runtime = {
        -- Tell the language server which version of Lua you're using (most likely LuaJIT in the case of Neovim)
        version = 'LuaJIT',
        -- Setup your lua path
        path = runtime_path,
      },
      diagnostics = {
        -- Get the language server to recognize the `vim` global
        -- Now, you don't get error/warning "Undefined global `vim`".
        globals = { 'vim' },
      },
      workspace = {
        -- Make the server aware of Neovim runtime files
        library = vim.api.nvim_get_runtime_file("", true),
      },
      -- By default, lua-language-server sends anonymized data to its developers. Stop it using the following.
      telemetry = {
        enable = false,
      },
    },
  },
}
The above lua-language-server's configuration helps you develop/work with neovim plug-ins.
Note: Head over to the neovim site for server configuration to get the list of servers and how to configure them.
Update (25 August 2023):
Issue 1: Warning/Error "sumneko_lua is deprecated, use lua_ls instead" shown at the bottom whenever you open any lua file.
Quick Fix: Replace sumneko_lua term in the above snippet with lua_ls. If you have any related questions, ask them in the comment section below.
Issue 2: Each time you open any lua file, you are faced with the following prompts:
Do you need to configure your work environment as `luassert`?
Request Actions:
1. Apply and modify settings
2. Apply but do not modify settings
3. Don't show again
Type number and <Enter> or click with the mouse (q or empty cancels):
Do you need to configure your work environment as `luv`?:
1: Apply and modify settings
2: Apply but do not modify settings
3: Don't show again
Type number and <Enter> or click with the mouse (q or empty cancels):
Fix: If you don't know what LÖVE/ Luv, and Luassert are, chances are you don't need them. So, disable them permanently - this way additional completions and intellisense will not be loaded making lua-language-server lighter. Choose 3 to disable it. However, somehow, choosing 3 is only working on VSCode, not in Neovim. For neovim, disable it manually using the lspconfig.lua file. Just add checkThirdParty = false, into the workspace = {...} like:
      workspace = {
        library = vim.api.nvim_get_runtime_file("", true),
        checkThirdParty = false,
      },
For those, who know what they are, enable them only on those projects where they are actually needed. I found a good Reddit instruction over here. In summary, create a file named .luarc.json in the root of your project and add the following:
{
	"workspace": {
		"library": [
			"<path-to-love-library>", "<path-to-luassert-library>"
		]
	}
}
To find the paths, you need to look at the places where lua-language-server is installed and browse through them. You can also use locate command in linux to search for these paths. In archlinux, these paths are - /usr/lib/lua-language-server/meta/3rd/luassert and /usr/lib/lua-language-server/meta/3rd/love2d.
Way Ahead
That's all folks for nvim-LSP configuration. And don't forget to source the file ~/.config/nvim/plug-config/lspconfig.lua in your init.vim:
source $HOME/.config/nvim/plug-config/lspconfig.luaIn order to completely set up your Nvim-lsp, please go through all articles in the nvim-lsp series.