In this article, I will talk about colorscheme in Neovim. I will talk about how to install a colorscheme theme in Vim/Neovim, then how to activate it and put some modifications on it - changing the color and font weight of cursorline, wrong spelling, diagnostics, and completion, markdown headings.
This article assumes you have set up a basic configuration of Vim/Neovim. If not done, do it. This article also assumes that you are using Vim/Neovim in your terminal. However, it will definitely help you set your Graphical User Interface (GUI) nonetheless.
📝 Note: All of these settings have been checked on Neovim. But they should work on Vim too.
Available colorschemes in Vim/Neovim
By default, Neovim and Vim come preinstalled with some colorschemes. To find out available colorschemes, execute the command - :colorscheme and keep pressing tabs. Select the colorscheme one by one and hit Enter to test it out. Don't worry; they will not be applied permanently. After restarting your neovim/vim window, they will be gone.
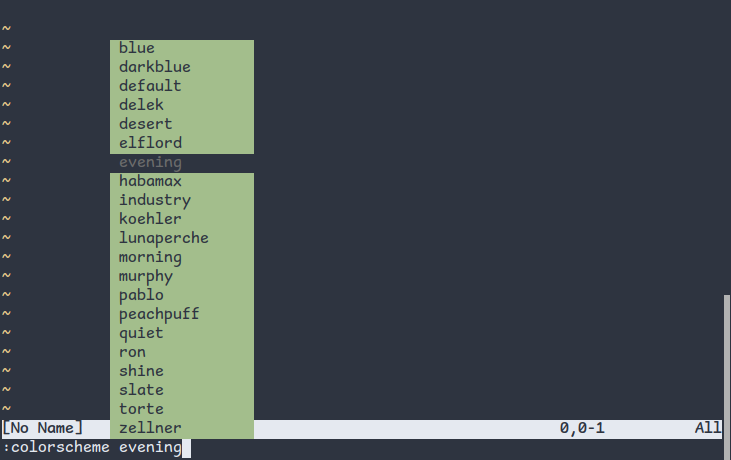
Fig: available colorscheme in vim/neovim
After you are satisfied, you can put colorscheme <your_chosen_colorscheme> in your init.vim or .vimrc file to make the changes permanent. As I have recommended in my article on the basic configuration of vim/neovim, you should partition your settings for better readability. So, create a separate colorscheme file, ~/.config/nvim/themes/<colorscheme_name>.vim and put all the colorscheme-related settings in this file instead of init.vim or .vimrc:
colorscheme <your_chosen_colorscheme>
Then, source it in your init.vim or .vimrc file using the source command:
source $HOME/.config/nvim/themes/wal.vimAnd don't forget to replace <your_chosen_colorscheme> with the name of your chosen scheme.
Installation of themes in Vim/Neovim
If you are not satisfied with the available colorschemes in Neovim/Vim, the other way is the installation of a plugin. For this, you can use a plugin manager.
Personally, I use a colorscheme based on pywal in Neovim. To install this plugin using the plugin manager Vim-Plug*, run the following command:
Plug 'dylanaraps/wal.vim'*Head on over to this article for a detailed and easy guide on managing plugins using vim-plug.
For other plugin managers, the installation will be almost the same. Follow their procedure.
⚔️ Conflict: The setting set termguicolors conflicts with the above pywal theme so remove this setting.
To activate this pywal colorscheme in Neovim/Vim, put the following in your setting file ~/.config/nvim/themes/wal.vim
colorscheme walFrom now on, I am going to tell you how to overwrite the colors provided by these colorscheme. This overwriting has been tasted on the pywal theme. But it should work on other nvim themes.
How to change the color, and weight of comments in Vim/Neovim
Put the following in your configuration file ~/.config/nvim/themes/wal.vim:
highlight Comment cterm=italic ctermfg=8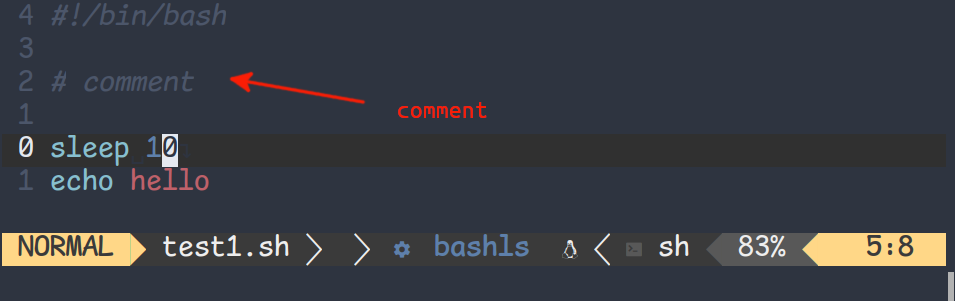
Figure: comment in vim/neovim
📝 Note : hi and highlight are the same.
Now, I will explain each of these terms one by one. They are used not just in comments but almost everywhere.
cterm in Neovim/Vim
To change the weight of the font, use cterm. Set it to one of the following or to a comma-separated list:
-
bold
-
underline
-
undercurl: curly underline
-
underdouble: double underline
-
underdotted: dotted underline
-
underdashed: dashed underline
-
strikethrough
-
reverse
-
inverse: same as reverse
-
italic
-
standout
-
NONE: no attributes used (used to reset it)
Your terminal should also support these. Most modern terminals like Kitty will work but you might face the problem with minimal ones like Urxvt. Configure your urxvt terminal based on this article.
Note: Append gui=italic to see the similar result in Graphical User Interface (GUI).
ctermfg and ctermbg in Neovim colorscheme
The terms ctermfg and ctermbg are used to set the foreground colors (the color used to colorize your fonts) and the background colors respectively.
Use the shell script 256-color-table.sh to find out colors. Read this article to learn how to create shell scripts. Just run the script in your terminal and choose your favourite color.
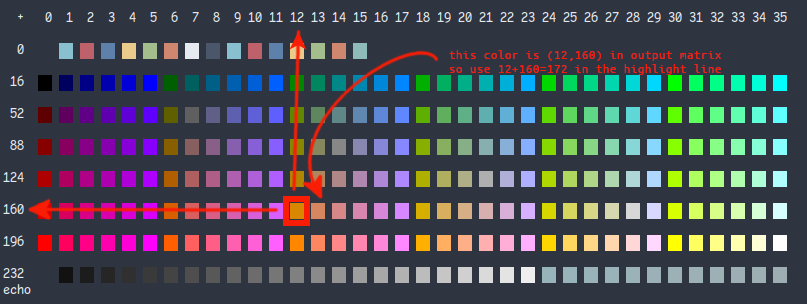
Figure: 256 color palette
Fig: color[12,160] in the output matrix = color 12+160 = color 172
📝 Note: If the color is beyond 16 i.e. the sum obtained above is more than 16, use set t_Co=256 in your vim/neovim setting file (init.vim or .vimrc)
Highlight diagnostics in Neovim LSP colorscheme
If you don't use Neovim's LSP, you can skip this paragraph.
To learn about Neovim Language Server Protocol's diagnostics and how to configure it, read this article.
Here is the color configuration I use for diagnostics:
highlight DiagnosticVirtualTextError ctermfg=8
highlight DiagnosticVirtualTextInfo ctermfg=8
highlight DiagnosticVirtualTextWarn ctermfg=8
highlight DiagnosticVirtualTextHint ctermfg=8
Here, all the Errors, Information, Warning, and Hints will be highlighted in a single color. Change these colors according to your need.
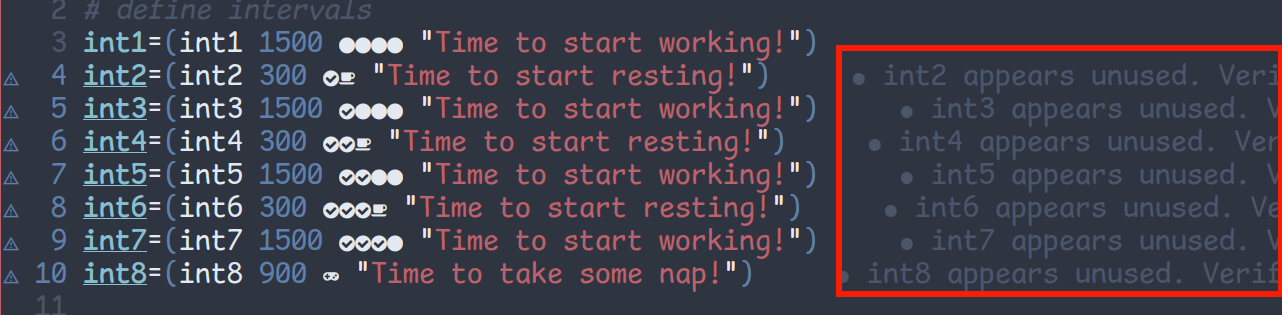
Figure: diagnostics color in vim/neovim
To highlight the symbol under the cursor, look here.
Highlight Cursor Line and Cursor Line Number in Neovim colorscheme
To highlight the cursor line and cursor line number, use the following settings:
highlight CursorLine term=NONE cterm=NONE ctermbg=236 ctermfg=NONE
hi CursorLineNr cterm=NONE ctermbg=236 ctermfg=7
Where,
-
term=NONEandcterm=NONEdo not put any weight (bold, italic etc.) over the font -
ctermbg,ctermfgare just like above.
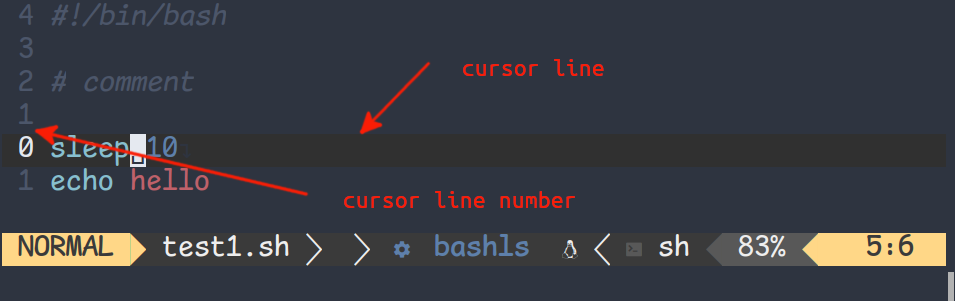
Figure: cursor line and cursor line number in vim/neovim
📝 Note: You can also remove the highlights when you enter insert mode. But personally, I don't use it. Here are the settings for this:
autocmd InsertEnter * highlight CursorLine term=NONE cterm=NONE ctermbg=0 ctermfg=NONE
autocmd InsertLeave * highlight CursorLine term=NONE cterm=bold ctermbg=236 ctermfg=NONE
Where,
-
InsertEntertells Neovim when we enter INSERT mode -
InsertLeavetells Neovim when we leave INSERT mode.
📝 Note: You can toggle cursorline using set cursorline!. You can bind this to a key sequence (say, tc) and when you press these keys, cursorline will be turned off and pressing this again, it will be turned on. Use the following settings for that:
nnoremap tc :set cursorline!<CR>
How to highlight markdown headings in Neovim/Vim colorscheme
Personally, I do not like the color configuration given by pywal for markdown headings. So I modified those using the following configuration.
hi markdownH1 cterm=bold ctermbg=NONE ctermfg=DarkMagenta
hi markdownH2 cterm=bold ctermbg=NONE ctermfg=DarkMagenta
hi markdownH3 ctermbg=NONE ctermfg=Magenta
  hi link markdownH4 markdownH3
  hi link markdownH5 markdownH3
  hi link markdownH6 markdownH3
hi markdownCode ctermbg=8 ctermfg=NONE
hi markdownCodeBlock ctermbg=8 ctermfg=NONE
Where,
-
markdownH1,markdownH2,markdownH3,markdownH4,markdownH5, andmarkdownH6are for headingsH1,H2,H3,H4,H5,H6. -
linktells Neovim/Vim to use the same highlighting for the given headings. -
markdownCodeandmarkdownCodeBlockare for the codes and codeblock (codes written in single and triple quotes respectively).
⚔️ Conflict: This setting is overwritten by the plugin vim-markdown
Highlight spellings in Neovim/Vim colorscheme
You might want to put different weights and colors on bad spellings, wrong upper/lowercase letters, etc. For that, use/modify the following codes:
hi SpellBad ctermbg=NONE ctermfg=NONE cterm=underline
hi SpellCap ctermbg=NONE ctermfg=NONE cterm=underline
hi SpellLocal ctermbg=NONE ctermfg=NONE cterm=underline
hi SpellRare ctermbg=NONE ctermfg=NONE cterm=underline
Use ctermbg ctermfg, and cterm according to your preference. I have removed all colors. Only underlining will be shown to remove the intrusion.

Figure: spelling check by vim/neovim
Highlight the completion popup menu in Neovim
If you have not set up your autocompletion in Neovim, do it using this article.
To highlight the completion menu, copy and/or modify the following commands:
highlight CmpItemAbbrDeprecated ctermfg=08
highlight CmpItemAbbrMatch ctermfg=75
highlight CmpItemAbbrMatchFuzzy ctermfg=75
highlight CmpItemKindVariable ctermfg=117
highlight CmpItemKindInterface ctermfg=117
highlight CmpItemKindText ctermfg=117
highlight CmpItemKindFunction ctermfg=176
highlight CmpItemKindMethod ctermfg=176
highlight CmpItemKindKeyword ctermfg=187
highlight CmpItemKindProperty ctermfg=187
highlight CmpItemKindUnit ctermfg=187
To learn more about these terms look at the help page (type :help CmpItem and hit the tab button one or more time).
Conclusion
That's all about Neovim colorscheme. To learn more, look at the help page (using :help <your_help_text>) in Neovim and its documents especially at /usr/share/nvim/runtime/doc/syntax.txt. For vim, look at similar file(s). This color file in pywal has various terms, you can just copy, and modify these codes and see if they work for you. If you have any suggestions or queries, put them in the comment section below.