Nvim lsp autocompletion helps you in completing any variable-name/file-path/function/spelling and thus preventing typing mistakes. It also prevents you from memorizing too much programming jargon. Nowadays AI-based completions (ex - Tabnine) are also being developed. More on this in my next article.
If have not set up basic configuration in Neovim, do that over here. This article is part of my series on setting up Nvim Lsp (Neovim Language Server Protocol):
-
Nvim lsp: diagnostics – keybindings, error/warning signs, floating and virtual texts
-
Nvim lsp: autocompletion (this article)
I recommend you to follow all three articles in the above order.
Install useful plug-ins
Please install the following plug-ins if you have not installed them. I will be showing the power of neovim-lsp autocompletion using these plug-ins.
-
collection of configurations for builtin neovim-lsp:
neovim/nvim-lspconfig -
SirVer/ultisnipsfor snippets. There are other snippet plug-ins. But this is one of the most famous plug-ins. So, I will be using it. -
honza/vim-snippets- it has the pre-built snippets for bash, python, etc. it integrates with ultisnips. -
Autocompletion engine:
hrsh7th/nvim-cmp -
Autocompletion sources for the above engine (these sources' output will be shown in the floating autocompletion-menu):
-
hrsh7th/cmp-nvim-lspprovidesnvim_lspsource for language servers' completion service. It is a very important plug-in. -
hrsh7th/cmp-cmdlineprovidescmdlinesource for vim's commands (figure 4) -
hrsh7th/cmp-pathprovidespathsource for the completion of filepaths -
hrsh7th/cmp-bufferprovidesbuffersource for completion from the opened buffer -
hrsh7th/cmp-calcprovidescalcsource for completion from vim's built-in mathematical expression calculation facility (for example, suppose I have typed2+3=in a text file. Now,5will be suggested in the autocompletion menu. -
f3fora/cmp-spellprovides aspellsource based on vim'sspellsuggest. It is good for typing difficult words such asflibbertigibbetin English. -
tamago324/cmp-zshprovideszshsource. It gives completion like your zsh. A similar plugin isValodim/vim-zsh-completion. -
quangnguyen30192/cmp-nvim-ultisnipsprovidesultisnipssource to put the list of available snippets into the autocompletion menu (figure 1) -
hrsh7th/cmp-nvim-lsp-signature-helpprovidesnvim_lsp_signature_helpsource. Signature help shows information about the parameters of your function/method in a floating window. For more, see the Signature Help section in nvim-lsp. -
For more sources, look at the List of Sources.
-
Snippets setup using Ultisnips
Please note that there are other snippet plug-ins that have been covered in this article at appropriate places. However, I have not tested them as extensively as Ultisnips.
When it comes to snippets' expansion, most of the snippet plug-ins such as Ultisnips set up a shortcut. For example, in bash language, when you type for and press the shortcut for the for snippet expansion, an "empty" for loop will be created. But here, we will use an auto-completion engine for this purpose. The engine will suggest to you if there are any snippets. Now, you don't have to use any shortcuts. As soon as you type the for keyword, a snippet, if any, will be shown. Just select that and the snippet will be expanded.
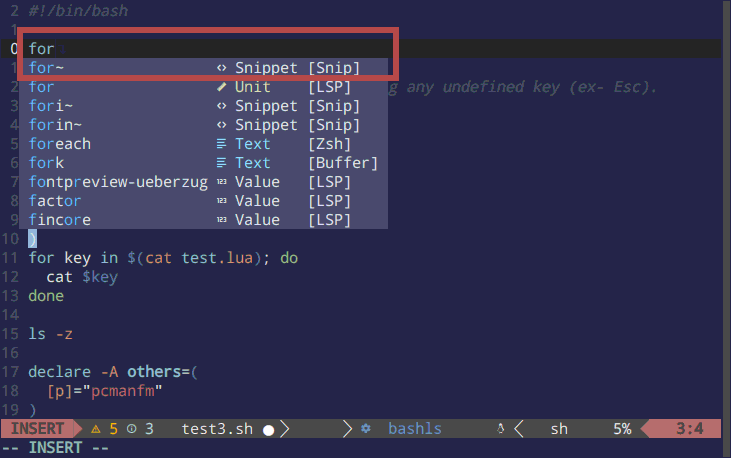
fig 1: nvim-lsp autocompletion: for snippet
For the above configuration, create a file ~/.config/nvim/plug-config/auto-cmp.lua. Until this file is "sourced", you will not see any result. I will show you how to source this file at the very end of this article.
Now, put the following lines in the file ~/.config/nvim/plug-config/auto-cmp.lua:
vim.cmd [[
let g:UltiSnipsJumpForwardTrigger='<Tab>'
let g:UltiSnipsJumpBackwardTrigger='<S-Tab>'
]]
Now, to move from one "tabstop" to another, use the tab key ("tabstops" are special stops within which you can move using the tab key). And when there is no tabstops type a tab i.e. '\t'.
Similarly, to go to the previous tabstop, use Shift+Tab.
In the above code, you can change the shortcut keys other than "Tab" and "Shift+Tab" (called <S-Tab> in neovim).
For more about snippets, please keep reading.
Create icons in nvim-lsp autocompletion
To see the icons in the autocompletion menu as shown in figure 1, put the following code in the file ~/.config/nvim/plug-config/auto-cmp.lua:
local kind_icons = {
Class = "ﴯ",
Color = "",
Constant = "",
Constructor = "",
Enum = "",
EnumMember = "",
Event = "",
Field = "",
File = "",
Folder = "",
Function = "",
Interface = "",
Keyword = "",
Method = "",
Module = "",
Operator = "",
Property = "ﰠ",
Reference = "",
Snippet = "",
Struct = "",
Text = "",
TypeParameter = "",
Unit = "",
Value = "",
Variable = "",
}📓 Note: You might not see the above icons in your browser. To see them, just enable a nerd font in your terminal and then copy and paste these lines into a text file.
Now, kindly follow the heading Formatting in nvim-lsp autocompletion.
Configure mapping, fuzzy matching, sources, and formatting in the autocompletion menu
Put the following codes in the file ~/.config/nvim/plug-config/auto-cmp.lua:
local cmp = require 'cmp'
cmp.setup({
  snippet = {
  SNIPPET_CONFIGURATION_GOES_HERE
  },
  formatting = {
  FORMATTING_GOES_HERE
  },
  mapping = {
  MAPPING_GOES_HERE
  },
  completion = {
  COMPLETION_RELATED_CONFIGURATION_GOES_HERE
  },
  matching = {
  FUZZY_MATCHING_GOES_HERE
  },
  sources = cmp.config.sources(SOURCES_RELATED_CONFIGURATION)
})
Where all the capitalized words will be replaced by your main configuration. And it is covered in the next headings (subheadings).
Snippet configuration in nvim-lsp autocompletion
Replace the "SNIPPET_CONFIGURATION_GOES_HERE" with the following:
    expand = function(args)
      -- For `vsnip`, uncomment the following.
      -- vim.fn["vsnip#anonymous"](args.body)
      -- For `luasnip`, uncomment the following.
      -- require('luasnip').lsp_expand(args.body)
      -- For snippy, uncomment the following.
      -- require('snippy').expand_snippet(args.body)
      -- For `ultisnips`
      vim.fn["UltiSnips#Anon"](args.body)
    end,
If you want to use a snippet engine other than Ultisnips, uncomment (delete the -- in front of that) that from the above code instead.
Formatting in nvim-lsp autocompletion
Formatting decides how autocompletion menu is shown - what is the order of icons, icon kinds, etc.
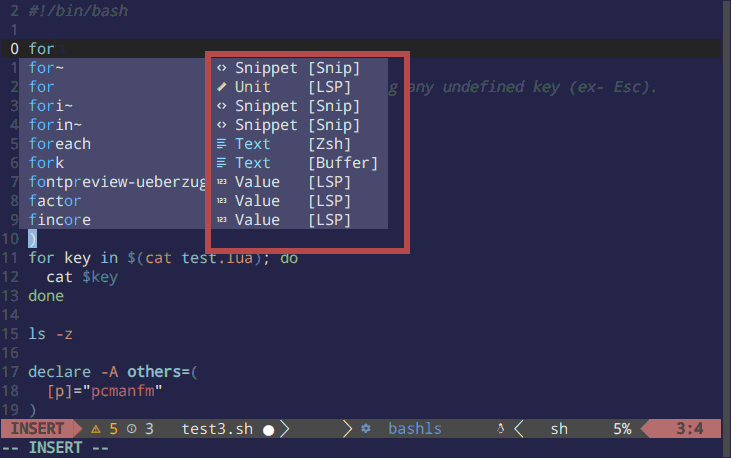
Fig 2: Formatting in nvim-lsp autocompletion menu: see how icons, icons' kinds, and icons' names are written
To configure the formatting, replace the FORMATTING_GOES_HERE with the following code:
    format = function(entry, vim_item)
      -- Kind icons
      vim_item.kind = string.format("%s %s", kind_icons[vim_item.kind], vim_item.kind) --Concatonate the icons with name of the item-kind
      vim_item.menu = ({
        nvim_lsp = "[LSP]",
        spell = "[Spellings]",
        zsh = "[Zsh]",
        buffer = "[Buffer]",
        ultisnips = "[Snip]",
        treesitter = "[Treesitter]",
        calc = "[Calculator]",
        nvim_lua = "[Lua]",
        path = "[Path]",
        nvim_lsp_signature_help = "[Signature]",
        cmdline = "[Vim Command]"
      })[entry.source.name]
      return vim_item
    end,
📓 Note 1: If you don't mention any source in the vim_item.menu(), the right part of the completion menu will have unsightly empty space.
![Unsightly empty space in the autocompletion menu if I delete the line nvim_lsp = "[LSP]"](/images/nvim-lsp-autocompletion-empty-space.png)
Fig 3: Unsightly empty space in the autocompletion menu if I delete the line nvim_lsp = "[LSP]"
📓 Note 2: Change the vim_item.kind line to have the desired format of the autocompletion menu. The format() function shown above is almost like the format() function in any other language. So it should not be very difficult.
Mapping in nvim-lsp autocompletion
Replace the MAPPING_GOES_HERE with the following:
    ['<C-n>'] = cmp.mapping(cmp.mapping.select_next_item(), { 'i', 'c' }),
    ['<C-p>'] = cmp.mapping(cmp.mapping.select_prev_item(), { 'i', 'c' }),
    ['<C-M-k>'] = cmp.mapping(cmp.mapping.scroll_docs(-4), { 'i', 'c' }),
    ['<C-M-j>'] = cmp.mapping(cmp.mapping.scroll_docs(4), { 'i', 'c' }),
    ['<C-Space>'] = cmp.mapping(cmp.mapping.complete(), { 'i', 'c' }),
    ['<C-y>'] = cmp.config.disable,
    ['<C-e>'] = cmp.mapping({
      i = cmp.mapping.abort(),
      c = cmp.mapping.close(),
    }),
    ['<CR>'] = cmp.mapping.confirm({ select = false }),
🧠 Explanation 1: i, and c shown above are for "insert" and "command" modes. Having them means the key bindings work in the autocompletion menu shown in both the insert as well as in command mode.
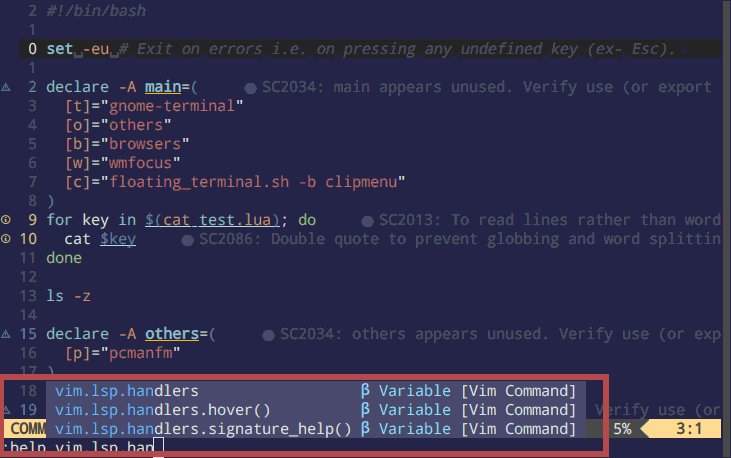
Fig 4: nvim-lsp autocompletion in command mode
🧠 Explanation 2: I am using "Control + n" (<C-n>) and "Control + p" (<C-p>) to move to the Next and Previous items shown in the auto-completion menu. This is similar to many other applications like Dmenu, Ranger's command line, Interactive Bash and Zsh Shells, Emacs, Fzf, and many more. Most of the shortcuts have been set up in this fashion. This is what I love above Linux (or Unix in general) based operating systems. You can configure all of your apps, their color schemes, shortcut keys, etc. in a similar fashion and thus reducing confusion.
🧠 Explanation 3: You need to use <C-M-k> (Control+Alt+k) and <C-M-j> (Control+Alt+j) to scroll up and down in the scroll documents. Alternatively, you can also use your mouse scroll wheel. But that will require a vim command :set mouse=a
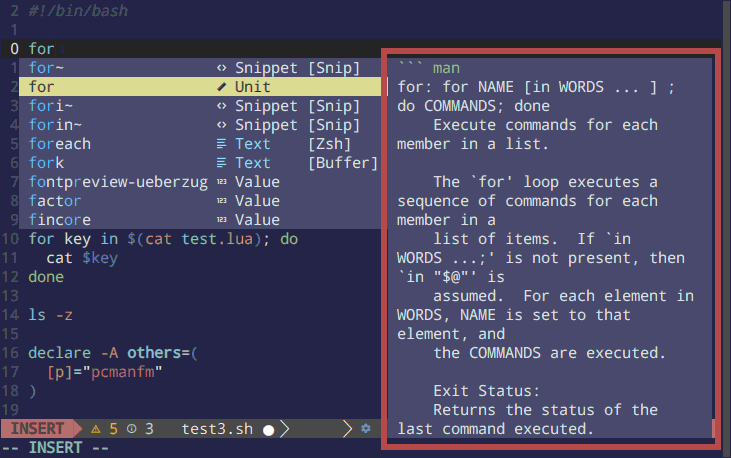
Fig 5: Scroll Document in nvim-lsp autocompletion
Increase the numbers shown in scroll_docs() (in the above code it is 4)), to increase the scroll sensitivity.
🧠 Explanation 4: <C-e> to escape i.e. close/abort the completion menu. In insert mode, this shortcut, using cmp.mapping.abort() will close the completion menu and restore the initial state. But in the console mode, it, using cmp.mapping.abort() only closes the completion menu.
📓 Note: Many other keys are already set up as default by the nvim-lsp. For example, <C-m> (Control+m) chooses your item from the completion menu.
Keyword length in nvim-lsp autocompletion
keyword_length sets the number of keywords you need to type before the autocompletion menu pops up. By default, it is 1. If you want to change it to a higher value, for example to 3, replace the COMPLETION_RELATED_CONFIGURATION_GOES_HERE with the following line:
keyword_length = 1,Fuzzy matching in nvim-lsp autocompletion
I do a lot of incorrect spellings. Therefore I have enabled the fuzzy matching. So, for example, if I just type fr instead of for, and there is a snippet for the loop, it will be shown in the autocompletion menu.
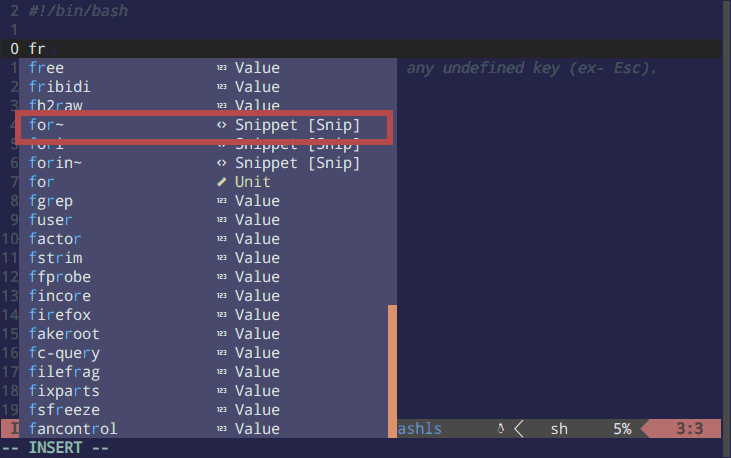
fig 6: fuzzy matching in nvim-lsp autocompletion
To enable the fuzzy matching, replace the FUZZY_MATCHING_GOES_HERE with the following:
disallow_fuzzy_matching = false,But if you like to disable this nice feature due to some reason, use true instead of false.
Configure sources to be used in the autocompletion menu
SOURCES_RELATED_CONFIGURATION decides items (sources), their orders, terms, and conditions, etc. in the autocompletion menu.
To set this, replace the SOURCES_RELATED_CONFIGURATION with the following code:
  {
    { name = 'nvim_lsp' },
    -- For ultisnips users
    { name = 'ultisnips' },
    -- For vsnip users, uncomment the following.
    -- { name = 'vsnip' },
    -- For luasnip users, uncomment the following.
    -- { name = 'luasnip' },
    -- For snippy users, uncomment the following.
    -- { name = 'snippy' },
  }, {
    { name = 'buffer' },
  }, {
    { name = 'nvim_lsp_signature_help' },
  }, {
    { name = 'path' },
  }
📓 Note 1: The above settings make sure that buffer source is visible in the completion menu only when the nvim_lsp and ultisnips sources are not available. Similarly, nvim_lsp_signature_help will be visible only when the nvim_lsp, ultisnips, and buffer are not available. The same goes for source path.
📓 Note 2: Having nvim_lsp and ultisnips in a single bracket will allow them to be mixed in the listing otherwise, all the autocompletion menu's place is taken over by nvim_lsp.
📓 Note 3: I have tried to optimize the above order as much as possible so that you get maximum recommendations in the right order in the autocompletion menu. You can rearrange the above sources or install new source plug-ins and use them here according to your own preference. But at the same time, you can also set these orders depending upon your filetypes. That is shown in the upcoming headings.
Configure nvim-lsp autocompletion for command line (console)
You can use the nvim-lsp autocompletion in the neovim's command line as well. To see it in action, see figure 4.
To use sources cmdline and path source, append the following code in your file ~/.config/nvim/plug-config/auto-cmp.lua:
cmp.setup.cmdline(':', {
  sources = cmp.config.sources({
    { name = 'path' },
    { name = 'cmdline' },
  })
})
Here cmdline source will suggest you vim/neovim commands and path source will complete file-path (ex - /usr/share, etc. in Linux).
📓 Note: if you have enabled native_menu, the above code will not work.
Configure nvim-lsp autocompletion for search (/)
Similarly, you can also use the autocompletion menu in the neovim's search (/) as shown in the following figure.

fig 7: nvim-lsp autocompletion for search (/)
To use buffer source for /, append the following code in the file ~/.config/nvim/plug-config/auto-cmp.lua:
cmp.setup.cmdline('/', {
  sources = {
    { name = 'buffer' },
  }
})
Conclusion
That’s all folks for nvim-LSP configuration. And don’t forget to source the file ~/.config/nvim/plug-config/auto-cmp.lua in your file init.vim:
source $HOME/.config/nvim/plug-config/auto-cmp.luaIn order to completely set up your Nvim-lsp, please go through all articles in the nvim-lsp series.
And don't forget giving special colors to completion - read the article on Neovim color configuration.