Nvim lsp diagnostics (also known as "linting") enables you to see Errors, Warnings, Hints, and Informations right on your screen while coding. It, therefore, prevents you from having most of the debugging headaches later.
📓 Note: Follow this article step by step to avoid any problems.
If have not set up basic configuration in Neovim, do that over here. This article is part of my series on setting up Nvim Lsp (Neovim Language Server Protocol):
-
Nvim lsp: diagnostics - keybindings, signs, virtual texts (this article)
-
Nvim lsp: autocompletion - mapping, snippets, fuzzy search, and icons
I recommend you to follow all three articles in the above order.
Key bindings in nvim lsp diagnostics
Now, we will set up key bindings to move from one error/warning to another, and open all errors in a new window.
Create a file ~/.config/nvim/plug-config/diagnostics.lua with the following content in it:
vim.api.nvim_set_keymap('n', '<leader>do', '<cmd>lua vim.diagnostic.open_float()<CR>', { noremap = true, silent = true })
vim.api.nvim_set_keymap('n', '<leader>d[', '<cmd>lua vim.diagnostic.goto_prev()<CR>', { noremap = true, silent = true })
vim.api.nvim_set_keymap('n', '<leader>d]', '<cmd>lua vim.diagnostic.goto_next()<CR>', { noremap = true, silent = true })
-- The following command requires plug-ins "nvim-telescope/telescope.nvim", "nvim-lua/plenary.nvim", and optionally "kyazdani42/nvim-web-devicons" for icon support
vim.api.nvim_set_keymap('n', '<leader>dd', '<cmd>Telescope diagnostics<CR>', { noremap = true, silent = true })
-- If you don't want to use the telescope plug-in but still want to see all the errors/warnings, comment out the telescope line and uncomment this:
-- vim.api.nvim_set_keymap('n', '<leader>dd', '<cmd>lua vim.diagnostic.setloclist()<CR>', { noremap = true, silent = true })
Here,
-
Just go to any line containing error/warning and press
<leader>do, you will be able to open the error/warning 'texts' in a new floating window (see figure 4) -
Use
<leader>d[to move to the next warning/error. -
Use
<leader>d]to Go to previous warning/error. -
You can use
<leader>ddfor the error/warnings in a telescope window (see figure 1). -
The sign "
--" is used to comment out any line in a Lua file.
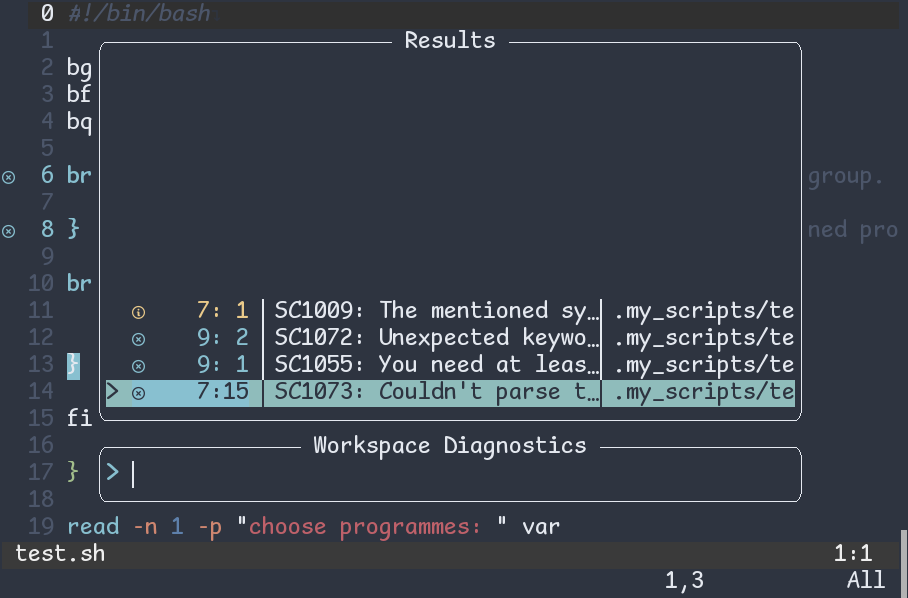
Fig 1: nvim diagnostics in telescope window
Severity signs in nvim lsp diagnostics
"Severity signs" are signs for severity levels of problems in your code. By default, they are E for Error, W for Warning, H for Hints, I for Informations. They are shown in the sign column on the left-most side (see figure 1). To change them, use the following lines into ~/.config/nvim/plug-config/diagnostics.lua:
local signs = { Error = " ", Warn = " ", Hint = " ", Info = " " }
for type, icon in pairs(signs) do
local hl = "DiagnosticSign" .. type
vim.fn.sign_define(hl, { text = icon, texthl = hl, numhl = hl })
endNote: you might not see the above signs in your browser because these signs are taken from the nerd fonts. Therefore, to see them, you need to use the nerd fonts in your terminal.
Print diagnostics in the message area
The message area in neovim is the area you see at the bottom (Figure 2). If you want to print error/warning/hints/information in the message area when your cursor is on any line having them, put the following lines in the ~/.config/nvim/plug-config/diagnostics.lua:
function PrintDiagnostics(opts, bufnr, line_nr, client_id)
  bufnr = bufnr or 0
  line_nr = line_nr or (vim.api.nvim_win_get_cursor(0)[1] - 1)
  opts = opts or {['lnum'] = line_nr}

  local line_diagnostics = vim.diagnostic.get(bufnr, opts)
  if vim.tbl_isempty(line_diagnostics) then return end

  local diagnostic_message = ""
  for i, diagnostic in ipairs(line_diagnostics) do
    diagnostic_message = diagnostic_message .. string.format("%d: %s", i, diagnostic.message or "")
    print(diagnostic_message)
    if i ~= #line_diagnostics then
      diagnostic_message = diagnostic_message .. "\n"
    end
  end
  vim.api.nvim_echo({{diagnostic_message, "Normal"}}, false, {})
end
vim.cmd [[ autocmd! CursorHold * lua PrintDiagnostics() ]]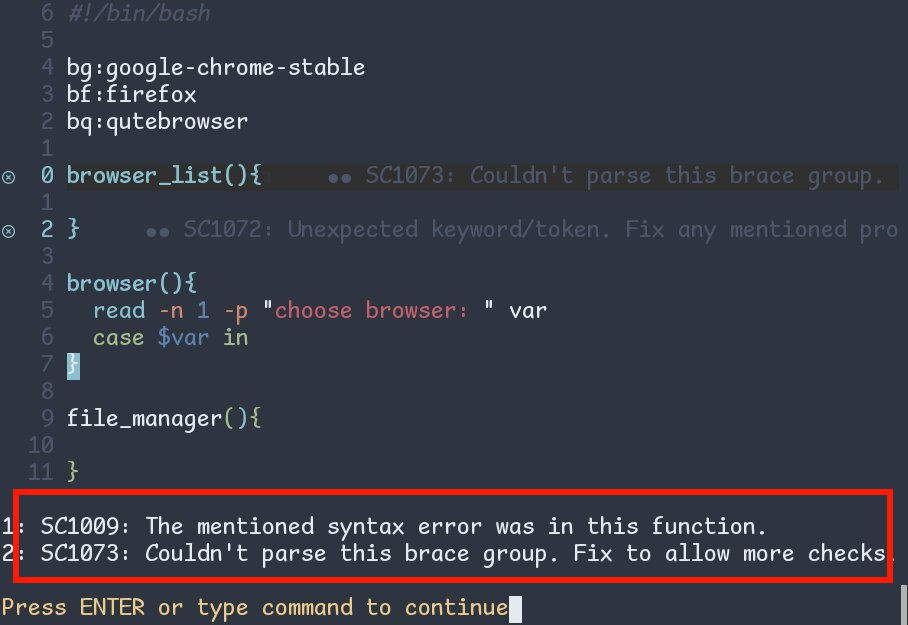
Fig 2: Print diagnostics in the message area in nvim-lsp
Personally, I don't use it because <leader>do is already doing the same task.
Configuration of virtual and floating text
Virtual Text: is the text you see after ●. Two ● means two diagnostics info and so on.
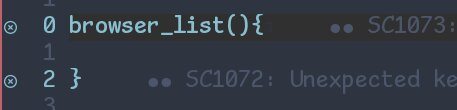
Fig 3: virtual text in nvim lsp diagnostics
Floating Text: is the text you will see in a floating window after pressing the shortcut <leader>do.
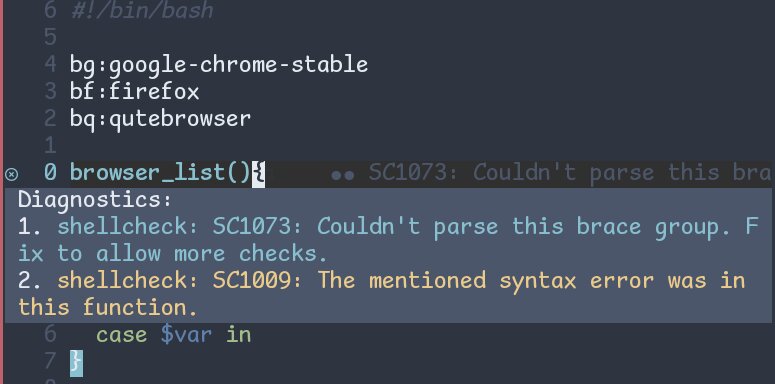
Fig 4: Floating text in nvim-lsp's diagnostics
Put the following configuration in the file ~/.config/nvim/plug-config/diagnostics.lua:
vim.diagnostic.config({
  virtual_text = {
    -- source = "always",  -- Or "if_many"
    prefix = '●', -- Could be '■', '▎', 'x'
  },
  severity_sort = true,
  float = {
    source = "always",  -- Or "if_many"
  },
})
Here,
-
severity_sort = truesets the order in which signs and virtual text are displayed. -
Use
virtual_text = falseinstead to remove Virtual Text altogether from your Neovim window. -
prefixsets character preceding the virtual text. -
source = alwaysshows diagnostic-source which can be a language server (likepyrightfor python) in the following figure (Figure 5). Use,source = "if_many"if you want to see the source only when the number of sources is more than one.
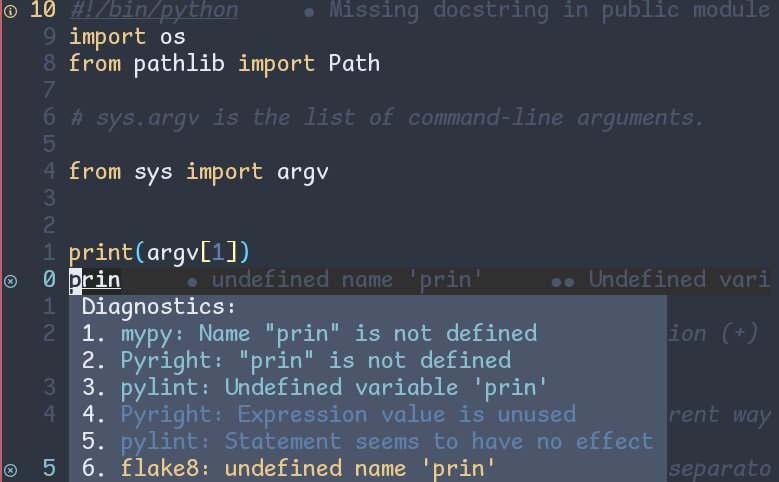
Fig 5: sources in a floating window (here, in this example, mypy, pyright, etc).
Now, source this file in your init.vim:
source $HOME/.config/nvim/plug-config/diagnostics.lua📓Note: depending upon your project size and computer's processing power, you might have to wait for some time before all the virtual texts are printed on your neovim window.
Colorize your virtual texts in Neovim diagnostics according to this article over here.
Way Ahead
That was a basic configuration for neovim-diagnostics (linting). You can comment below if you have any problems or suggestions.
In order to completely set up your Nvim-lsp, please go through all articles in the nvim-lsp series.