URxvt, also known as Rxvt-Unicode, is one of the oldest terminal emulators in the world. Despite being old, it brings many benefits:
| Benefits | Consequences |
| --- | --- |
| Fewer system resources | -> Extended Laptop Battery Life
-> Good for old systems
-> In developing countries, even a 4 GB laptop costs a lot
-> More Frames Per Seconds in games.
-> You can open multiple windows without pressurizing your system. Currently, I use many terminal-based applicators like neomutt, neovim, newsboat, ranger, my own script launcher.sh bound to Win + D key, etc.
-> You can minimize the resource consumption even more by using it in daemon-client mode using urxvtd and urxvtc commands. |
| Configured through a text file ~/.Xresources | -> sharing configuration is very easy
-> tighter integration with other packages like pywal through this file |
Some of you might be thinking that because of oldness it would not have many modern features. But it is completely false. It has been updated over time to bring support to:
- Images in terminal which even many modern emulators struggle.
- Internationalization: unicode support
Table of Contents
- URxvt: Installation
- URxvt: Configuration
- URxvt: Colors
- URxvt: Fonts
- URxvt: Extensions
- Closing URxvt Window Gracefully when a Child Process is Running
- URxvt: Resize Font on the Fly
- Handling URLs in URxvt
- keyboard-select: Moving Around Using Keyboard instead of Mouse
- Copy Paste Functionality in URxvt
- Scrollbar in URxvt
- Transparency in URxvt
- Conclusion
URxvt: Installation
URxvt is called rxvt-unicode in many official repositories. Therefore, to install it, use
~$ sudo apt install rxvt-unicode # On Debian and Ubuntu~$ sudo dnf install rxvt-unicode # On Fedora, CentOS, or RHEL~$ sudo pacman -S rxvt-unicode # On ArchLinux, and ManjaroAfter installation, when we open it, it looks pretty ugly.
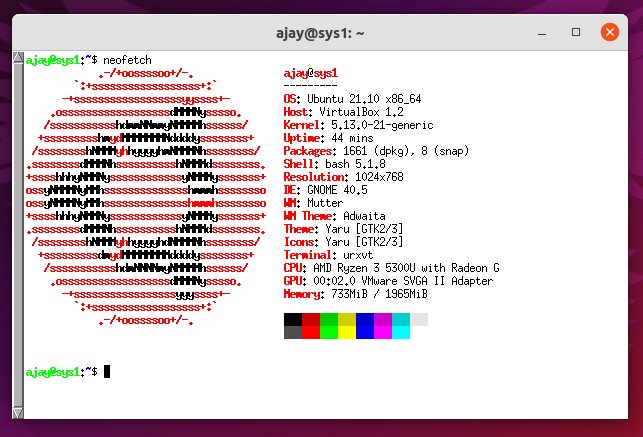
Default URxvt Look
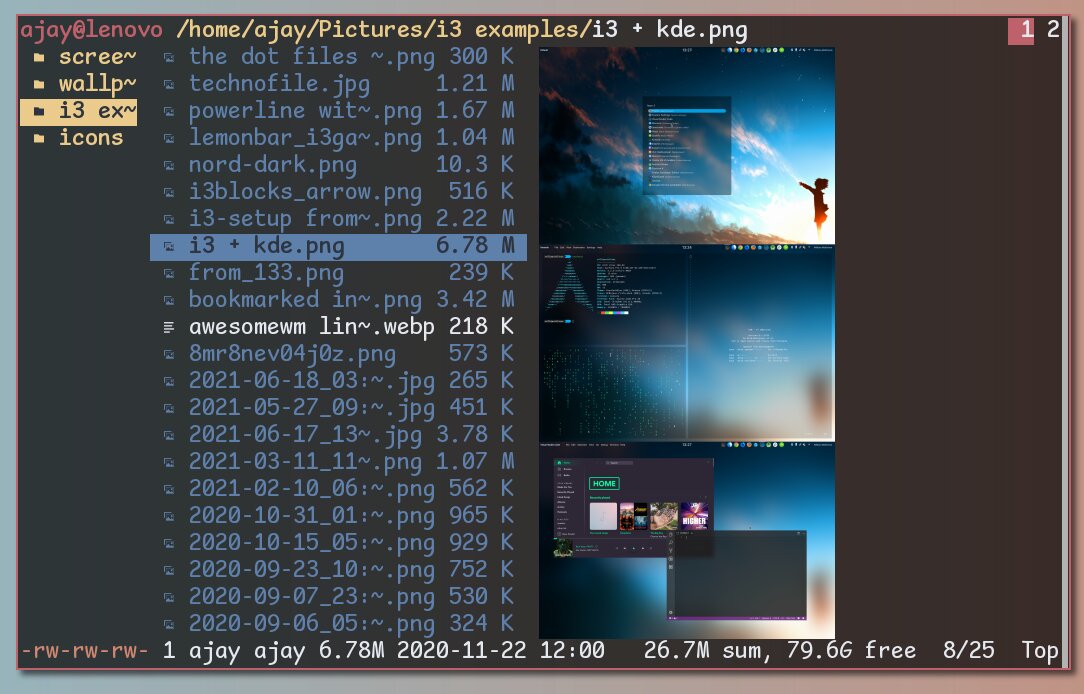
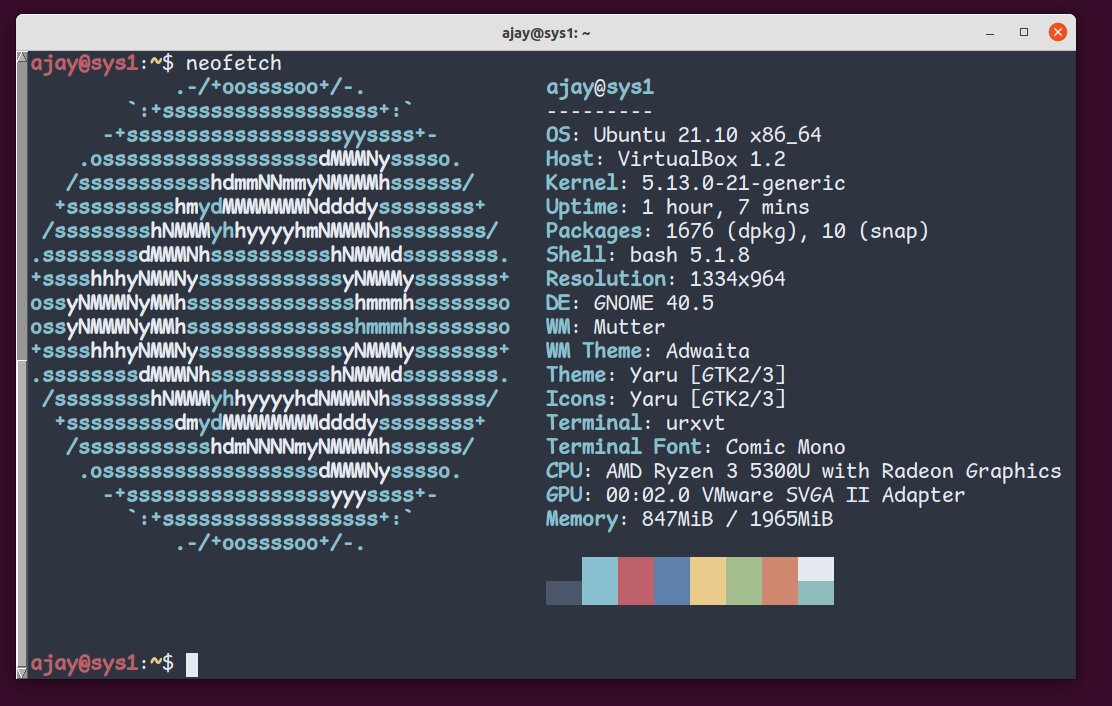
But it can be made to look as beautiful as the following with a very little configuration.

URxvt on My i3 Tiling Manager System
URxvt: Configuration
URxvt does its configuration using a text file called ~/.Xresources. If your computer does not have one, create an empty file called ~/.Xresources using touch command:
~$ touch ~/.XresourcesNow, we will be filling up this file with font size, colors, and other configurations. To see the result after changing the file, use the xrdb command:
~$ xrdb ~/.XresourcesNote: It is also a good practice to create a symbolic link
~$ ln --symbolic ~/.Xresources ~/.XdefaultsURxvt: Colors
Suppose, some command wants to write some output in some color (say red), URxvt prints that in red and nothing else. This is what the developer of that command had intended.
But you can remap red, blue, etc. with your desired colors. Thus you get your own color scheme. Here is my color mapping:
! Special
URxvt.foreground:   #E5E9F0
URxvt.background:   #2E3440
URxvt.cursorColor:  #E5E9F0

! black
URxvt.color0: #2E3440
URxvt.color8: #4C566A

! red
URxvt.color1: #88C0D0
URxvt.color9: #88C0D0

! green
URxvt.color2:  #BF616A
URxvt.color10: #BF616A

! yellow
URxvt.color3:  #5E81AC
URxvt.color11: #5E81AC

! blue
URxvt.color4:  #EBCB8B
URxvt.color12: #EBCB8B

! magenta
URxvt.color5:  #A3BE8C
URxvt.color13: #A3BE8C

! cyan
URxvt.color6:  #D08770
URxvt.color14: #D08770

! white
URxvt.color7:  #E5E9F0
URxvt.color15: #8FBCBB
After putting the above resources and their values in ~/.Xresources, and using xrdb ~/.Xresources; urxvt command, our URxvt looks like this:
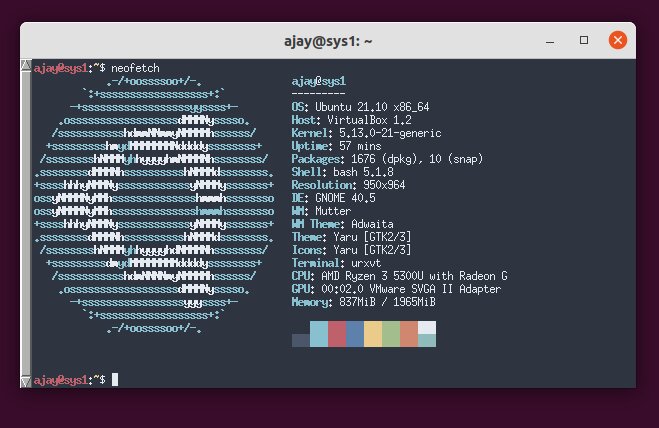
URxvt with the above Color Configuration
Note: terminal.sexy is a great source to find plenty of color schemes.
URxvt: Fonts
Configuring fonts in URxvt is a little tricky. We need to take care of glyphs, spacing, bold colors, etc.
Regular Fonts
In ~/.Xresources, this is a comma-separated list of fonts. While trying to find some glyphs/characters, URxvt checks from left to right. If the character is not found in the first font, it is searched in the second, and so on. In ~/.Xresources file, we use:
URxvt.font: font1,font2,...URxvt supports two types of fonts:
-
X11 Core Fonts
-
mainly for legacy devices
-
bitmap font.
-
but at the same time, it is highly customizable suiting to people with eye problems.
-
-
Xft Fonts
- This is what I use and shown below
- For modern devices
URxvt.font: \
            xft:Comic Mono:style=Normal:antialias=true:size=16:minspace=False, \
            xft:UbuntuMono Nerd Font Mono:style=Regular:antialias=true:size=16:minspace=False, \
            xft:SauceCodePro Nerd Font:style=Regular:antialias=true:size=16:minspace=False, \
            xft:DejaVuSansMono Nerd Font:antialias=true:size=16:minspace=False, \
            xft:DroidSansMono Nerd Font Mono:antialias=true:size=16, \
            xft:FuraMono NF:size=16:antialias=true:minspace=False, \
            xft:RobotoMono Nerd Font:antialias=true:size=16:minspace=False, \
            xft:Noto Sans Mono:antialias=true:size=16:minspace=False, \
            xft:Monospace:style=Medium:antialias=true:minspace=False
Where,
| Terms | Explanation |
| --- | --- |
| backslash (\) | linebreak in ~/.Xresources file |
| size | font-size; according to man urxvt, the first font defines the cell size for characters; other fonts might be smaller, but not (in general) larger |
| antialiasing | eliminates jaggies
 |
|
You need to play with these resources and see what is giving you the best results.
Note: To find font-names such as UbuntuMono Nerd Font Mono:style=Regular, use fc-list command:
~$ fc-list | grep --ignore-case ubuntuAfter putting the above font resources in ~/.Xresources, and using xrdb ~/.Xresources; urxvt command, our URxvt looks like this:
URxvt with above Font Configuration
Bold Fonts
For bold fonts, we need to follow the same procedure:
URxvt.boldFont: \
            xft:Comic Mono:style=Bold:antialias=true:size=18:minspace=False, \
            xft:UbuntuMono Nerd Font Mono:style=Regular:antialias=true:size=16:minspace=False, \
            xft:SauceCodePro Nerd Font:style=Medium:antialias=true:size=16:minspace=False, \
            xft:DejaVuSansMono Nerd Font:antialias=true:size=16:minspace=False, \
            xft:DroidSansMono Nerd Font Mono:antialias=true:size=16, \
            xft:FuraMono NF:size=16:antialias=true:minspace=False, \
            xft:RobotoMono Nerd Font:antialias=true:size=16:minspace=False, \
            xft:Noto Sans Mono:antialias=true:size=16:minspace=False, \
xft:Monospace:style=Medium:antialias=true:minspace=FalseNote: By default, bold characters in URxvt also use colors from URxvt.color8 to URxvt.color15. If you want boldness to be shown only by the boldness and nothing else, remove this setting by setting the URxvt.intensityStyles resource to false in your ~/.Xresources:
URxvt.intensityStyles: false
Unexpected Colors of Bold Characters in URxvt
URxvt after the above Fix
URxvt: Extensions
To use features like font-resize on the fly, tabbed, etc., you need to enable relevant extensions. URxvt ships with many extensions. Go check your /usr/lib/urxvt/perl/ directory in ArchLinux (in Ubuntu - /usr/lib/x86_64-linux-gnu/urxvt/perl/) and you will find many perl extensions at this moment. You can even add your own location using
URxvt.perl-lib: /home/ajay/.config/urxvt/extIf you want to use these extensions, just put the following line into your **~/.Xresource**s file:
URxvt.perl-ext-common: url-select,keyboard-select,resize-font,matcher,selection-to-clipboard,readline,tabbed,...| Extension | Functionality | | --- | --- | | tabbed | tab functionality; see man urxvt-tabbed to find the shortcut keys for navigation and color settings | | matcher | URL handling; for more, see below | | url-select | URL handling; for more, see below | | keyboard-select | Vi-mode; for more, see below | | resize-font | resize font using shortcuts | | close-gracefully | One of the MOST IMPORTANT extensions; it prevents the URxvt window from closing when a child process is running. More info is given below. | | others | use man urxvt-extension command |
Just remove/add these extensions based on your requirement. If your distribution does not provide these extensions, just search them on Google. They are very famous and you will find them easily.
Closing URxvt Window Gracefully when a Child Process is Running
I got this from StackExchange. It creates a bell sound whenever you try to close the urxvt window while a background process like an opened file is running. First, you need to close that process, and only then it will allow you to close the window. It is enabled by default in Gnome-terminal and many other terminal emulators.
Create a file ~/.config/urxvt/ext/close-gracefully with following in that:
#!/usr/bin/perl

sub on_wm_delete_window {
    my ($self, $event) = @_;
    my $CP = **ps --ppid $self->{shell_pid} -o pid= | wc -l**;
    chomp $CP;
    if ( $CP != 0 ) {
        $self->scr_bell;
        return 1;
    } else {
        return 0;
    }
}

sub on_child_start {
    my($self, $pid) = @_;
    $self->{shell_pid} = $pid;
}
URxvt: Resize Font on the Fly
You need to use resize-font extension. Download this extension from github and place it in ~/.config/urxvt/ext/ as mentioned above. By default, Ctrl-Minus reduces the font size. Ctrl-Plus increases it. Ctrl-Equal brings it to its original size. You can change them using the following:
URxvt.keysym.C-minus:  resize-font:smaller
URxvt.keysym.C-plus:   resize-font:bigger
URxvt.keysym.C-equal:  resize-font:equal
Where, C stands for Ctrl, M for Meta (Alt), C-M for Ctrl and Alt. To find out the names of other keyboard buttons, just search for keysym word in URxvt's manpage.
Handling URLs in URxvt
If you want to open the URL when you click on it, either use matcher or url-select extension.
Matcher Extension
It comes shipped with URxvt > 9.21. To use it, put the following in ~/.Xresources file:
URxvt.url-launcher: firefox
URxvt.matcher.button: 1
URxvt.keysym.M-u: perl:matcher:select
Where,
| X-resources | Explanation | | --- | --- | | url-launcher | browser name or use xdg-open for defaults. | | matcher.button | click on the URL using this mouse button; 1 for the left mouse button, 2 for the middle (default) | | M-u | Alt+u to get into the selection mode. Now use the Home, End, Up, and Down keys to choose one of the URLs. Press Enter to open the URL. Press y to copy the URL. Press the Esc button to escape from the mode. If you want vi-like keybindings, use url-select instead. |
url-select
Put following in Xresources file:
URxvt.url-select.launcher: firefox
URxvt.keysym.M-u: perl:url-select:select_next
URxvt.url-select.underline: true
Where,
the third line puts the underline below the links when you are in url-select mode. Everything is the same as matcher extension except few things:
- Vi like keybindings
- press o to open the link
- press q to quit from the mode.
Note: Although url-select has been deprecated, it still works well for me. You can also use both url-select and matcher together but don't use Alt+u in both cases.
keyboard-select: Moving Around Using Keyboard instead of Mouse
This is like Alacritty terminal's Vi Mode. You can use Alt-Escape (as set below) to get into this mode → use Vi keybindings to navigate, search, select and copy any text shown on your terminal.
URxvt.keysym.M-Escape: perl:keyboard-select:activateOr, use Alt-s to search directly for a word in your terminal:
URxvt.keysym.M-s: perl:keyboard-select:searchCopy Paste Functionality in URxvt
After the 9.20 version, you don't need to install anything. Just use Ctrl-Meta-c (also called Ctrl-Alt-c) for copy and Ctrl-Meta-v for paste.
Note 1: For versions older than 9.20, you need to enable a perl extension called "clipboard" from muennich/urxvt-perls
Note 2: By the way, you can also paste any selected text just by clicking the middle button of your mouse. This functionality is not just limited to URxvt. It is also available in browsers like firefox.
Note 3: To copy the selection each time a selection is made, use the selection-to-clipboard extension shipped with URxvt.
Scrollbar in URxvt
To make the scrollbar look slick, use
URxvt.scrollstyle: plain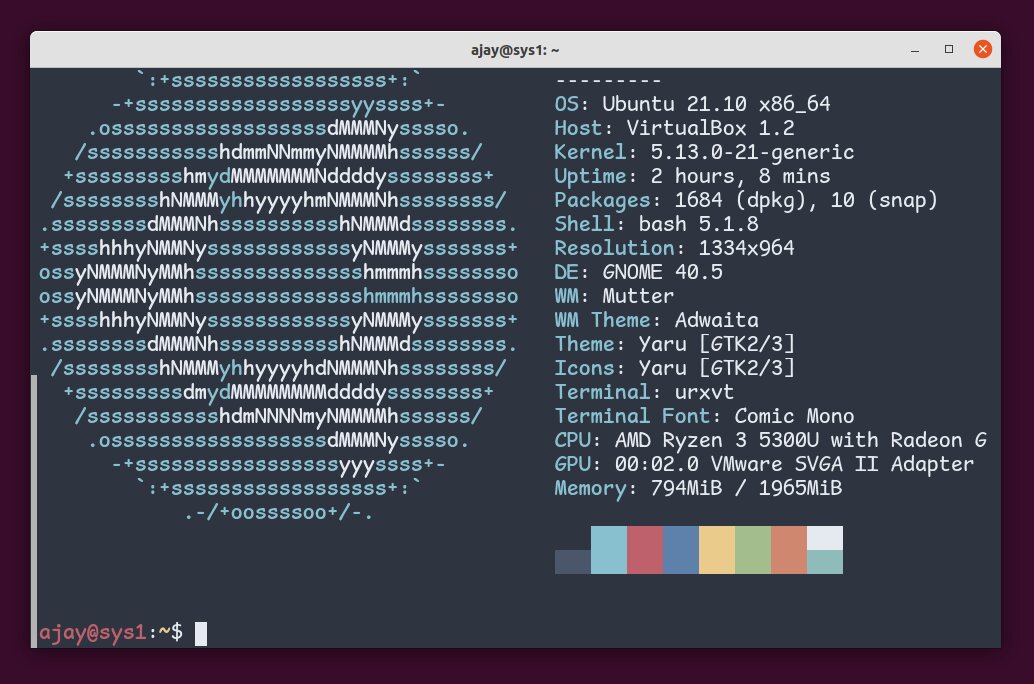
Plain Scroll Style in URxvt on the Left Side
Other options for scrollbar style: rxvt (default), next, and, xterm
Other settings for scrollbar:
| X-Resource | Application | | --- | --- | | URxvt.scrollBar: false | removes scroll bar | | URxvt.scrollBar_right: true | puts scroll bar to the right side |
Transparency in URxvt
There are many methods. Few of which are:
Pseudo Transparency in URxvt
In this, URxvt uses your PC's background wallpaper (more exactly x11's root window) as its own wallpaper. Everything including images and characters in the terminal is painted above this wallpaper and thus they don't get merged.
Pseudo Transparency in URxvt
For this put the following in your Xresources file:
URxvt*transparent: true
URxvt*shading: 30
Where,
URxvt*shading: 0 to 99 darkens, 101 to 200 lightens the transparency.
You can also use the blurring effect with the transparency using
URxvt*blurRadius: 3Keep changing the radius to get what you want. But personally, I find it toooo heavy on my CPU.
Note: I could not make it work on my new Ubuntu setup (as of 16 Nov 2021). But It is working fine on my ArchLinux Setup.
True Transparency in URxvt
This behaves just like what is expected. Here everything including images and characters in the terminal is painted above what is just below the URxvt Terminal instead of URxvt's background image.
URxvt*depth: 32
URxvt.background: [90]#2E3440
Use the bit depth of 32 and the percentage of opaqueness written in the bracket just before the background color.
True Transparency in URxvt
Transparency by Compositor
Use your compositor. If you are using picom, put the following in picom.conf file:
opacity-rule = [
  "80:class_g = 'URxvt'"
];
The number 80 is just an example. keep changing it to get the desired value.
I don't like this because the images shown in the terminal are merged with what is beneath it. This is true even for characters. Or, you can make it good enough by using a very high opacity value like 97 instead of 80.
Transparency Achieved using a Compositor - Exaggerated Opacity-Value Taken Just to Make My Point
Conclusion
I have tried my best to cover everything that a normal Linux user needs. Just play with these resources and their values to get your desired configuration. But don't forget the xrdb ~/.Xresources command after modifying the **~/.Xresource**s file.
To get the best possible experience from your terminal, I will recommend you to have a look at this article - Configuring Zsh: syntax-highlighting, autosuggestion, themes, binding, alias, fzf