Null-ls's unofficial full form is null-language-server i.e. it is a sort of language server which does not provide any services such as formatting and diagnostics you expect from a language server. Instead of that, you will need to install corresponding external "sources" and then hook these sources into the neovim lsp client through null-ls.
For example, bash-language-server does not provide formatting services. Therefore, the formatting nvim commands :vim.lsp.buf.formatting() or vim.lsp.buf.formatting_sync() (in nvim v 0.8, vim.lsp.buf.format) will not work. For them to work, you need to install an external formatter called shfmt and hook (merge) shfmt into Neovim LSP client by using 1-2 lines of configuration (I will show you that below). Now, the nvim's above formatting commands will format your code.
Similarly, I was able to hook Diagnostics and Code-Actions into the Neovim client using shellcheck.
Using null-ls, you can hook not only formatting, code actions, and diagnostics, but the following services as well:
-
Hover
-
Completion
Install null-ls and other packages and configure them
First of all, install the null-ls plugin using your favorite plugin manager.
For example, to install using vim-plug*, use the following command in init.vim:
Plug 'jose-elias-alvarez/null-ls.nvim'*Head on over to this article for a detailed and easy guide on managing plugins using vim-plug.
For this article, I will be using bash-language-server, shfmt, and shellcheck as examples. So, kindly install them as well using your distributions' package managers:
Using snap
sudo snap install bash-language-serverOn Debian-based distros:
sudo apt install shellcheckOn Fedora-based distributions
dnf install -y nodejs-bash-language-server
dnf install shellcheck
For Arch Linux, Manjaro, and other Arch Linux-based distributions
sudo pacman -S bash-language-server shfmt shellcheckIf the above does not cover your distributions/OSes, head over to the official websites of these packages or search on Google and install them from there. However, always prefer your distributions/OSes' package managers because of the ease in the update/install/uninstall.
Please set up your bash-language-server if you have not done it. You can follow my article on this nvim-lsp setup.
Formatting in null-ls
Format-commands in nvim-lsp remove/insert unnecessary tabs/spaces in your code. Therefore, it beautifies it.
To know more about it, look at my article on formatting in nvim-lsp.
As foretold, for the bash-language-server, the nvim's formatting commands :vim.lsp.buf.formatting() or vim.lsp.buf.formatting_sync() (in nvim v 0.8, vim.lsp.buf.format) will not have any effect.
To make them work, first create a file ~/.config/nvim/plug-config/null-ls.lua. In this file, you will be populating all of your plugin-related configurations. You could throw all of your configurations in the init.vim or init.lua instead but that will be quite a messy configuration. So, I am creating a separate file. Later, I will show you how this file can be "sourced" into the init.vim using the source command.
After creating the file put the following configuration into it:
require("null-ls").setup({
  sources = {
    require("null-ls").builtins.formatting.shfmt, -- shell script formatting
  },
})
In the above configuration, I am using the "source" shfmt. To find other supported sources, head over to the list of supported sources on the official website.
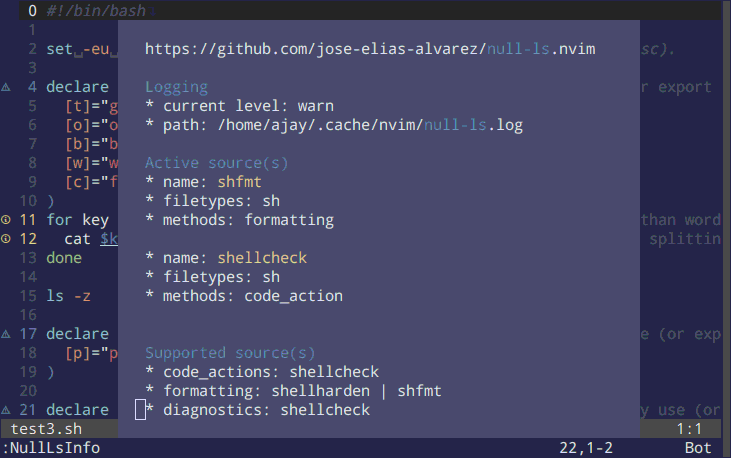
Or, execute the nvim command :NullLsInfo.

Figure: :NullLsInfo shows you supported sources for the given filetype in a floating window
It will be a good practice to bind a key to the above command. For this, you can append the following line in the file ~/.config/nvim/plug-config/null-ls.lua:
vim.cmd('map <Leader>ln :NullLsInfo<CR>')
The above formatting configuration was for sh file type. For other filetypes, follow the similar procedure.
For example, for markdown formatting, open a markdown file, and execute the :NullLsInfo command, it will show you supported formatting sources. If you like to use the source prettier, use the prettier line in sources = {} in the following fashion:
require("null-ls").setup({
  sources = {
    require("null-ls").builtins.formatting.shfmt, -- shell script formatting
    require("null-ls").builtins.formatting.prettier, -- markdown formatting
  },
})
Test if the above formatting configuration in null-ls is working
Now as a test, go ahead and destroy the formatting of one of your shell scripts by inserting unnecessary tabs and spaces. Now, execute the nvim formatting command. You will see the removal of unnecessary tabs and spaces.
I will recommend you bind the formatting commands with some key(s) as shown below.
Keybindings for nvim-lsp formatting
Append the following lines to the file ~/.config/nvim/plug-config/null-ls.lua:
vim.cmd('map <Leader>lf :lua vim.lsp.buf.formatting_sync(nil, 10000)<CR>')
If you get timeout error on executing the above shortcut, which might happen on a long file, increase the number. 10000 is already a very big number, so the error is highly unlikely.
Note 1: Please note that the formatting command is a little different in nvim v 0.8:
-- 0.7
vim.lsp.buf.formatting_sync(nil, 2000) -- 2 seconds

-- 0.8
vim.lsp.buf.format({ timeout_ms = 2000 }) -- 2 seconds
Note 2: If you already have bound key(s) for the formatting command(s), there is no need to rebind using the above method.
Some sources (but not the shfmt) support range formatting as well. For this, append the following line in the file ~/.config/nvim/plug-config/null-ls.lua:
vim.cmd('map <Leader>lF :lua vim.lsp.buf.range_formatting()<CR>')
Now, you can visually select the lines (using the standard vim key Shift+v) on which you want to apply the formatting and press the shortcut key. The Rest of the lines will be untouched.
Diagnostics (linting) in null-ls
Nvim lsp diagnostics (also known as “linting”) enables you to see Errors, Warnings, Hints, and information right on your screen while coding. It, therefore, prevents you from having most of the debugging headaches later.
To know more about it, head over to my article on diagnostics in nvim-lsp.

Figure: Diagnostics in bash-language-server pulled from shellcheck
By default, the bash-language-server server does not provide diagnostics services.
Now, to get the diagnostics enabled use the following code in your file ~/.config/nvim/plug-config/null-ls.lua:
require("null-ls").setup({
  sources = {
    require("null-ls").builtins.formatting.shfmt, -- shell script formatting
    require("null-ls").builtins.formatting.prettier, -- markdown formatting
    require("null-ls").builtins.diagnostics.shellcheck, -- shell script diagnostics
  },
})
Just add the shellcheck line from the above code in the file. There is no need to repeat/remove other configurations from the file.
Now, open a shell script and you will see diagnostics printed on your terminal.
Note: with the recent update of bash-language-server, you don't have to follow this heading. Now, bash-language-server uses the shellcheck if installed for the linting. Nonetheless, this method is still useful for other scenarios.
Code actions in null-ls
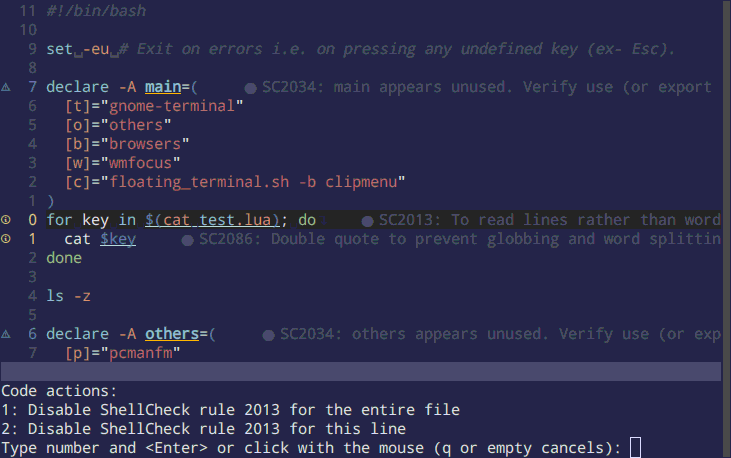
Diagnostics show you the errors and warnings in your code. On the other hand, code actions are available suggestions to fix/remove these errors and warnings. Not all language servers provide this service. To fill this gap, you can use null-ls.

Figure: code actions in nvim-lsp (shown at the bottom) from shellcheck
To hook code actions from shellcheck into the neovim client, insert the line require("null-ls").builtins.code_actions.shellcheck, in the file ~/.config/nvim/plug-config/null-ls.lua in the following fashion:
require("null-ls").setup({
  sources = {
    require("null-ls").builtins.formatting.shfmt, -- shell script formatting
    require("null-ls").builtins.formatting.prettier, -- markdown formatting
    require("null-ls").builtins.diagnostics.shellcheck, -- shell script diagnostics
    require("null-ls").builtins.code_actions.shellcheck, -- shell script code actions
  },
})
Way Ahead
To use other null-ls features such as "Hover" (example - on hovering on a word, you would get its meaning; it is good for language learners), how to create a source, etc. see the official null-ls documentation
And don't forget to source the file ~/.config/nvim/plug-config/null-ls.lua in your init.vim:
source $HOME/.config/nvim/plug-config/null-ls.luaIn order to completely set up your Nvim-lsp, please go through all articles in the nvim-lsp series.