Zsh (or z-shell), like bash, is a POSIX compliant shell. Therefore, most of the bash commands are applicable in z-shell as well. However, bash does not provide features like autosuggestion, and syntax highlighting among other modern features. On the other hand, fish shell provides these features out of the box but fish is not POSIX compliant. So, our best solution is this shell.
Note: I recommend you to follow this article from top to bottom to minimize the problems.
Installation and make zsh default shell
Debian, Ubuntu, and Kali Linux
apt-get install zshAlpine
apk add zshArch Linux
pacman -S zshCentOS
yum install zshFedora
dnf install zshmacOS:
$ sudo port install zshOr with Homebrew
brew install zshRaspbian
apt-get install zshTo make it the default shell, execute the following command:
~$ sudo chsh -s $(which zsh)Basic Configuration
When you start Z shell for the first time, you will get the following prompt:
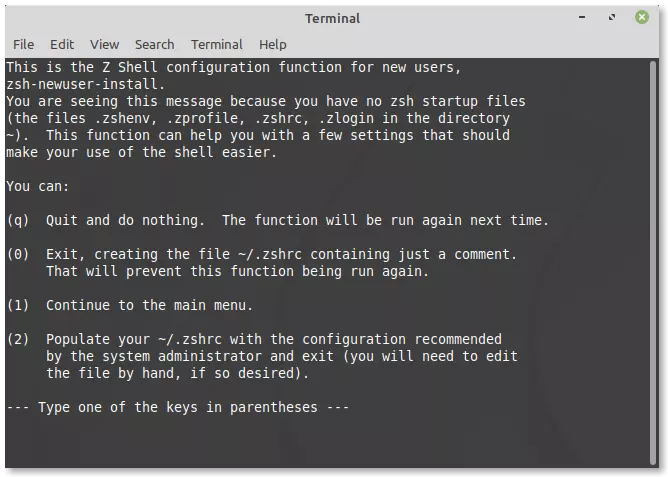
First Zsh Prompt
Press 0 to create an empty file ~/.zshrc as suggested. This will be your configuration file. We will be populating it with our values.
Zsh History
Put the following three lines in the .zshrc file:
HISTFILE="${XDG_DATA_HOME:-$HOME/.local/share}/zsh/history"
HISTSIZE=1000000
SAVEHIST=1000000
Here,
- Now, all commands you type in the terminal will be stored in the given location.
- The above size may seem very big, but the file size hardly goes beyond 10-20 MB.
Set options for glob, correction, beep, autocd
Now, now you can set the following option(s) using the setopt command in ~/.zshrc:
setopt appendhistory autocd extendedglob notify correctall nomatch globdotsWhere,
appendhistorymake sure that Arrow keys bring your history.- extendedglob sets glob-related options.
autocdmeans to change into a directory say~/Music, you just need to type the name of the directory only and hit Enter instead of wholecd ~/Music.correctallasks you to correct the mistyped words (n for no, y for yes, a for all, e for exit):
~$ cta ~/.profil
zsh: correct 'cta' to 'cat' [nyae]? y
zsh: correct '~/.profil' to '~/.profile' [nyae]?globdots: include hidden files in tab completion.
Turn off the beef sound on errors. By default, it is on:
unsetopt beeptab-completion
Now, to enable the tab completion, put the following commands in your ~/.zshrc file:
zstyle :compinstall filename "${ZDOTDIR:-$HOME}/.zshrc"

autoload -Uz compinit
compinit
Add-ons and plug-ins
fzf-tab
fzf-tab replaces z shell's default completion selection menu with fzf.
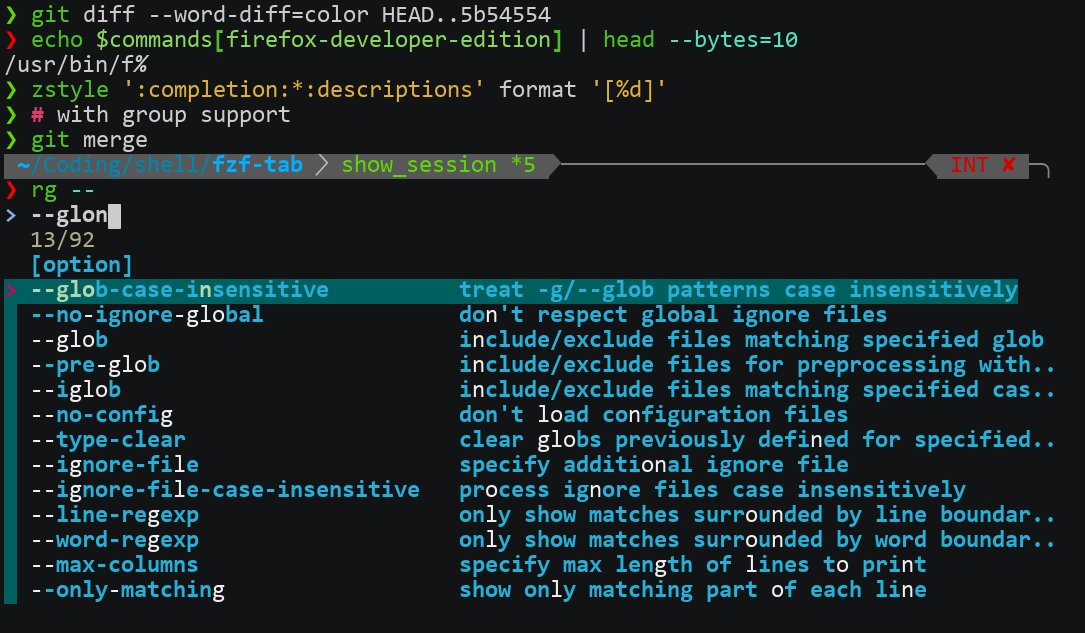
fzf-tab
Take a look at this video to understand its importance. You don't have to remember anything now.
To enable it just download it using git:
~$ git clone https://github.com/Aloxaf/fzf-tab
And now source the main file into ~/.zshrc by putting the following command into it:
[ ! -f ~/fzf-tab/fzf-tab.plugin.zsh ] || source ~/fzf-tab/fzf-tab.plugin.zshNote: Please note that you should put the above command after the compinit, but before plugins that will wrap widgets, such as zsh-autosuggestions or fast-syntax-highlighting!
Additional completion definitions (zsh-completions)
For this, we will use zsh-completions.
According to the zsh-completions website, it "aims at gathering/developing new completion scripts that are not available in Zsh yet".
Installation using official repositories: It is available in most of the official repositories of your distributions. Install from there and you are done. Nothing to do anymore.
| System | Package | | --- | --- | | Debian / Ubuntu | zsh-completions OBS repository | | Fedora / CentOS / RHEL / Scientific Linux | zsh-completions OBS repository | | OpenSUSE / SLE | zsh-completions OBS repository | | Arch Linux / Manjaro / Antergos / Hyperbola | zsh-completions, zsh-completions-git | | Gentoo / Funtoo | app-shells/zsh-completions | | NixOS | zsh-completions | | Void Linux | zsh-completions | | Slackware | Slackbuilds | | macOS | homebrew, MacPorts | | NetBSD | pkgsrc | | FreeBSD | shells/zsh-completions |
Source: zsh-completions
Manual Installation:
Step 1: Download the repository:
git clone https://github.com/zsh-users/zsh-completions.git
Step 2: Now, put the following into your ~/.zshrc file. It will add zsh-completions' directory into fpath:
fpath=(~/zsh-completions/src $fpath)Step 3: Now, force rebuild zcompdump using the following command on your terminal (don't put it into the ~/.zshrc):
rm -f ~/.zcompdump; compinitFish like autosuggestions using zsh-autosuggestions
Step 1: Download zsh-autosuggestions
From Official Repositories:
| System | Package | | --- | --- | | Debian / Ubuntu | zsh-autosuggestions OBS repository | | Fedora / CentOS / RHEL / Scientific Linux | zsh-autosuggestions OBS repository | | OpenSUSE / SLE | zsh-autosuggestions OBS repository | | Arch Linux / Manjaro / Antergos / Hyperbola | zsh-autosuggestions, zsh-autosuggestions-git | | NixOS | zsh-autosuggestions | | Void Linux | zsh-autosuggestions | | Mac OS | homebrew | | NetBSD | pkgsrc |
Source: zsh-autosuggestions
Manual:
git clone https://github.com/zsh-users/zsh-autosuggestions
Step 2: Source the main file into your ~/.zshrc:
If you have downloaded it from your official repositories, put the following command into your ~/.zshrc :
[ ! -f /usr/share/zsh/plugins/zsh-autosuggestions/zsh-autosuggestions.zsh ] || source /usr/share/zsh/plugins/zsh-autosuggestions/zsh-autosuggestions.zshAnd if you have downloaded it manually, put the following instead:
[ ! -f ~/zsh-autosuggestions/zsh-autosuggestions.zsh ] || source ~/zsh-autosuggestions/zsh-autosuggestions.zshStep 3: configuration of zsh-autosuggestions
Put the following into ~/.zshrc:
ZSH_AUTOSUGGEST_STRATEGY=(history completion)Now, you will be suggested first from the history, and if that is not available then tab-completion. Please note that the tab-completion based suggestion requires a zsh-module called zpty. Most of the distributions already install it when you install zsh. You can make sure it using the locate command:
~$ locate zpty
/usr/lib/zsh/5.8.1/zsh/zpty.so
/usr/share/zsh/5.8.1/help/zpty
/usr/share/zsh/functions/Completion/Zsh/_zpty
zsh-autosuggestions says that there is one more option - match_prev_cmd which is:-
For example, suppose your history has the following entries:
pwdls fools barpwd
Given the history list above, when you type ls, the suggestion will be ls foo rather than ls bar because your most recently executed command (pwd) was previously followed by 'ls foo'.
Step 3: Start a new terminal session.
Result:
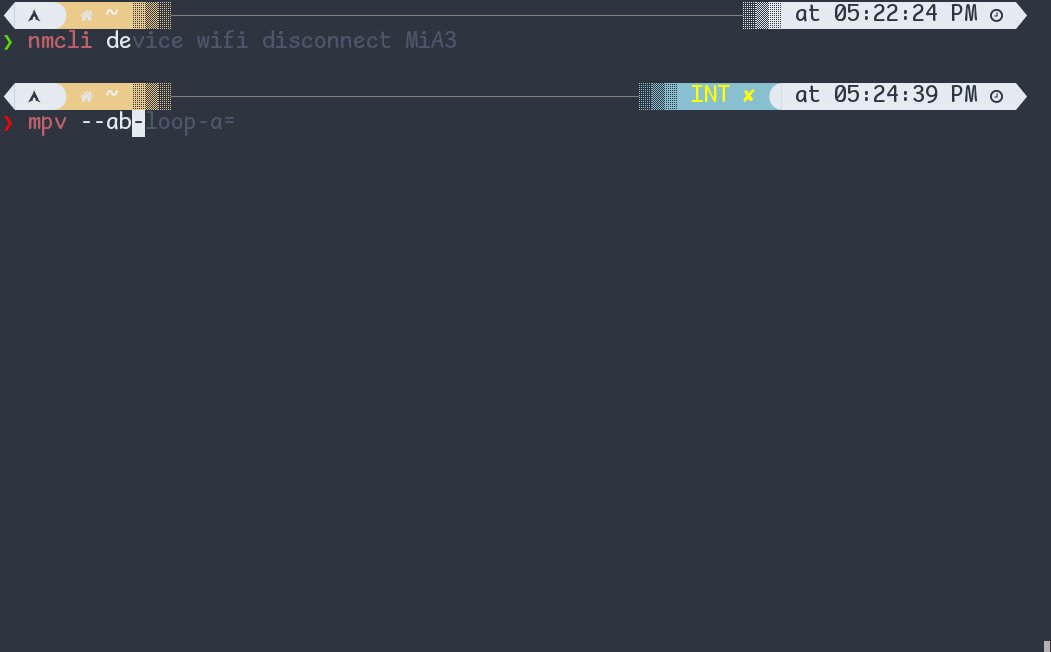
zsh-autosuggestions
In the above example, as soon as I type nmcli de, it suggests nmcli device wifi disconnect MiA3 from my history. But when I type something new like mpv --ab which I had never executed in the past, it will use 'tab-completion' and suggest the nearest one --ab-loop-a=.
Later, in this article, I will help you set up some keybindings related to autosuggestions (autosuggest-accept, and autosuggest-execute).
Fish like syntax highlighting using 'zsh-syntax-highlighting'
Install the package zsh-syntax-highlighting using your official repository:
- Arch Linux: community/zsh-syntax-highlighting / AUR/zsh-syntax-highlighting-git
- Debian:
zsh-syntax-highlightingpackage instretch(or in OBS repository) - Fedora: zsh-syntax-highlighting package in Fedora 24+ (or in OBS repository)
- FreeBSD:
pkg install zsh-syntax-highlighting(port name:shells/zsh-syntax-highlighting) - Gentoo: app-shells/zsh-syntax-highlighting
- Mac OS X / Homebrew: brew install zsh-syntax-highlighting
- NetBSD:
pkg_add zsh-syntax-highlighting(port name:shells/zsh-syntax-highlighting) - OpenBSD:
pkg_add zsh-syntax-highlighting(port name:shells/zsh-syntax-highlighting) - openSUSE / SLE:
zsh-syntax-highlightingpackage in OBS repository - RHEL / CentOS / Scientific Linux:
zsh-syntax-highlightingpackage in OBS repository - Ubuntu:
zsh-syntax-highlightingpackage in Xenial (or in OBS repository) - Void Linux:
zsh-syntax-highlighting packagein XBPS
Or, you can install it manually using:
git clone https://github.com/zsh-users/zsh-syntax-highlighting.git
Now, if you have installed it from your official repository, source it into your ~/.zshrc using the following:
[ ! -f /usr/share/zsh/plugins/zsh-syntax-highlighting/zsh-syntax-highlighting.zsh ] || source /usr/share/zsh/plugins/zsh-syntax-highlighting/zsh-syntax-highlighting.zshOr, if you have it installed it manually using the git clone... method, source the following file instead:
source ~/zsh-syntax-highlighting/zsh-syntax-highlighting.zshPowerlevel10k Theme
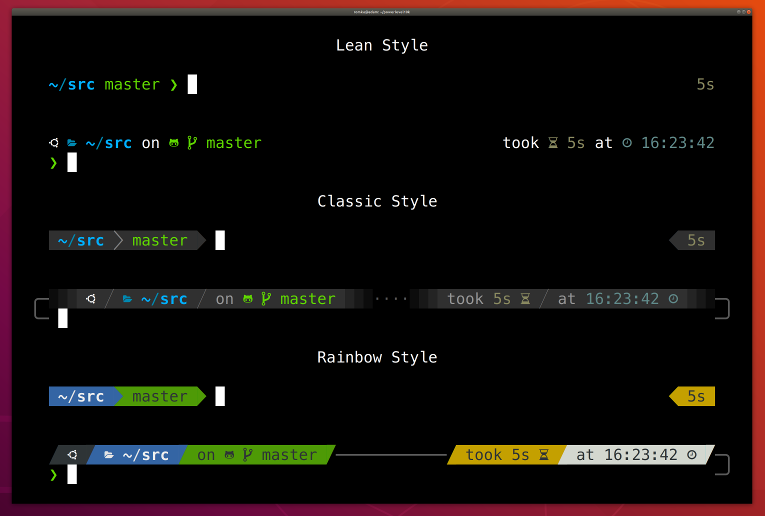
Powerlevel10k theme
Step 1: Installation
git clone --depth=1 https://github.com/romkatv/powerlevel10k.git ~/powerlevel10k
echo 'source ~/powerlevel10k/powerlevel10k.zsh-theme' >>~/.zshrc
And also install one of the Nerd Fonts.
Step 2: Configuration
Restart your terminal session. Now, the powerline's configuration wizard will set up your configurations by asking you a few questions. If the wizard does not start, just execute the command p10k configure.
After executing the above command, you will notice two files sourced at the top as well as the bottom. Now, all of your commands will go between these two files.
Key bindings
Vim-keybindings
To choose vim keybindings, use the bindkey -v in the ~/.zshrc. Now, when you press the Escape button, you will reach the vim mode, after which you can use the keys h and l to move left and right in the current line, and j and k for up and down in history.
Emacs Keybindings
Personally, I prefer emacs key bindings because that is supported by many other software and packages (ranger's console, fzf, dmenu, and many more). For this, put the following into the ~/.zshrc:
bindkey -eAt the same time, emacs mode also provides a few extra widgets such as beginning-of-line and end-of-line that you can bind with other keys.
Now, you can open a new terminal session and execute the command bindkey to get a list of all key-bindings at that moment:
~$ bindkey
"^@" set-mark-command
"^A" beginning-of-line
"^B" backward-char
"^D" delete-char-or-list
"^E" autosuggest-accept
"^F" forward-char
"^G" "ranger_for_cd^J"
"^H" backward-delete-char
"^I" fzf-completion
"^J" accept-line
"^K" kill-line
"^L" clear-screen
"^M" accept-line
"^N" history-search-forward
"^O" accept-line-and-down-history
...
...
Where, ^A means 'Ctrl-A', ^[A means Alt-A. Use the command cat -v to find the name of other keys.
Please note that ^A and ^a both are the same.
Change the keybindings
To change the default bindings, just put the new key-combo in front of the widget and then prepend it with bindkey. For example, personally, I, have modified the default keybindings using the following commands in my ~/.zshrc:
bindkey '^[[8~' end-of-line # end key;
bindkey '^[[7~' beginning-of-line # Home key
bindkey "^[n" down-line-or-history
bindkey "^[p" up-line-or-history
bindkey "^N" history-search-forward # or you can bind it to the down key "^[[B"
bindkey "^P" history-search-backward # or you can bind it to Up key "^[[A"
# autosuggest keybindings
bindkey '^X' autosuggest-execute
bindkey '^E' autosuggest-accept
The above bindings for history-search-forward and history-search-backward will take you forward and backward without omitting what you have typed on the terminal. For example, suppose, you executed the following commands in your terminal one by one:
echo 1
echo 2
echo 3
ls
And now, when you type echo and press the key for history-search-backward, you will move from echo 3 to echo 2 and then echo 1 as expected. On the other hand, up-line-or-history will omit the echo commands, and move you to ls and then echo 3 and so on.
Here, are the keybindings I use very often:
- Ctrl-F, End, Ctrl-E - autosuggest-accept/end-of-line
- Home, Ctrl-A - beginning-of-line
- Ctrl-X - autosuggest-execute
- Enter - execute whatever you have typed
- Ctrl-F and Ctrl-B - forward and backward char
- Alt F and Alt B - forward and backward word
- Ctrl-a Home
- Ctrl-b Left
- Ctrl-c Escape
- Ctrl-d Delete
- Ctrl-f Right
- Ctrl-h Backspace
- Ctrl-m Return
- Alt-p Up
- Alt-n Down
- Ctrl-n History Next without omitting your typed words
- Ctrl-p previous history without omitting your typed words
- Ctrl-w Delete word left
- Ctrl-e, End, Ctrl-f: autosuggest-accept
- Ctrl-x: autosuggest-execute
Edit line in vim with alt-e
Put the following in your ~/.zshrc:
autoload edit-command-line; zle -N edit-command-line
bindkey '^[e' edit-command-line
Now, whatever you have typed, after pressing alt-e, will be opened in your separate text editor vim. Now, you can edit your text in that editor.
Fzf for history, directory, and file navigation
Install fzf package using your package manager. Now, put the following commands in your ~/.zshrc:
[ -f /usr/share/fzf/key-bindings.zsh ] && source /usr/share/fzf/key-bindings.zsh
[ -f /usr/share/fzf/completion.zsh ] && source /usr/share/fzf/completion.zsh
Note: please make sure that the above files key-bindings and completion.zsh exist at the given location. You can use the locate command for that purpose.
Now, use
- ctrl t: target files in the current directory
- ctrl r: recent commands from history
- alt c: alternate the cd (directory) into the given directory.
Title of your terminal
To change the title to the $USER@$HOME:pwd, put the following lines into your ~/.zshrc:
function precmd () {
    print -Pn -- '\e]2;%n@%m %~\a'
}
Zsh aliases
Here, is my favorite aliases. Put/modify them in your ~/.zshrc if you like them:
alias mv="mv -iv"
alias rm="rm -ivr"
alias trash="gio trash"
alias trash_restore='gio trash --restore "$(gio trash --list | fzf | cut -f 1)"'
alias cp="cp -ivr"
alias nv="nvim"
alias vi="nvim"
alias nf="neofetch"
alias l="ls --color=auto --group-directories-first -AF"
alias ls="ls --color=auto"
alias archwiki="wiki-search"
alias bc='bc --quiet <(echo "scale=5;print\"scale=5\n\"")'
alias xo='xdg-open'
alias lc='lolcat'
alias di='dictionary.py'
alias grep='grep --color=auto'
alias rsync_progress='rsync --archive --acls --xattrs --hard-links --verbose --progress'
lolbanner ()
{
    echo
    figlet -f $XDG_DATA_HOME/figlet-fonts/3d.flf $* | lolcat
    echo
}
Pywal support (to change color)
If you don't use pywal, skip this portion. Otherwise, put the following in your ~/.zshrc:
(cat ~/.cache/wal/sequences &)
clear #find better way to remove the ugly output of above commands
# source colors.sh file to fix fzf colors and ls command's colors
source ~/.cache/wal/colors.sh
# Ls color is ugly. Modify it using
eval "$(dircolors -p | perl -pe 's/^((CAP|S[ET]|O[TR]|M|E)\w+).*/$1 00/' | dircolors -)"
That's all
That was all folks. The above settings have enabled me not to remember much of the shell commands since I can recall my past executed commands using fzf's history. The above settings also reduce typos thanks to autosuggestion and fzf-tab plugins. As you can see I did not use any special framework like Oh my zsh, because they, in my opinion, bring unnecessary complexities.
After configuring the z-shell, you will need to set up your terminal and one of the best terminals is - urxvt. Therefore, I will recommend you to have a look at this article - URxvt: Installation, Color Scheme, Fonts, Resize, etc.