Linux is not natively supported by laptop manufacturers, as they primarily focus on Windows. Therefore, it is highly likely that your system's brightness does not change when you press the brightness key on your Linux laptop. In this article, I will explain how to bind your brightness key to control the screen brightness.
📔 Note: After applying any changes, restart your system, as system-level changes may not take effect immediately.
Method 1: Changing Linux Brightness by Directly Editing the File backlight_device/brightness
Step 1: Set ACPI Backlight Option in Grub
Setting the right acpi backlight option creates the required backlight file.
📔 Note: Since kernel version 6.1, the backlight system has been revamped. You may not need to set this option. Just skip to the next step. If the following steps do not work, try to follow this step. To check your kernel version, use the following Linux command:
[ajay@legion ~]$ uname -r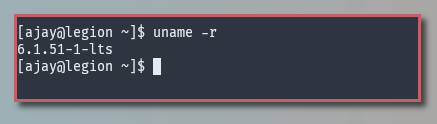
Figure: finding kernel in linux
I will be using the Grub bootloader to set this at system startup. Most of you might already be using this (for example, Ubuntu uses it by default). If you use a different bootloader, refer to your bootloader's guide for setup.
Set the acpi_backlight option to one of the following: none, native, video, or vendor.
For example, to set it to 'vendor,' open the file /etc/default/grub using your favorite text editor:
[ajay@legion ~]$ sudo nvim /etc/default/grub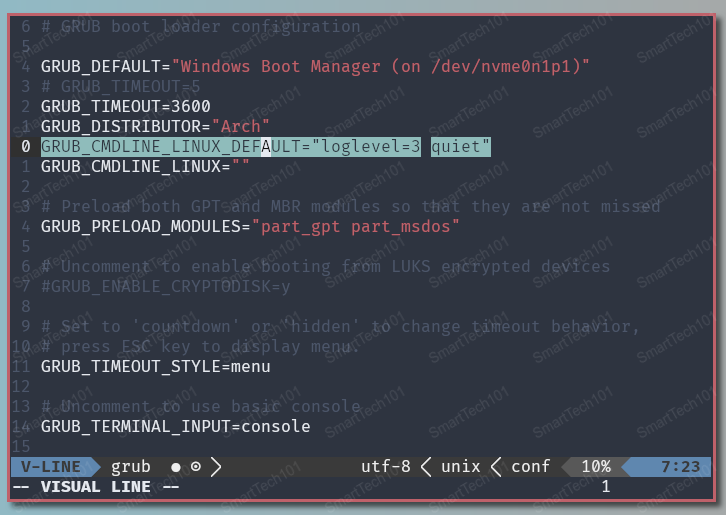
Figure: Grub Command Line Default Option
Now, change the highlighted line to the following:
GRUB_CMDLINE_LINUX_DEFAULT="loglevel=3 quiet acpi_backlight=vendor"Every time you change /etc/default/grub, execute the following command:
Arch Linux-based distribution (e.g., Manjaro):
[ajay@legion ~]$ sudo grub-mkconfig -o /boot/grub/grub.cfgDebian-based distribution (e.g., Ubuntu):
[ajay@legion ~]$ sudo grub-mkconfig -o /boot/grub/grub.cfg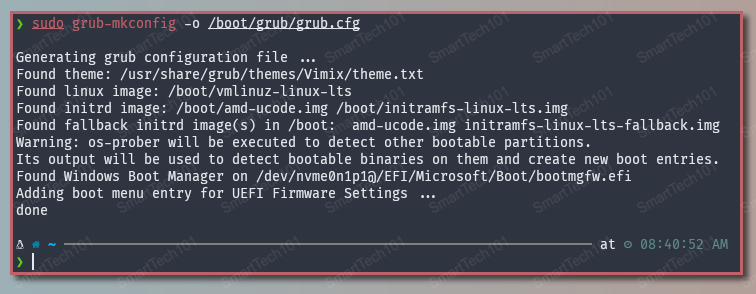
Figure: grub-mkconfig to genereate grub.cfg
Description of options available under acpi_backlight:
vendor: When I had not set any option usingacpi_backlightand I started the ThinkPad laptop (AMD GPU), I got the following error:
Oct 13 02:00:48 lenovo systemd[1]: Failed to start Load/Save Screen Backlight Brightness of backlight:acpi_video0.However, the system started normally.
Now, using the option vendor turns off the journalctl error shown at the start by LightDM.
-
native: Creates AMD's directoryamdgpu_bl0(or something like that) in/sys/class/backlight. Note it down on some paper; it will be used later. This directory,/sys/class/backlight/amdgpu_bl0, contains multiple files. -
videoorvendor: Create Nvidia's directorynvidia_wmi_ec_backlight(or something like that) inside/sys/class/backlight. Note it down on some paper. Since kernel 6.1, as mentioned above, the backlight system has been revamped, and now, in my Legion 5, the Nvidia directory is automatically created. -
none: Creates no directory at all.
Step 2: Change Brightness by Editing the Contents of Files in /sys/class/backlight
In step 1, I discussed the creation of directories/files for Nvidia and AMD GPUs in /sys/class/backlight. You can change your brightness by editing these files.
For example:
[ajay@legion ~]$ ls /sys/class/backlight/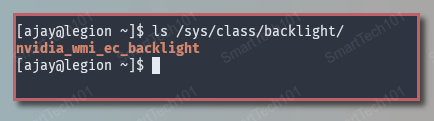
Figure: nvidia backlight directory used to set brightness on a Linux laptop
To learn more, see Kernel command-line options on the Arch Wiki.
For example, in AMD GPU laptops, writing some number into /sys/class/backlight/amdgpu_bl0/brightness (or something like that) changes your brightness. For Nvidia laptops, it is something like /sys/class/backlight/nvidia_wmi_ec_backlight/brightness.
In AMD GPU laptops, there is a file like /sys/class/backlight/amdgpu_bl0/max_brightness. It is the maximum number that can be written to /sys/class/backlight/amdgpu_bl0/brightness. For Nvidia laptops, it is something like /sys/class/backlight/nvidia_wmi_ec_backlight/max_brightness.
Now, try increasing/decreasing these values and see if the brightness changes. If it does, you are almost finished. Thank me in the comments section.
You might need the sudo command to change the content of these files since they are owned by the root user, not you. In the next step, we will tackle this.
Step 3: Changing Ownership of Backlight Files
To change the group ownership and editing restrictions, you need to use udev, the device manager. These backlight files are created by Linux each time you start your PC, so these permissions need to be set each time you restart your system. udev handles this automatically.
You might be wondering why I need to remove the sudo restriction. The reason is that I want to bind brightness changes to the brightness up and down buttons, and I don't want to enter a password each time I change the brightness.
Create or open the file /etc/udev/rules.d/backlight.rules using your favorite text editor:
[ajay@legion ~]$ sudo nvim /etc/udev/rules.d/backlight.rulesAdd the following two lines:
RUN+="/bin/chgrp video /sys/class/backlight/<backlight_device>/brightness"
RUN+="/bin/chmod g+w /sys/class/backlight/<backlight_device>/brightness"
Replace <backlight_device> with your specific device name.
💡Note: Restart the system after making any changes to udev rules. You can also execute the following command to reload udev rules: sudo udevadm control --reload. However, restarting the system is preferred for minimum fuss.
The chgrp command changes the group ownership of the file brightness to video (the first line). The chmod command gives the group video write permission (w for 'write'). So, all users who are part of the video group should be able to write to the brightness file without requiring sudo.
Please make sure that you are part of the video group using the groups command:
[ajay@legion ~]$ groups <user_name>
Replace <user_name> with your username.
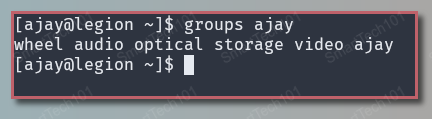
Figure: finding groups of which you are part of using groups command
If you are not part of the video group, you can add yourself using the usermod command:
[ajay@legion ~]$ sudo usermod --append --groups video <user_name>
Step 4: Creating Scripts and Binding Them to Brightness Up and Down Keys
Now, we will create two simple scripts: one for brightness up and one for brightness down. You can combine them into one script and use flags if you are familiar with shell scripting, but I won't cover that here to keep it simple.
[ajay@legion ~]$ nvim ~/bin/brightness_down.sh#!/bin/bash
# Check the /sys/class/backlight directory to find your backlight (bl) device and use that.
bl_device=/sys/class/backlight/nvidia_wmi_ec_backlight
# Reduce brightness in steps of 20.
newbrightness=$(($(cat $bl_device/brightness)-20))
# Set a minimum brightness of 10 to prevent the screen from going completely dark.
# Ensure the `brightness` file has write permission (use udev)
[[ $newbrightness -le 10 ]] || echo $newbrightness > $bl_device/brightness
# Uncomment it for i3 and i3blocks; similarly, for other minimalist systems
# pkill -SIGRTMIN+1 i3blocks[ajay@legion ~]$ nvim ~/bin/brightness_up.sh#!/bin/bash
# Check the /sys/class/backlight directory to find your backlight (bl) device and use that.
bl_device=/sys/class/backlight/nvidia_wmi_ec_backlight
# Increase brightness in steps of 20.
newbrightness=$(($(cat $bl_device/brightness)+20))
# Get the maximum brightness from the `max_brightness` file.
# Ensure the `brightness` file has write permission (use udev)
[[ $newbrightness -gt $(cat $bl_device/max_brightness) ]] || echo $newbrightness > $bl_device/brightness
# Uncomment it for i3 and i3blocks; similarly, for other minimalist systems
# pkill -SIGRTMIN+1 i3blocksMake these two scripts executable using chmod. Ensure these scripts are in a directory included in the $PATH. If you want to learn more about shell scripts, refer to this article.
Now, bind these scripts to the brightness up and down keys named XF86MonBrightnessUp and XF86MonBrightnessDown, respectively. These are standard names. To find names of other XF86* keys, refer to this page. These keys may not be recognized by a key recognition tool called xev, but they still work.
bindsym XF86MonBrightnessUp exec --no-startup-id brightness_up.sh
bindsym XF86MonBrightnessDown exec --no-startup-id brightness_down.sh
For something other than i3, use your system’s configuration or use sxhkd, or follow this article to bind any shortcut key with any command.
You can take it a step further and add dunst commands in these scripts to create beautiful notifications each time you press the brightness up and down keys.
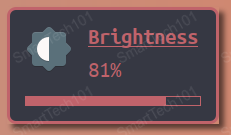
Figure: dunst notification to show brightness on a Linux laptop
You can also create i3blocks to show current brightness in i3 or other minimalistic tiling window managers. Just create a similar script that prints the current brightness level from the file /sys/class/backlight/amdgpu_bl0/brightness and then sends the signal pkill -SIGRTMIN+1 i3blocks to update the brightness reading each time you press the brightness up and down keys.

figure: i3blocks brightness
Method 2: How to Change Screen Brightness Using xbacklight
I could not make xbacklight work on ThinkPad (AMD GPU) and Legion (AMD and Nvidia GPUs) laptops. As of October 16, 2021, according to ArchWiki, it does not support Radeon drivers.
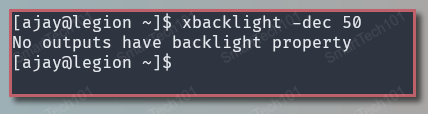
figure: execute any xbacklight command to test if it can change brightness on your linux laptop
So, it is highly likely that xbacklight is intended for older laptops. Nonetheless, you should try it, as it appears to be the simplest method. If any of the commands fail, proceed to the other methods mentioned below.
Installation of xbacklight
Ubuntu/Debian:
sudo apt-get install xbacklightFedora:
sudo dnf install xbacklightCentOS:
sudo yum install xbacklightArch Linux:
sudo pacman -S xorg-xbacklightopenSUSE:
sudo zypper install xbacklightTo decrease the screen brightness, use the following command. Replace <percentage> with the desired brightness level (e.g., 20 for 20%):
xbacklight -dec <percentage>
Example:
xbacklight -dec 20Similarly, to increase the brightness to 20%, run:
xbacklight -inc <percentage>
Now, you need to bind these commands to brightness up and down keys, as mentioned in Method 1.
Method 3: How to change Linux Brightness with ACPI Daemon
In this method, similar to Method 1, backlight files are edited. However, you don't need to set any group or write permissions or create keybindings.
Step 1: Install the ACPI Daemon
Debian/Ubuntu:
sudo apt-get install acpidRed Hat/CentOS:
sudo yum install acpidFedora:
sudo dnf install acpidArch Linux:
sudo pacman -S acpidopenSUSE:
sudo zypper install acpidStep 2: Start/Enable acpid.service
Use systemd:
[ajay@legion ~]$ sudo systemctl start acpid.service
[ajay@legion ~]$ sudo systemctl enable acpid.service
Now, run the acpi_listen command. acpi_listen will print something when you press volume/brightness/WLAN/other keys, power button, close the laptop lid, audio jack plug/unplug, etc. You can use this not just for brightness but also for all these functionalities.
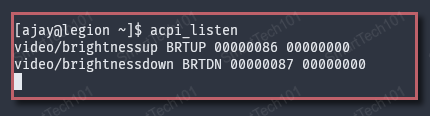
Figure: acpi_listen prints when you press brightness up and down button
Step 3: Creating ACPI Actions and Events
Copy and paste the above two scripts, brightness_down.sh and brightness_up.sh, into the ACPI action directory /etc/acpi/actions/. This defines the actions.
Now, define two events:
- Create a file
brightness_upin the events directory/etc/acpi/events/with exactly the following content:
event=video/brightnessup BRTUP 00000086 00000000
action=/etc/acpi/actions/brightness_up.sh- Similarly, create another file
brightness_downin/etc/acpi/events:
event=video/brightnessdown BRTDN 00000087 00000000
action=/etc/acpi/actions/brightness_down.sh
These events are what are shown in the above figure.
Step 4: Restart ACPI Daemon
Use systemd to restart:
sudo systemctl restart acpid.serviceAlternatively, you can restart your PC.
Here you don't have to bind any key to any script.
Method 4: How to Change Linux Brightness Using xrandr
This method is the simplest of all. It is more like an ad-hoc arrangement and is software-only. Use it if other methods don't work. Prefer hardware control mentioned in other methods.
First, make sure xrandr is installed on your system (use the command which xrandr to confirm).
Now, change brightness using:
[ajay@legion ~]$ xrandr --output <display> --brightness <brightness_level>
Replace <display> with the name of the monitor where brightness will be changed. To find the display names, use the xrandr command:
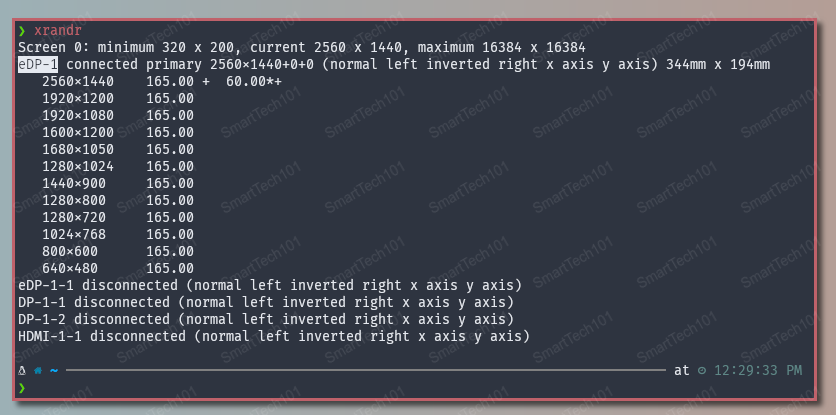
figure: finding monitor's name using xrandr
Replace <brightness_level> with the desired brightness level. 0 means no brightness, and 1 is full brightness.
Example: the following command sets my laptops brightness to half:
xrandr --output eDP-1 --brightness 0.5Now, bind this command to the brightness up and down keys.
Conclusion
In this article, I have discussed four methods to change screen brightness on a Linux laptop. You should try all of them and see which one works best for your system.
Thank you for reading. If you have any questions, comments, or suggestions, please leave them in the comments section below.
To change the battery charging threshold on your laptop, check out this article.