Xcape is an innovative utility that empowers users to harness the untapped capabilities of modifier keys. Often, modifier keys like Windows and Control serve as crucial tools for executing shortcuts and commands when combined with other keys. However, they remain underutilized when pressed individually. Xcape changes the game by enabling users to assign alternative functions to these keys when pressed and released on their own. In my previous article on remapping your keys using xmodmap, I briefly touched upon this concept in the conclusion. Now, let's delve deeper into the remarkable potential of Xcape and how it can enhance your computing experience.
What Are Modifier Keys
Modifier keys are keys that are pressed in conjunction with other keys. For example, Shift, Control, Windows, Alt, etc.
To get a list of modifier keys, use the command xmodmap -pm:
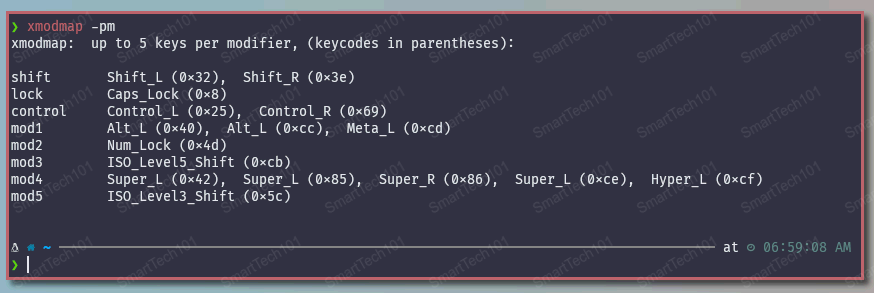
Figure: xmodmap to print modifier keys
Super_L for the left Windows key, Super_R for the right. Similarly, Alt_L and Alt_R, and so on.
If you don't recognize other keys in the above figure, no worries; just don't use them.
Step 1: Installation of Xcape
Arch Linux/Manjaro/other Arch Linux-based distro:
[ajay@legion ~]$ sudo pacman -S xcapeUbuntu/Debian:
[ajay@legion ~]$ sudo apt-get install xcapeFor other distros, install it from their official repo, and if it is not found, build and install xcape using this GitHub page.
Step 2: Configuration
If you are planning to use it with xmodmap (and I recommend that), put all of your xmodmap configuration in a file ~/.config/X11/Xmodmap:
[ajay@legion ~]$ nvim ~/.config/X11/Xmodmap! Create Super_L on the key on which CapsLock is written.
! If you need to interfere with modifier keys, use the clear and add command as given below.
! The modified keys can be obtained using the command "xmodmap -pm".
! The keycodes (the number) and keysyms (the names) can be obtained using "xmodmap -pke".
clear mod4
clear lock
keycode 66 = Super_L NoSymbol Super_L
! I don't need Caps_Lock, so I am just binding it to a non-existent keycode 8.
! Xcape recommends the above.
keycode 8 = Caps_Lock NoSymbol Caps_Lock
add lock = Caps_Lock
add mod4 = Super_L Super_R Super_L Hyper_L
To learn about these xmodmap configuration, look at this article.
Now, create a script remaps.sh in your bin directory. If you want to learn about how to create and use shell scripts, refer to this article.
Its contents are:
# ~/.Xmodmap is executed by gdm, lightdm, xdm
xmodmap ~/.config/X11/Xmodmap
killall xcape 2>/dev/null
# When Super_L is pressed only once, treat it as escape.
xcape -e 'Super_L=Escape'
In the above script, the xmodmap command runs it. The killall xcape command removes any xcape instances if that is running, and the xcape command runs the xcape application. Using the killall along with xcape makes sure that only one instance of xcape runs at a time.
As you see in the above bash script I used the following command:
xcape -e '<key_mapping>'
The flag -e is used to map keys. Use as many mappings as you want seperated by semicolon. For example the following maps left shift to escape and left control to control+o,
xcape -e 'Shift_L=Escape;Control_L=Control_L|O'In the above bash script remaps.sh, ~/.config/X11/Xmodmap maps CapsLock to the Windows (called Left Super) key, and then xcape maps that to Escape in its unique way. It is a beautiful combo for tiling window and Vim users like i3. I want to put my fingers always on the home row on my keyboard (the h-j-k-l row) - so pressing the CapsLock button on the keyboard emulates the escape button, and when it is pressed in conjunction with any other keys like h, it works as Windows + h. Create your amazing combo like this.
-t <timeout ms> If you hold a key longer than this timeout, xcape will not generate a key event (default: 500 ms). Default is good for me.
There are other flags, but I don't find them useful.
Step 3: Running the xmodmap and xcape using ~/.xprofile
Now, you need to include this file in your ~/.xprofile or ~/.profile depending on your system configuration by appending the following line to it:
remaps.shThis will make sure that each time you log into your system, the remaps.sh is executed, and key remapping is applied.
If you update your system, these remappings will be removed. In that case, you will need to log out and log back in to reapply these changes. Or, just execute the script remaps.sh again in your terminal. This is why I have created a dedicated script remaps.sh instead of putting its few lines of code directly in the file ~/.profile.
Way Ahead
Thanks, folks. If you have comments/suggestions/questions, ask them in the comment section below. If you have not configured xmodmap completely or want to learn more about it, look at this article.