GPG is used to encrypt and sign a file. In gpg, we have a key pair. Each key pair has one public and one secret (also known as private) key.
Encryption: Public key is used to encrypt a message/file. Now, to decrypt the encrypted message/file, we need the corresponding private key. For example, Bob encrypts a massage/file meant for Alice using Alice's public key; now Alice can open it using her private key.
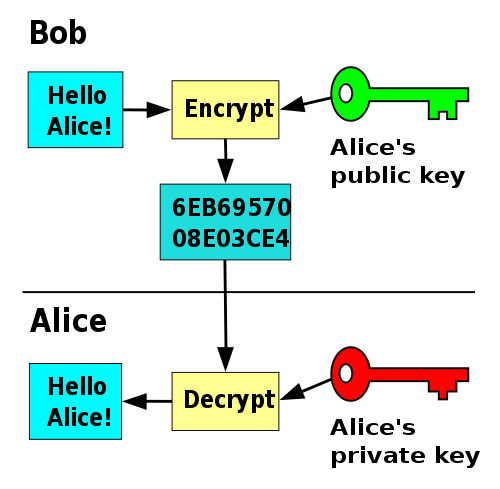
Asymmetric encryption using gpg (source: Wikimedia)
Signature: One can use his/her private key to sign a message/file. Now, another person can use the corresponding public key to verify the massage. For example, Alice signs a message with her private key. Using Alice's public key, Bob can verify that Alice sent the message and that the message has not been modified.
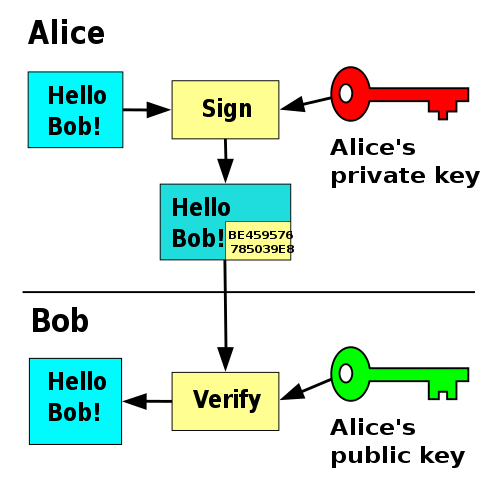
Signature in gpg (source: Wikimedia)
Benefits of GPG
Many Linux distributions are distributed over torrents. They ensure their safety by digitally signing their distribution. You might always notice a *.sig file along with your file *.iso. This *.sig file is used to verify that the *.iso file has not been changed.
Many password managers (ex PASS) use GPG to store your passwords in encrypted forms.
Installation of GPG
Linux
By default, gpg2 is already installed in most Linux distributions. If it is not pre-installed, just install it from your official repository. It is highly likely you will find such a famous package. But if you don't find it there, install it manually. First, download the file(s) GnuPG (LTS) or GnuPG from GPG Download Page.
$ tar jxf <gnupg_tar.bz2>
$ cd <gnupg_tar_dir>
$ ./configure
$ make
$ sudo make install
Windows
Download the installer from the GPG Download page. Run the installer. Add the GPG in Windows' PATH. Now, you can run gpg from Windows CMD.
Or Use Chocolatey:
choco install gnupgIn this article, I will mainly talk about Linux (Unix) based systems. For windows, these commands have not been tested but they should work.
Mac OS
Use Homebrew.
GPG home directory and its configuration
GPG, by default, uses ~/.gnupg for storing its keys and configuration. Or set the environment variable $GNUPGHOME to overwrite the default behavior. Or use --homedir to use your_path instead of ~/.gnupg or $GNUPGHOME.
gpg --homedir <your_path>
By default, GPG uses permissions 700 (rwx------) and 600 (rw-------) on directories and files respectively. If there are other permissions, it warns you, but it does not give any errors.
GPG configuration files
GPG sets its configuration from gpg_home_dir/{gpg.conf,dirmngr.conf,...} and /etc/gnupg/{gpg.conf,dirmngr.conf}. For example, If you use the flags --no-default-keyring --keyring keyring-path with gpg commands all the time, you can just put them in gpg.conf. Now no need to supply these flags anymore.
no-default-keyring
keyring keyring-path
How to create a key pair in gpg
To generate a key pair, use the following command. It will guide you to set up the key.
gpg --full-gen-keygpg (GnuPG) 2.2.41; Copyright (C) 2022 g10 Code GmbH
This is free software: you are free to change and redistribute it.
There is NO WARRANTY, to the extent permitted by law.
Please select what kind of key you want:
(1) RSA and RSA (default)
(2) DSA and Elgamal
(3) DSA (sign only)
(4) RSA (sign only)
(14) Existing key from card
Your selection? 1
RSA keys may be between 1024 and 4096 bits long.
What keysize do you want? (3072) 3072
Requested keysize is 3072 bits
Please specify how long the key should be valid.
0 = key does not expire
<n> = key expires in n days
<n>w = key expires in n weeks
<n>m = key expires in n months
<n>y = key expires in n years
Key is valid for? (0) 3w
Key expires at Sat 01 Apr 2023 06:03:44 PM IST
Is this correct? (y/N) y
GnuPG needs to construct a user ID to identify your key.
Real name: Test12345
Email address: test12345@gmail.com
Comment: just kidding
You selected this USER-ID:
"Test12345 (just kidding) <test12345@gmail.com>"
Change (N)ame, (C)omment, (E)mail or (O)kay/(Q)uit? O
We need to generate a lot of random bytes. It is a good idea to perform
some other action (type on the keyboard, move the mouse, utilize the
disks) during the prime generation; this gives the random number
generator a better chance to gain enough entropy.
We need to generate a lot of random bytes. It is a good idea to perform
some other action (type on the keyboard, move the mouse, utilize the
disks) during the prime generation; this gives the random number
generator a better chance to gain enough entropy.
gpg: revocation certificate stored as '/home/ajay/.gnupg/openpgp-revocs.d/090070A730217F1FAC03E7A5D2571362EB8B21F2.rev'
public and secret key created and signed.
pub rsa3072 2023-03-11 [SC] [expires: 2023-04-01]
090070A730217F1FAC03E7A5D2571362EB8B21F2
uid Test12345 (just kidding) <test12345@gmail.com>
sub rsa3072 2023-03-11 [E] [expires: 2023-04-01]
How to list your keys
To list public keys present in your computer, use --list-keys or --list-public-keys
$ gpg --list-public-keysOutput:
gpg: checking the trustdb
gpg: marginals needed: 3  completes needed: 1  trust model: pgp
gpg: depth: 0  valid:   2  signed:   0  trust: 0-, 0q, 0n, 0m, 0f, 2u
/home/ajay/.gnupg/pubring.kbx
-----------------------------
pub   rsa3072 2023-02-17 [SC]
      03894010F347890A123DF87ABA7C45B7108F0083
uid           [ultimate] Ajay Yadav <xyx1@gmail.com>
sub   rsa3072 2023-02-17 [E]

pub   rsa3072 2023-02-17 [SC]
      91D335983408E555CFDC47D77F192C20064C28D5
uid           [ultimate] unblocked8888 <xyx2@gmail.com>
sub   rsa3072 2023-02-17 [E]
To list secret keys present in your computer, use --list-secret-keys.
$ gpg --list-secret-keysOutput:
/home/ajay/.gnupg/pubring.kbx
-----------------------------
sec   rsa3072 2023-02-17 [SC]
      03894010F347890A123DF87ABA7C45B7108F0083
uid           [ultimate] Ajay Yadav <xyx1@gmail.com>
ssb   rsa3072 2023-02-17 [E]

sec   rsa3072 2023-02-17 [SC]
      91D335983408E555CFDC47D77F192C20064C28D5
uid           [ultimate] unblocked8888 <xyx2@gmail.com>
ssb   rsa3072 2023-02-17 [E]
Abbreviations used in the above outputs:
-
pub: public
-
sec: secret
-
sub or ssb: subordinate keys
-
uid: user id
Note:
-
In the above outputs, there are two keyids (respective fingerprints are underlined). Each keyid has one public, one secret key, and one user id.
-
item in
<>is the email id you had entered in thegpg --full-gen-key -
You can use
--keyid-format <short|long|0xshort|0xlong>to print the keyid as well in the desired format.
$ gpg --list-keys --keyid-format short
/home/ajay/.gnupg/pubring.kbx
-----------------------------
pub   rsa3072/108F0083 2023-02-17 [SC]
      03894010F347890A123DF87ABA7C45B7108F0083
uid         [ultimate] Ajay Yadav <xyx1@gmail.com>
sub   rsa3072/5814BF83 2023-02-17 [E]

$ gpg --list-keys --keyid-format long
/home/ajay/.gnupg/pubring.kbx
-----------------------------
pub   rsa3072/BA7C45B7108F0083 2023-02-17 [SC]
      03894010F347890A123DF87ABA7C45B7108F0083
uid                 [ultimate] Ajay Yadav <xyx1@gmail.com>
sub   rsa3072/79BA29CC5814BF83 2023-02-17 [E]
What are gpg keyid, secret, public, master and subordinate keys, user id, fingerprint, etc?
Observer the following output.
$ gpg --list-public-keys --fingerprint --with-subkey-fingerprints --keyid-format 0xlong
/home/ajay/.gnupg/pubring.kbx
-----------------------------
pub   rsa3072/0x7F192C20064C28D5 2023-02-17 [SC]
      Key fingerprint = 91D3 3598 3408 E555 CFDC  47D7 7F19 2C20 064C 28D5
uid                   [ultimate] unblocked8888 (comment goes into the bracket) <xyx2@gmail.com>
sub   rsa3072/0x459DA250EC6F3071 2023-02-17 [E]
      Key fingerprint = CC16 7002 5FA5 C884 0385  B4E9 459D A250 EC6F 3071
$  gpg --list-secret-keys --fingerprint --with-subkey-fingerprints --keyid-format 0xlong
sec   rsa3072/0x7F192C20064C28D5 2023-02-17 [SC]
      Key fingerprint = 91D3 3598 3408 E555 CFDC  47D7 7F19 2C20 064C 28D5
uid                   [ultimate] unblocked8888 (comment goes into the bracket) <xyx2@gmail.com>
ssb   rsa3072/0x459DA250EC6F3071 2023-02-17 [E]
      Key fingerprint = CC16 7002 5FA5 C884 0385  B4E9 459D A250 EC6F 3071
Here, rsa is the key's type and 3072 is the key's bit length. The values shown in the above output were set by you during the generation of the key using --full-gen-key.
GPG keyid
The first word 0x... is the primary key and the second word 0x... is the subordinate key. 0x tells that the keys are in a hexagonal format. Therefore the keyids are 7F192C20064C28D5 and 459DA250EC6F3071 in the above output.
GPG Public and Secret Keys
The public key has two parts - one master public key and one subordinate public key. The first two lines in the above output are corresponding to the master public key and the bottom two lines are corresponding to the subordinate public key. Similarly, The secret key has two parts - one master secret key and one subordinate secret key.
In this article, I will mainly talk about the master keys.
You should never share your secret keys with anyone. But you can share the public keys with anybody. Therefore, you will easily find the public key from all over the internet.
GPG Fingerprints
There are two fingerprints mentioned in the above output. The first one is for the public master key and the second one is for the public subordinate key. Since you get the public key from the internet, you need to verify your fingerprint as well. For that, you need to contact the key owner directly, or through mail/internet and ask about their fingerprint. And then match with the above command's result.
For corresponding secret keys, they are the same.
Notice some common letters in keyid and fingerprint (for example, 7F192C20064C28D5 and 91D3 3598 3408 E555 CFDC 47D7 7F19 2C20 064C 28D5).
Userid in GPG
unblocked8888 (comment goes into the bracket) <xyx2@gmail.com> is your user-id. During the generation of the key (recall --full-gen-key), you might have used some comment which goes into the bracket.
In any command, you need to use the key identifier:
gpg <your_options> <key-identifier>
Here, <key-identifier> is the key ID, fingerprint, user-id, or part of it, etc. GPG is quite flexible in this regard. ZSH's autocompletion also works here.
How to encrypt a file using gpg
gpg -r xyx@gmail.com -e your_file.txt-r or --recipient is used to specify the user to encrypt. -e or --encrypt is for encryption. Now, a file called your_file.txt.gpg will be generated.
Only the people with a secret key corresponding to the user xyx@gmail.com will be able to open it. But you only need the public key of the user xyx@gmail.com to encrypt the file. Because of involving two different keys, it is called 'asymmetric cryptography'.
How to decrypt a file using gpg
gpg -d your_file.txt.gpg-d or --decrypt is used to decrypt the given file. Please note that you don't need to specify the username here. gpg will pick up that from the *.gpg file. Now you need to input the passphrase corresponding to this user id.
Symmetric encryption in gpg
gpg --symmetric docIt generates doc.gpg. Here, no key pair is needed i.e. even if you have not generated any key using gpg --full-gen-key, you can use this command. It will ask for a passphrase using which this file will be encrypted.
Note: a more robust command:
gpg --symmetric --s2k-cipher-algo AES256 --s2k-digest-algo SHA512 --s2k-count 65536 docHere,
-
It uses the AES256 (default: AES128)
-
"Uses the SHA-512 digest algorithm to mangle the passphrase and generate the encryption key"
-
"Mangles the passphrase for 65536 iterations"
-
To find all of the available options, use
--version.
$ gpg --version
gpg (GnuPG) 2.2.40
libgcrypt 1.10.1-unknown
Copyright (C) 2022 g10 Code GmbH
License GNU GPL-3.0-or-later <https://gnu.org/licenses/gpl.html>
This is free software: you are free to change and redistribute it.
There is NO WARRANTY, to the extent permitted by law.

Home: /home/ajay/.gnupg
Supported algorithms:
Pubkey: RSA, ELG, DSA, ECDH, ECDSA, EDDSA
Cipher: IDEA, 3DES, CAST5, BLOWFISH, AES, AES192, AES256, TWOFISH,
        CAMELLIA128, CAMELLIA192, CAMELLIA256
Hash: SHA1, RIPEMD160, SHA256, SHA384, SHA512, SHA224
Compression: Uncompressed, ZIP, ZLIB, BZIP2
To decrypt doc.gpg, use --decrypt or -d. Input the passphrase you used to encrypt the file. You can decrypt it on another computer. There is no need for a private or public key on that computer. Just use the passphrase.
gpg -d doc.gpgEncrypting/decrypting a directory
Use gpgtar
gpgtar --symmetric --output dir.gpg dirTo decrypt it, use
gpgtar -d dir.gpgHow to export a public key in gpg
To export the public key, use --export flag:
$ gpg --export --output public-key.gpg xyx1@gmail.comNow, you can email it to your friend...
How to import a public key in gpg
To import anyone's public key, you need to have the file public-key file. Contact the person or download it from their website. Then use --import
$ gpg --import public-key.ascNow, when you list the public key, you will have one more key in your list.
$ gpg --list-public-keysgpg: checking the trustdb
gpg: marginals needed: 3 completes needed: 1 trust model: pgp
gpg: depth: 0 valid: 2 signed: 0 trust: 0-, 0q, 0n, 0m, 0f, 2u
/home/ajay/.gnupg/pubring.kbx
-----------------------------
pub rsa3072 2023-02-17 [SC]
03894010F347890A123DF87ABA7C45B7108F0083
uid [ultimate] Ajay Yadav <xyx1@gmail.com>
sub rsa3072 2023-02-17 [E]
pub rsa3072 2023-02-17 [SC]
91D335983408E555CFDC47D77F192C20064C28D5
uid [ultimate] unblocked8888 <xyx2@gmail.com>
sub rsa3072 2023-02-17 [E]
/home/ajay/.gnupg/pubring.kbx
-----------------------------
pub rsa3072 2023-02-16 [SC]
28C1E1C8A559745FA162B7AE83873602785B519E
uid [ultimate] test123 (test) <test@gmail.com>
sub rsa3072 2023-02-16 [E]
Now, you can use gpg -r test@gmail.com -e your_file.text to encrypt it; only the user test@gmail.com will be able to open the encrypted file, not even the user who encrypted it.
What is gpg keyserver
Keyservers are the servers used to distribute public keys. Anybody can upload and download keys from it. Some of them require you to verify your email as well. But be aware that sharing emails might promote spam in your inbox. Some allow you to delete your keys and some don't.
Ex - https://keys.openpgp.org/; https://keys.mailvelope.com/; https://keyserver.ubuntu.com/
Most of the distributions/OSes use a default keyserver (for example, https://162.213.33.9:443 in Arch Linux). But you can use a desired key server instead of the default one using --keyserver
$ gpg --keyserver hkps://keys.openpgp.org/ <further_arguments>
Or, put this in the file ~/.gnupg/dirmngr.conf to use this server as default:
keyserver hkps://keys.openpgp.org/
Import a public key from the keyserver
If you don't have the public key file, you can use the keyserver. In fact, it is the standard method.
Use --search-keys flag to search for a key. You can use uid or a part of it to search for the key.
$ gpg --search-keys <user-id>
For example,
$ gpg --search-keys test
gpg: data source: https://162.213.33.9:443
(1)    test pc <test@rothlin.com>
      2048 bit RSA key A3D3149FC9D7CC40, created: 2009-12-12
(2)      2048 bit RSA key 75C686106C62E780, created: 2015-04-24
(3)    Detlev Grothe (test hat nichts mit pgp schlüssel gemein) <detlev.grot
      1024 bit DSA key DBABBE316E4E75B0, created: 2005-01-30
(4)    test-key (Testing) <info@dldh.hu>
      1024 bit RSA key FF80AA9F73A90A01, created: 2010-09-08
(5)    kjloh (test) <kjloh71@gmail.com>
      1024 bit DSA key 1605D441D52DAF01, created: 2006-08-28
(6)    test <pavlo.shevchuk@vgs.io>
      4096 bit RSA key D9DCE17365815641, created: 2018-10-10
(7)    Parker Gibson (Test RSA Key) <rsa@pgibson.org>
      4096 bit RSA key 2B9ED50EBA8CFA02, created: 2010-12-13
(8)      2048 bit RSA key B00B355090F1BE02, created: 2017-01-28
(9)    filipe motta (teste) <filipemotta@gmail.com>
      1024 bit DSA key F583CD78566B9612, created: 2009-10-03
(10)      2048 bit RSA key DB094661B3D74D32, created: 2018-05-29
(11)      1024 bit DSA key 71751E0256925AB2, created: 2014-11-07
(12)      1024 bit DSA key 2C285BA3F3EFBDB2, created: 2013-10-10
(13)    kiran (test cetrificate) <kiran.sp@gmail.com>
      2048 bit RSA key 826357A9B74F9FF2, created: 2014-12-15
(14)    alice (lab test) <101430613@host.local>
      1024 bit RSA key E5BB325A8412CC13, created: 2011-09-09
Keys 1-14 of 100 for "test".  Enter number(s), N)ext, or Q)uit >
Just enter the corresponding number as given in the output and you are done.
Or, you can directly import the public key without searching for it:
$ gpg --recv-keys key-idBut make sure that you use full key-id (for example, BA7C45B7108F0083 instead of 108F0083) otherwise, you might end up importing other people's keys as well.
How to send keys to the keyserver
Use --send-keys to send keys to the default keyserver.
gpg --send-keys <key-id>
How to import the secret key
The same command gpg --import secret-key.asc also imports the secret key. But you will need the passphrase corresponding to the secret key.
How to export your secret key
$ gpg --export-secret-keys --armor --output private-key.asc <key-identifier>
Unlike --export, it asks for a passphrase; during --import private-key.asc, it again asks for the passphrase.
It is also recommended to put symmetric encryption on private-key.asc so that nobody knows the content of the file (-----BEGIN PGP PRIVATE KEY BLOCK-----...). For more info, see Moving GPG Keys Privately.
By the way, the output file private-key.asc also includes the corresponding public keys as well. So when you import this secret key, the corresponding public key is imported as well.
$ gpg --import private-key.asc
gpg: directory '/home/ajay/.gnupg' created
gpg: keybox '/home/ajay/.gnupg/pubring.kbx' created
gpg: /home/ajay/.gnupg/trustdb.gpg: trustdb created
gpg: key BA7C45B7108F0083: public key "Ajay Yadav <xyx1@gmail.com>" imported
...
...
...
You can also use the packages paperkey and qrencode to export your secret keys in human-readable text format or machine-readable barcode respectively. Now, this can be backed up somewhere safe.
The inclusion of the public key increases the file size. On the other hand, the package paperkey only exports the secret key thus reducing the file size (but I did not notice any significant reduction in the file size).
gpg --export-secret-keys ajay | paperkey > sec-paper.txtHow to backup gpg
You can follow three methods:
-
copy the directory
~/.gnupg: fastest and least secure. -
gpg --export-secret-keys key-identifier --output private-key.gpg: both public and private keys are backed up. -
Secret key using
paperkeyand public key using key-server/google-drive, etc.
But in all of these methods, you need to remember/backup your passphrase separately.
Signatures in GPG
How to create signatures in GPG
gpg --output file.sig --sign fileIt creates a signature; now using the file.sig I can verify if the file has been tempered since it was last signed or not.
Here, file.sig is not encrypted. It is only in the Binary format hence you can just use gpg --decrypt file.sig to read its content (no password will be asked).
The file.sig contains both file as well signature. To get a separate signature, use --detach-sig
gpg --output 10.pdf.sig --detach-sig 10.pdfHere, 10.pdf.sig only contains the signature part. It is most useful in distributing software, operating systems, etc. to verify that they have not been tampered with. On the other hand, if I use --sign, the output 10.pdf.sig will contain both signature as well 10.pdf; opening the pdf from 10.pdf.sig will be difficult.
In the above command, file.sig is in binary format. To get the signature in human-readable format, use --clearsign:
gpg --output file.sig --clearsign fileNote: In all of the above signing commands, the signing key is the 'default key'. If the default key is not set, the first unrevoked key in the output gpg --list-secret-keys will be used as the default key or you can use --default-key <key-identifier> or --local-user <key-identifier> option to supply the key.
Note: You can put encryption on signed documents to bring another level of security.
How to verify a file using GPG
Use --verify to verify the file:
gpg --verify file.sigNow, look for Good or Bad in the output. If it is good, then you are good to go. Otherwise, your file has been modified since it has been created.
If file.sig is created with --detach-sig, you need to put file in the same directory as well, or use full path instead:
gpg --verify file.sig /path/to/fileExample: during the Arch Linux installation, you should verify the signature. First, put the signature file (*.sig) and the iso file in the same directory. Now, use the command:
gpg --keyserver=hkp://pool.sks-keyservers.net --keyserver-options auto-key-retrieve --verify archlinux-2020.08.01-x86_64.iso.sig
Now you will get something like:
...
gpg: Signature made Wed 25 Jan 2023 04:50:45 PM IST
...
gpg: key 7F2D434B9741E8AC: public key "Pierre Schmitz <pierre@archlinux.de>" imported
...
gpg: Good signature from "Pierre Schmitz <pierre@archlinux.org>" [unknown]
...
Primary key fingerprint: 4AA4 767B BC9C 4B1D 18AE  28B7 7F2D 434B 9741 E8AC
In the result, match the above fingerprint with Pierre's fingerprint given on his website (for this example, Arch Developers' website (https://www.archlinux.org/people/developers/) for an additional level of verification.
--keyserver-options auto-key-retrieve will retrieve (import) the required key from the server when needed. You can use this in your configuration file by adding a line keyserver-options auto-key-retrieve.
How to get the printable output from gpg
Use --armor with any of the gpg commands to get the output in ASCII. Ex- keys, encrypted documents, signatures, etc. Otherwise, it is in binary form. For example,
$ gpg --export --armor --output public-key.asc xyx1@gmail.com$ cat public-key.asc
-----BEGIN PGP PUBLIC KEY BLOCK-----
mQGNBGPvj/0BDACXjqDT38XfhOJ1y47RZSwUyK+sLsdn6Hp5bL8kfFfWKgz0w99n
NdkNAKPrm+b3QfPSDNM+bWf6Sz123OAikxFMGszZRagMj2kXhgjYR+vUL+2it0TJ
Yca40xMwbsjmJb/BCRw2gW/q+oMjxLqlvulU9yj0l6dfdfdfdryTAyw+Wsu/J2/6
sKrmIbMoO3/DkobIJ0zke1L6diBMAAKGHjDnO07oUZMRnqZKNlubBL5WMogHeT8K
EoFBJ7PbzQpVaH4to/xhGkYg6p+GW5iCj2E0Q1d+JxXEBwidYfbvqJJkYb05Gp0q
uokVWxQZbna7ererdcxewr563#$asfdMDd8Cdz5OwXPrLJVNxwHlSJQ3PwHi0iaA
E52G3iQIc95U5yAcNg7csDKsKaM9WGsHQpII2jwFG/tk7H2XiAaK+fASsrLRnTih
+qvhRgY785VhWI/MAKvGLIWeD04RRPyuZ+hDyWsbYIoK4V8Kx3lYc1gWuV4xa/uY
/DpRsVNRCRLxfL8AEQEAAbQkQWpheSBZYWRhdiA8eWFkYXZhamF5OTQ1MkBnbWFp
bC5jb20+iQHOBBMBCAA4FiEEA4lAEPNHiQoSPfh6unxFtxCPAIMFAmPvj/0CGwMF
CwkIBdfdfscsxfewIGFQoJCAsCBBYCAwECHgECF4AACgkQunxFtxCPAIMPYQv/Zt
JB5mAViDXJf8mSz3LLpHNUbNtC+fTDd1BY7qro9tW0Nt+VEdUDP8S9NyK22Z6MAG
U/oHbHp4qVOSc5RRn1KBVDKpbuOFuuk/cNBEKTMAd5YnOYBmo9wlxFRWwvdGFafH
LjDxUv3d6m/wj/TSO5RQLGFwuQlXo/zOT2ED9lJP0SZNYosWb/QjZ2WIKfx/uaLb
iZfmR6F6JmvNW6tukao6/QNe4OGdrOBIad0fL0ace5CW3IBEiWZDjD1R/wD/D7o3
l9ieefmsn5ADcA3tE2XLTI2H6lILt3InswLhG0SkLYUh9BC7cgKn5WkhKcvs/Cdk
1ilKYm+WfbWDz7gsmSfudfdfdfdfGSVMViPkTaEIcOQhQ0UuCAsF7+5qLzJKV0fR
Iv5Fsex5vXlyKxLmP+dV9VfXM+J4Xdax0w40G1yHPMv/yUySFJU4FEYdSp7UkpTN
jao7pkfoMyfo2OKx6yQYPTWh0/iKKeky6143Zc4fT5Ylpwb4zLP9uQGNBGPvj/0B
DADXbuWLeUkBJH5ibM4n5sc7bJhBmse0nnsJSu5+cIMgpi1FgZsdfdfdfdNDwfH4
tCeg4JG7nBhCxx4lXppU5VUVOkjiFy4xX/25Sreuh0GSFx0bbK4ecF2lbBGgXidh
8y03ENDsn8hZ48XQIl9ChRdOhk54zWA2MJWL4T1wR21xPWSfLxcVPjHHCDYsVMAO
Cn5SeIeOxp1YqT8w9qPHCSVPM8B8rVxNMed+1kbS6ztO1HTVXZkp2frb3fmVeX84
Fmmz510CPZ7OX1Snb1GB1MxcrBBM7MyNUufiBQs+xd1uO/VTQTV4M4JIqdvn/Ja+
lQAGo9eb974evCpOoQ6gxOFm4b7IOGupfJmilshp69QCRYwhoix/5LtsNPNOOxQF
qKQ6CsLsyhXMrPpXS7z/IGXMTdfYNwZJMy6rulcACne94tG/q6MF4gzbVeLoCFS8
gTU/Er5rSdbBn3qGxtsTlo3JZi0U62cElrmRTKj/lhXqsb6b01THKtoKWlFyM0hT
/c0AEQEAAYkBtgQYAQgAIBYhBAOJQBDzR4kKEj34erp8RbcQjwCDBQJj74/9AhsM
AAoJELp8RbcQjwCDY20L/3svQ8nG2gwXkRgWdqEiswzgJoFd+LwR1mg1ArPhELCB
P3Rmd9Oe8nwYMqE6vWvq6MLMM1EIHKhCkvzZiM4rjAIAztDT1PgoFrc21PehHK62
ew4G+d0yHbiTGG4uX2tjzsgtVhB5VdKPQRFeD1V/0vcd/Ym3DEPRdu3+WYt/h6px
Gf8gAhdjCM6VP6c7mDS2CbS9MpM6cQsLB85j8fpqzGUe81PY0imW1hoZRTOu+yka
R3VJM3YBV+QECLrGmiAtrmozkXeotVk74Ecfw32l7rIHAQgcb/9KbjIrVSF+gyZt
15drAph+F6EwR3zg67HVYtrK4i3vqDLZOKiEEUblXIDAHql/fEsan36C9mPJMJ8l
Bmrcifl+w0AwVbcTFZ5FbSjLHWpJc5ZX1+gh/H5B68rgpBcL7GobFalCafT2Vj7d
lIHO639i2tMOuLPaLasijsNFbvWHcklFvgXFGxyZtN+MR2knQBmHnyeiood42rZg
EAgtEFzX7sZhTbjPkV0HnQ==
=MV80
-----END PGP PUBLIC KEY BLOCK-----$ gpg --export --output public-key.gpg xyx1@gmail.com��c��
������߄�uˎ�e,ȯ�.�g�zyl�$|W�*
����A�� ���g5�
�>mg�K=v��"�L���E�
�i�G��/���D�aƸ�0n��%�� 6�o���#ĺ���T�(����L
��k.�����
�G|���!�(;��'L�{R�v L�0�;N�Q���J6[��V2�y?
�A'���
Uh~-��a�F Ᶎ[���a4CW~'�a�晴da�9��*���J$UlPe���h�\���'s��>��T�pT�Cs�-"h�������s�T� 6ܰ2�)�=XkB�<d�}�������ѝ8����F;�aX����,��ND��g�C�k�
�_
�yXsX�^1k���:Q�SQ �|��$Ajay Yadav <xyx1@gmail.com>�8!�@�G�
=�z�|E���c��
...
...
Revocation Certificates in GPG
What are revocation certificates
Revocation certificates are used to revoke a key when it is ever lost or compromised. Revocation certificates are absolutely necessary. Create one and store it somewhere safe such as your safe deposit box. Prefer revocation to deletion of a key whenever your key is lost because the revoked key can still be used to decrypt and verify old data (files and signatures).
Creations of revocation certificates
$ gpg --gen-revoke --armor --output revcert.asc <key-identifier>
However, revocation certificates are automatically generated for newly generated keys. Their filename's format is fingerprint.rev.
$ ls -1 /home/ajay/.gnupg/openpgp-revocs.d

03894010F347890A123DF87ABA7C45B7108F0083.rev
91D335983408E555CFDC47D77F192C20064C28D5.rev
These are text files. You need to remove the extra colon in :-----BEGIN PGP PUBLIC KEY BLOCK----- from the file before using it. See the file for more info.
[ajay@legion ~]$ cat '/home/ajay/.gnupg/openpgp-revocs.d/91D335983408E555CFDC47D77F192C20064C28D5.rev'
This is a revocation certificate for the OpenPGP key:

pub   rsa3072 2023-02-17 [S]
      91D335983408E555CFDC47D77F192C20064C28D5
uid          unblocked8888 <xyx2@gmail.com>

A revocation certificate is a kind of "kill switch" to publicly
declare that a key shall not anymore be used.  It is not possible
to retract such a revocation certificate once it has been published.

Use it to revoke this key in case of a compromise or loss of
the secret key.  However, if the secret key is still accessible,
it is better to generate a new revocation certificate and give
a reason for the revocation.  For details see the description of
of the gpg command "--generate-revocation" in the GnuPG manual.

To avoid an accidental use of this file, a colon has been inserted
before the 5 dashes below.  Remove this colon with a text editor
before importing and publishing this revocation certificate.

:-----BEGIN PGP PUBLIC KEY BLOCK-----
Comment: This is a revocation certificate

iQG2BCABCAAgFiEEkdM1mDQI5VXP3EfXfxksIAZMKNUFAmPvkDkCHQAACgkQfxks
IAZMKNXungv+PaZMvDVQ1FSL5i1m3YJAlXT9WKHJ9KxpzzzQlkUDM7Et/E1/HVGI
XIsMk+1ZREZIrULMm9wi0etoRrKZsvPrEy6cdd9WqZpf/NqDC5GIVfmHsvvct47v
by5d6ekxddfdsfaeccxeedfsrgYUyhehemncdvErkQSdcrUMjP8AQW+tpdRmBjxR
+jjHSmwKpFpcA2siXDasOZ6akgsIR2LrfghjjjkhjtrfvhS6IK4md580jy9urOJO
mmSedE/Ktq1g3upEoBlDREAnIk9fwaMK6NAQ3QsP0CR8achnoKjTFmK0CppCgQoz
E6XaNEFyudUQdhHIaddfebK+t/mu+Ddu0y0DL3q3w/tAN7NdHdqeKT9CR2E395oD
osoxeVfKFSpSHxBIz/69WYjeoT6cNQkL/fO4VMMjhghjfhgde323434iL5Devvxj
nrzJ21GyBfcPxLp/8YJHG757dRDheAoOXOzLeAf4Wu3a3y0NDiyjrpBN5vEGeObP
J6Z71XXBfME5
=oJD2
-----END PGP PUBLIC KEY BLOCK-----
Revocation of a key
To revoke a key, first, make sure that the public key is accessible from the computer. Now, use
gpg --import revcert.ascNow, you can see the revoked word in the list of your secret and public keys:
$ gpg --list-secret-keys
/home/ajay/.gnupg/pubring.kbx
-----------------------------
sec   rsa3072 2023-02-17 [SC] [revoked: 2023-02-21]
      03894010F347890A123DF87ABA7C45B7108F0083
uid           [ revoked] Ajay Yadav <xyx1@gmail.com>

sec   rsa3072 2023-02-17 [SC]
      91D335983408E555CFDC47D77F192C20064C28D5
uid           [ultimate] unblocked8888 <xyx2@gmail.com>
ssb   rsa3072 2023-02-17 [E]

$ gpg --list-public-keys
/home/ajay/.gnupg/pubring.kbx
-----------------------------
pub   rsa3072 2023-02-17 [SC] [revoked: 2023-02-21]
      03894010F347890A123DF87ABA7C45B7108F0083
uid           [ revoked] Ajay Yadav <xyx1@gmail.com>

pub   rsa3072 2023-02-17 [SC]
      91D335983408E555CFDC47D77F192C20064C28D5
uid           [ultimate] unblocked8888 <xyx2@gmail.com>
sub   rsa3072 2023-02-17 [E]
After revoking a public key, please send it to the keyserver and your communication partner.
Changing expiration date, passphrase, etc. in gpg
Use --edit-key
gpg --edit-key <key-identifier>
Type help to see the manual.
...
gpg> help
...
> passwd       # change the passphrase
> revkey       # revoke a key
> addkey       # add a subkey to this key
> expire       # change the key expiration time
...
...
You can change the expiration date of the key after it has expired using the --edit-key.
Conclusion
That was a basic introduction. To learn more, read the man page (man gpg). This gpg manual is a little bit old but explains cryptography etc. quite well. You can also use gpa, gpg-crypter, and gpg-tui if you fill uncomfortable with commands. If there is any mistake. Just tell me using the comment section.