In this article, I will talk about how to configure dunst in Linux - colors, paddings, frame, timeout, progressbar, separator, font, markup (bold, underline, etc.), text alignment, icon alignment, icons, mouse settings, etc. There will be lots of examples and images to illustrate my point. I will use simple language and hope in the end you will have a pretty-looking notifications in your computer.
Installation
# Debian
apt-get install dunst
# Ubuntu
apt-get install dunst
# Alpine
apk add dunst
# Arch Linux
pacman -S dunst
# Kali Linux
apt-get install dunst
# Fedora
dnf install dunst
# Windows (WSL2)
sudo apt-get update sudo apt-get install dunst
Run dunst:
dunstHow I have configured dunst
Here is the configuration I am using on my PC. It is based on Nord Color Scheme. Its effect is what is shown above in the title image.
# My PC: 1440p at 15.6 inch
[global]
    follow = keyboard
    width = (0, 1500)
    height = 950
    origin = top-right
    offset = 48x60
    scale = 0
    notification_limit = 10
    progress_bar = true
    progress_bar_height = 10
    progress_bar_frame_width = 1
    progress_bar_min_width = 150
    progress_bar_max_width = 300
    progress_bar_corner_radius = 0
    icon_corner_radius = 0
    indicate_hidden = yes
    transparency = 5
    separator_height = 2
    padding = 15
    horizontal_padding = 15
    text_icon_padding = 0
    frame_width = 3
    frame_color = "#aaaaaa"
    gap_size = 0
    separator_color = frame
    sort = yes
    idle_threshold = 120
    font = UbuntuMono Nerd Font Mono 17
    line_height = 10
    markup = full
    format = "<b><u>%s</u></b>\n%b\n"
    alignment = left
    vertical_alignment = top
    show_age_threshold = 60
    word_wrap = no
    ellipsize = end
    ignore_newline = no
    stack_duplicates = true
    hide_duplicate_count = false
    show_indicators = yes
    enable_recursive_icon_lookup = true
    icon_theme = "breeze-dark, Papirus-Dark"
    icon_position = left
    min_icon_size = 48
    max_icon_size = 128
    icon_path = /usr/share/icons/gnome/16x16/status/:/usr/share/icons/gnome/16x16/devices/
    sticky_history = yes
    history_length = 50
    dmenu = /usr/bin/dmenu -i -fn Ubuntu-18 -l 30 -p dunst:
    browser = qutebrowser
    always_run_script = true
    title = Dunst
    class = Dunst
    corner_radius = 9
    ignore_dbusclose = false
    force_xwayland = false
    force_xinerama = false
    mouse_left_click = close_current
    mouse_middle_click = do_action, close_current
    mouse_right_click = close_all

[experimental]
    per_monitor_dpi = false

[urgency_low]
    background = "#E5E9F0"
    foreground = "#2E3440"
    frame_color = "#2E3440"
    timeout = 10

[urgency_normal]
    background = "#2E3440"
    foreground = "#BF616A"
    frame_color = "#BF616A"
    highlight = "#BF616A"
    timeout = 10

[urgency_critical]
    background = "#ffffff"
    foreground = "#900000"
    frame_color = "#900000"
    timeout = 0
Now, I am going to modify these configurations one by one and show the difference they make.
Before you begin
Dunst is configured using the file ~/.config/dunst/dunstrc at the user level. And if you are configuring it for all the users on your computer, do it in /etc/dunst/dunstrc.
Restart dunst each time you change any configuration value. For this, execute the command killall dunst && dunst from your terminal.
In this configuration, all dimensional units are in pixels. Here, sometimes, I will take very large values just to show you the effects. You need to set them accordingly.
Comments in dunstrc begin with a hash (#) and ignored.
Dunst's configuration is divided into segments (global, experimental, urgency_low, etc.). Each segment begins with a square bracket (ex - [global]). Under each segment, each configuration is prepended with a tab.
[global]
    <global segment>
[experimental]
    <experimental>
[urgency_low]
    <urgency_low>
[urgency_normal]
    <urgency_normal>
[urgency_critical]
    <urgency_critical>
[...]
Display Related Configuration
How to set the monitor on which the notifications will be displayed
This option decides which monitor should the notifications be displayed on. This option is used when there are more than one monitor connected to your computer.
monitor = 0How to make notifications follow keyboard/mouse
This option decides how to display notifications on the focused monitor. Possible options are: mouse, keyboard, and none.
-
mouse: notifications will follow the mouse pointer, i.e., they will move to the monitor on which your mouse pointer is located. -
keyboard: notifications will follow the window with keyboard focus. This requires a window manager that exports the_NET_ACTIVE_WINDOWproperty. Most modern window managers support this, so you don't have to worry about it. -
none: notifications won't follow anything.
If this option is set to mouse or keyboard, the monitor option set above will be ignored.
follow = keyboardGeometry in dunst configuration
Width of notification
For constant width of 1500 (all notifications will have a constant width of 1500), set the following:
width = 1500For dynamic width from 0 to 1500 (all notifications' width will be between 0 and 1500 depending upon the notification's content):
width = (0, 1500)Height of notification
This option decides the maximum height of a single notification, excluding the frame.
Please note that 'frame' of any entity is what 'surrounds' it. This term will be used for the notification-window and progress bar.
Set it to some very large value. When less height is needed, dunst will use that.
height = 1000Position the notification in the top right corner
Other options:
-
top-left
-
top-center
-
bottom-left
-
bottom-center
-
bottom-right
-
left-center
-
center
-
right-center
origin = top-rightOffset from the origin
It should be written in the format of XxY where X is the horizontal offset and Y is the vertical offset
offset = 48x60Scale factor for HiDPI screens
This should be an Integer. It is auto-detected if the value is 0.
scale = 0Maximum number of notifications shown at a time
Let's say some program is bombarding your screen with a lot of notifications. If it is set to 10, only 10 of these will be shown at a time by the given configuration. Rest will be shown only after the oldest ones time out (non-critical messages time out).
Message: timeout is set below.
Its default value is 20.
Set it to 0 for no limit.
notification_limit = 10Progress bar in dunst configuration
This option turns on the progress bar. It appears when a progress hint is passed with, for example, dunstify -h int:value:12
progress_bar = trueProgress bar height
progress_bar_height = 10Progress Bar Frame Width
It should be less than half of the progress bar height.
progress_bar_frame_width = 1Minimum Width of the progress bar
progress_bar_min_width = 150Maximum width of the progress bar
progress_bar_max_width = 300progress bar corner radius
Set it to 0 to disable it.
progress_bar_corner_radius = 0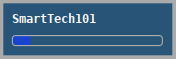
Text
Notification Font
If you want to see tables in your notification use mono fonts like UbuntuMono Nerd Font Mono. After the font name, you need to append the font size.
You can use fc-list command to find the list of installed fonts.
font = UbuntuMono Nerd Font Mono 17[ajay@legion ~]$ fc-list | grep Mono
/usr/share/fonts/gsfonts/NimbusMonoPS-BoldItalic.otf: Nimbus Mono PS:style=Bold Italic
/usr/share/fonts/liberation/LiberationMono-Bold.ttf: Liberation Mono:style=Bold
/home/ajay/.local/share/fonts/Ubuntu Mono Bold Nerd Font Complete Mono.ttf: UbuntuMono Nerd Font Mono:style=Bold
/home/ajay/.local/share/fonts/Roboto Mono Nerd Font Complete.ttf: RobotoMono Nerd Font:style=Regular
/usr/share/fonts/TTF/DejaVuSansMono.ttf: DejaVu Sans Mono:style=Book
/usr/share/fonts/gsfonts/NimbusMonoPS-Regular.otf: Nimbus Mono PS:style=Regular
/home/ajay/.local/share/fonts/Ubuntu Mono Nerd Font Complete Mono.ttf: UbuntuMono Nerd Font Mono:style=Regular
/usr/share/fonts/liberation/LiberationMono-Italic.ttf: Liberation Mono:style=Italic
/home/ajay/.local/share/fonts/ComicMono-Bold.ttf: Comic Mono:style=Bold
/home/ajay/.local/share/fonts/Droid Sans Mono Nerd Font Complete Mono.otf: DroidSansMono Nerd Font Mono:style=Book
/usr/share/fonts/gsfonts/NimbusMonoPS-Bold.otf: Nimbus Mono PS:style=Bold
/usr/share/fonts/TTF/DejaVuSansMono-Oblique.ttf: DejaVu Sans Mono:style=Oblique
/home/ajay/.local/share/fonts/DejaVu Sans Mono Nerd Font Complete.ttf: DejaVuSansMono Nerd Font:style=Book
/usr/share/fonts/liberation/LiberationMono-Regular.ttf: Liberation Mono:style=Regular
/home/ajay/.local/share/fonts/Fura Mono Regular Nerd Font Complete Mono Windows Compatible.otf: FuraMono NF:style=Regular
/usr/share/fonts/gsfonts/NimbusMonoPS-Italic.otf: Nimbus Mono PS:style=Italic
/usr/share/fonts/TTF/DejaVuSansMono-Bold.ttf: DejaVu Sans Mono:style=Bold
/usr/share/fonts/liberation/LiberationMono-BoldItalic.ttf: Liberation Mono:style=Bold Italic
/home/ajay/.local/share/fonts/fantasque_sans_mono.ttf: Fantasque Sans Mono:style=Regular
/usr/share/fonts/TTF/DejaVuSansMono-BoldOblique.ttf: DejaVu Sans Mono:style=Bold Oblique
/home/ajay/.local/share/fonts/ComicMono.ttf: Comic Mono:style=Normal
Mono Font
Non-Mono (Calibri) Font
Line Height in Notification
line_height is used to set the height between lines. If it is smaller than the font's height, it will get raised to the font height.
line_height = 100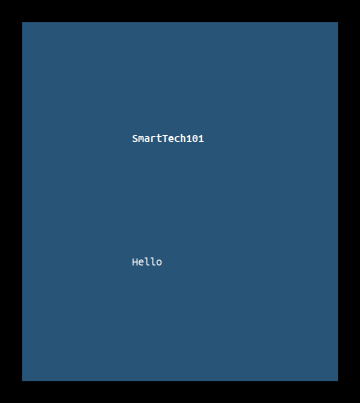
Bold, Italic, Underline, etc. in Notification
You can use one of the three options - full, strip, no.
full: accepts the many markups in your notification command. Some of these are:
<b>bold</b>
<i>italic</i>
<s>strikethrough</s>
<sub>subscript</sub>
<u>underline</u>
More such pango markups are given in this gtk documents - https://docs.gtk.org/Pango/pango_markup.html.
strip: Here, dunst "tries" its best to remove all the markups. It is for compatibility purposes. Use this option as your last recourse. You will only get the plain text of the notification - no bold, no italic, nothing.
no: Disable markup parsing, incoming notifications will be printed as they are.
Try executing the command dunstify SmartTech101 "A <s>great</s> blog about smart technologies." You will see the strikethrough.
markup = full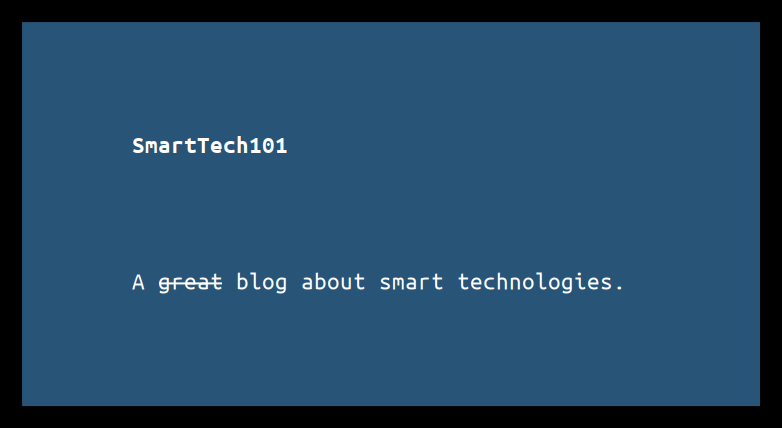
Notification Format
It is used to set the format of the message.
Possible variables are:
%a appname
%s summary
%b body
%i iconname (including its path)
%I iconname (without its path)
%p progress value if set ([ 0%] to [100%]) or nothing
%n progress value if set without any extra characters
%% Literal %
Please make sure that markup is allowed by setting the option markup to full.
For example, in the command dunstify SmartTech101 Hello, SmartTech101 is %s and Hello is %b. So, you get the following result.
Icons, appname, summary, etc. are located at their default position if you don't set them up using the format variable.
format = "<b>%s</b>\n%b"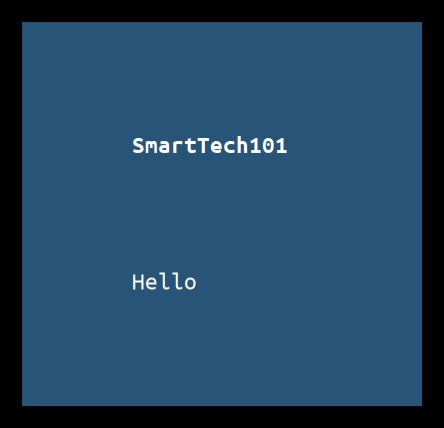
Alignment of message text
Alignment of message text. Choose one of "left", "center" and "right". For Arabic texts, use right.
alignment = leftShow the age of the message
Set it to -1 to disable it. For messages older than this time, the age will be written in the notification in brackets.
show_age_threshold = 60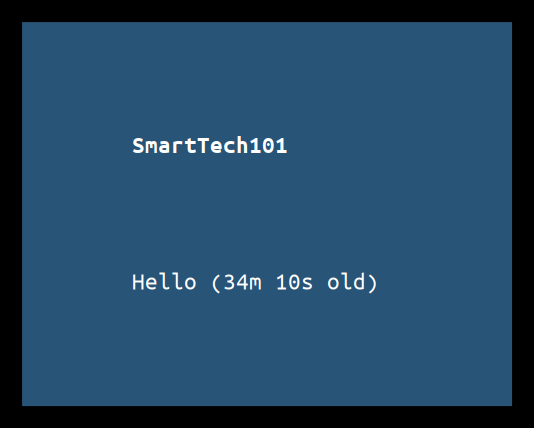
Wrap the lines
Wrap the lines i.e. show them in multiple lines if they don't fit into the notification window.
word_wrap = yesHandling long lines in Notification
When there are very long sentences in the notification and you have set word_wrap option to no, you need to ellipsize the text. End value puts three dots in the end. Similarly, start and middle put three dots at the start and in the middle.
ellipsize = end
Ignore New Lines in Notification
To ignore newlines (\n), set the option ignore_newline to yes. But no is the most sane option so use that.
ignore_newline = noDuplicate Notifications
Stack duplicate notifications
In order to stack duplication notifications, you need to set stack_duplicates to true. So, for example, if you run dunstify SmartTech101 Hello in quick succession five times, you will be shown only one notification.
stack_duplicates = true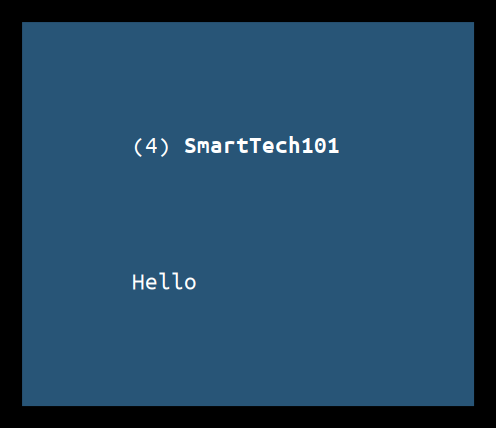
Hide Duplicate Count
The option hide_duplicate_count is in continuation to the stack_duplicates option. If it is set to false, a duplicate count will also be shown in the notification. For the above example, the remaining number of duplicate notifications will be written in a bracket.
hide_duplicate_count = falseShow indicators for URLs (U) and actions (A)
It means if your notification has URLs or actions, (U) and(A) will be prepended in the notification. For example, if you run the command:
[ajay@legion ~]$ dunstify SmartTech101 www.SmartTech101.comYou will see the following image. Now, pressing certain keys (in my system, ctrl + dot) will let you open the URLs, or take certain actions. For more about this, look over here.
show_indicators = yes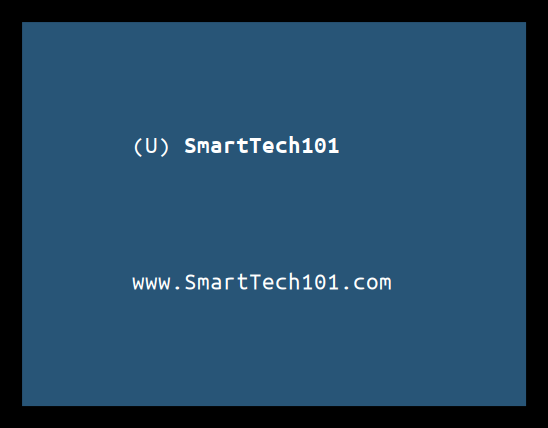
Icons
Recursive icon lookup
By setting enable_recursive_icon_lookup to true, you only need to put icon_theme name (for example, Adwaita) given below. Now, Dunst will search into the directories (for example, /usr/share/icons/Adwaita) recursively for the icon name supplied with dunstify --icon. In earlier versions of dunst, I had to put all the paths under icon_path (given below) I wanted - this was tiresome.
enable_recursive_icon_lookup = trueSet icon theme (works for enable_recursive_icon_lookup)
Currently, I have set it up to breeze-dark and Papirus-Dark. Install them using your distribution's package manager or follow the instructions given over here - Papirus-Icon-Theme. Similarly, install breeze icons.
For example - the command
dunstify --icon=alarm-clock SmartTech101makes dunst look for alarm-clock first in the /usr/share/icons/breeze-dark/ and then in the /usr/share/icons/Papirus/. It finds alarm-clock.svg in the second directory (/usr/share/icons/Papirus/64x64/apps/alarm-clock.svg). I recommend you install the Papirus-Dark icons since it includes the vast majority of icons. So, no matter what application send a notification, you might always get the pretty icons.
icon_theme = "breeze-dark, Papirus-Dark"![]()
Align icons left/right/top/off
I have set it to left as is visible in the above image.
icon_position = leftMinimum Icon Size
The min_icon_size scales small icons up to this size. It is quite useful if your screen has a very high resolution or the image is tiny. In that case, the image is scaled up to this size. Or, you can disable it altogether by setting it to zero.
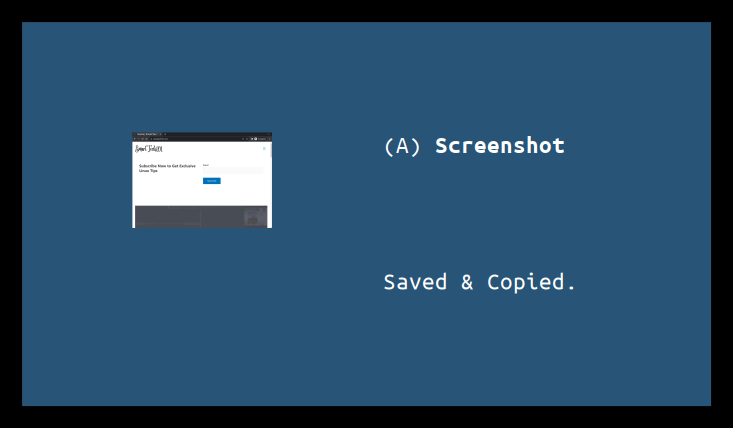
min_icon_size = 32Maximum Icon Size
The max_icon_size scales larger icons down to this size. It is quite useful when you take a screenshot and want to put that screenshot into dunstify notification - otherwise, the screenshot increases the size a lot. Set it to 0 to disable it. It should be larger than min_icon_size as is obvious. If you set it to something less than min_icon_size, min_icon_size will be ignored.
max_icon_size = 128![]()
Icon's Path
The icon_path is used to set individual paths to search for the icons. It is unnecessary if you have setup icon_theme properly.
icon_path = /usr/share/icons/gnome/16x16/status/:/usr/share/icons/gnome/16x16/devices/Corner radius for the icon image
Icon images in dunst are passed using dunstify --icon=<image>. To set the corner radius of these images, set the following option:
icon_corner_radius = 5![]()
Older Notifications in Dunst
Make older notifications stay on your screen
The option stick_history makes the notification pop up from the history stay on your screen. Generally, all the notifications disappear after a certain time. But you can see the very old notifications using a special shortcut (in my system, I have set it by mapping dunstctl history-pop to ctrl+grave). And if you have configured stick_history to yes, these old notifications stay on your screen until you click on them. In my dunstify article, I have talked about how to map dunstctl history-pop.
sticky_history = yesThe maximum number of notifications kept in history
You cannot call notifications more than the "history_length" using the dunstctl history-pop.
history_length = 20Notification Looks - frame, separator, padding, colors, transparency, padding, corners
Separator Height
It draws a line of "separator_height" pixel height between two notifications. Set it to 0 to disable it.
separator_height = 10
Vertical Padding
Vertical distance between text and separator:
padding = 100
Horizontal Padding
Horizontal distance between text and frame:
horizontal_padding = 100
Padding between text and icon
This decides distance between the text and icon.
text_icon_padding = 100![]()
The transparency of the notification window
Its Range: [0; 100].
This option will only work if a compositing window manager is present (e.g. picom, xcompmgr, compiz, etc.). (X11 only). Personally, I use picom and it works fine.
transparency = 10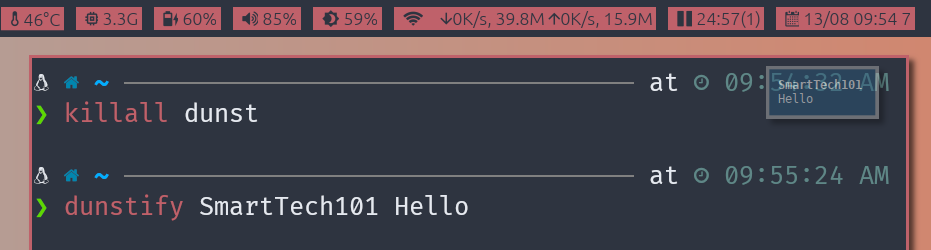
Separator color
Possible values are:
-
auto: dunst tries to find a color fitting to the background;
-
foreground: use the same color as the foreground;
-
frame: use the same color as the frame;
-
anything else will be interpreted as an X color.
separator_color = frameFrame Color
It sets the color of the frame around the notification window:
For the black frame color, set it to #000000.
Or uncomment it here and set it for low, normal, and critical urgency given below.
frame_color = "#000000"
Frame Width
It defines the width in pixels of the frame around the notification window:
Set it to 0 to disable it.
frame_width = 20
Frame Corners
This option defines the corner radius of the notification window. Set it to 0 to disable it. The corner radius will be automatically lowered if it clips text and/or icons.
corner_radius = 15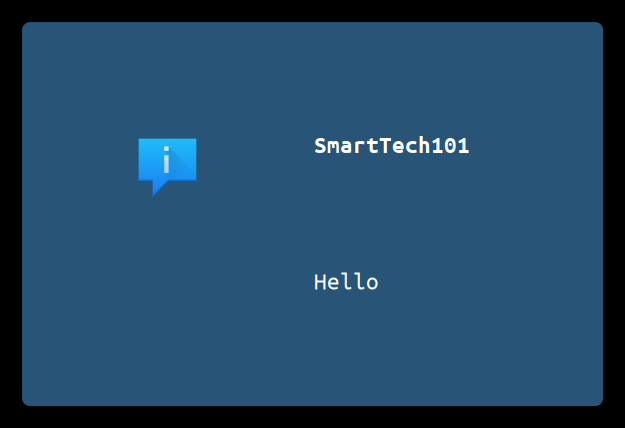
Sort messages by urgency
The option sort, if set to true sorts messages by their urgency. At the top, critical messages will be shown, then normal, and then low.
sort = yes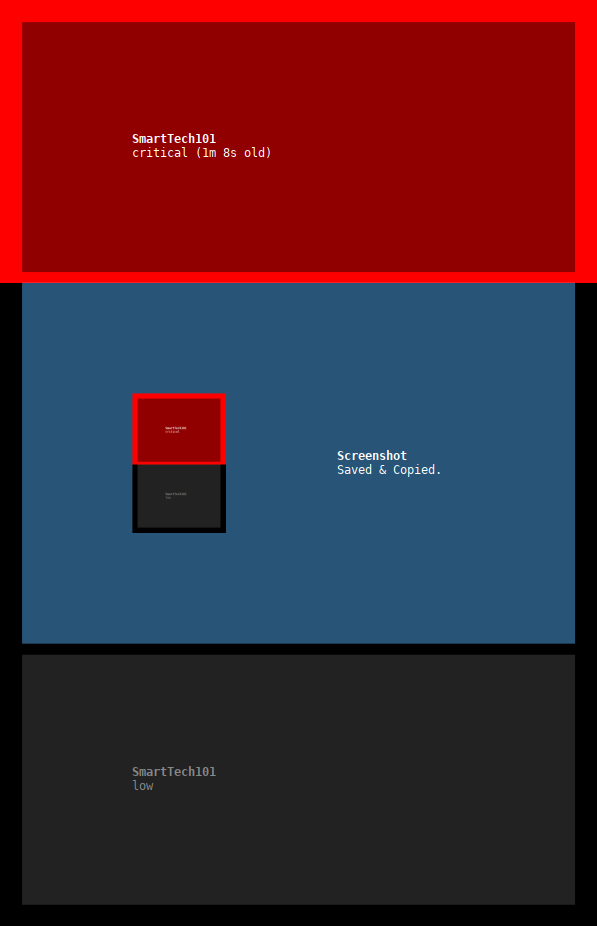
Indicate the number of hidden messages
It shows how many messages are currently hidden (because of the option notification_limit).
Example: for notification_limit = 10, if there are currently 13 notifications, 9 notifications will be shown, and 1 notification will be used up to indicate that 4 notifications are currently hidden.
indicate_hidden = yes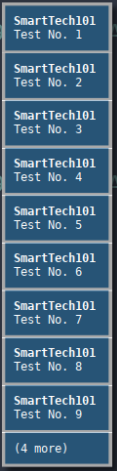
Notifications to become sticky if you are idle for more than this time
By default, notifications are removed from your screen after some time. This is expected behavior (happens in Windows OS too). If you are idle i.e. don't use the mouse and keyboard for times longer than this, the notifications appearing after this time will not be removed at all. This is extremely useful, for example, when you are away from your screen for more than this time. This feature is not available in Windows OS. This is what makes Linux better than Windows - the customizability. You can test it out on your own. Set it to 10, execute the command sleep 11s && dunstify SmartTech101 Hello and don't touch the mouse and keyboard - you will see that notifications will stay on your screen forever.
Set This option to 0 to disable it.
idle_threshold = 10Use dmenu/rofi/fzf to choose actions on notifications
Recall: Above I talked about (A) indicating actions in dmenu. I will talk more about this in my upcoming article. Just know that if you press a special shortcut (mapped to dunstctl context, or press middle click on the notification as configured below), a dmenu appears. Now, you can choose the action you want to take. For example, in my system, whenever, I take a screenshot, I can choose from 1) delete the screenshot, 2) reduce the size of the screenshot, or 3) open the image.
Set the right font and font size and other options you want to pass to the dmenu. To learn more about dmenu, look at this article.
dmenu = /usr/bin/dmenu -i -fn Ubuntu-18 -l 30 -p dunst:I personally use dmenu. But I believe you can also use Rofi in a similar fashion. For fzf, you will need to pass a terminal emulator as well.
Browser for opening URLs in the context menu
Also recall when there are URL(s) in the notification, you get to open them by pressing dunstctl context. You will be given a list of URL(s) to choose from using dmenu. Hitting enter button will open them with the following browser application. You can set it to /usr/bin/firefox or anything you like.
browser = /usr/bin/google-chrome-stableTitle and Class of the Notification Windows
By setting the right title, and class you can execute various commands using your window managers (for example, in the i3 tiling window manager, using for_window [class="dunst" title="dunst"] move to workspace $ws1).
To define the title, use the option title and for class, use the option class.
title = Dunstclass = DunstYou can check the title and class of the notification window, using xprop. Here is a sample output:
[ajay@legion ~]$ xpropOutput:
# _NET_WM_WINDOW_OPACITY(CARDINAL) = 3865470480
# _NET_WM_STATE(ATOM) = _NET_WM_STATE_ABOVE
# _NET_WM_WINDOW_TYPE(ATOM) = _NET_WM_WINDOW_TYPE_NOTIFICATION, _NET_WM_WINDOW_TYPE_UTILITY
# WM_CLASS(STRING) = "Dunst", "Dunst"
# _NET_WM_NAME(UTF8_STRING) = "Dunst"
# WM_NAME(STRING) = "Dunst"
Force your timeout settings over those of the applications
Sometimes, some applications automatically close the notification much before the timeout configured by you. They do so send dbus closeNotification message. You can set ignore_dbusclose to true to force your timeout settings over the applications. You can set your timeout settings using the option timeout as given below (coming soon).
ignore_dbusclose = falseMouse Configuration in Dunst
Under this heading, I will talk about how you can define a list of actions for left, right, and middle mouse clicks.
Possible values are:
-
none: Don't do anything.
-
do_action: Invoke the action determined by the action_name rule. If there is no such action, open the context menu (dmenu). This runs
dunstctl context. -
open_url: If the notification has exactly one URL, open it. If there are multiple ones, open the context menu (dmenu) to select one.
-
close_current: Close current notification (only one notification not all.)
-
close_all: Close all notifications in the notification window.
-
context: Open the context menu (dmenu) for the notification.
-
context_all: Open the context menu for all notifications.
These values can be strung together for each mouse event and will be executed in sequence.
mouse_left_click = close_current
mouse_middle_click = do_action, close_current
mouse_right_click = close_all
Wayland Support in Dunst
Ignore this if you use X11.
The above settings were for both X11 and Wayland Display Servers. But the Wayland one requires some additional settings. These settings do not affect X11. The layer option let you choose whether you want your notification to appear under the fullscreen or not. Use this if you want to let notifications appear under fullscreen applications (default: overlay).
layer = topSet the following option to true to use X11 output on Wayland.
force_xwayland = falseDunst on a very old PC
By default, Dunst automatically detects if an extra monitor is connected to your PC. Then it moves notifications to the required monitor as configured by you in the above options. If you have a modern PC, then set the option force_xinerama to false. But for a very old PC with NVidia drivers, set it to true, use Xinerama instead of RandR.
force_xinerama = falseScale up/down notifications automatically in Dunst
These are experimental features. They sometimes work and sometimes don't. When there is a new release of dunst, you might see some changes.
The option per_monitor_dpi if set to true, enables dunst to calculate dpi automatically. It helps in scaling up and down your notification. It is quite useful when you have multiple monitors with different resolutions and screen sizes.
[experimental]
    per_monitor_dpi = true
Please note that this option is set under the segment [experimental] not [globar]. So, use tabs accordingly.
Customize Low, normal, and critical messages
The segments urgency_low, urgency_normal and urgency_critical are used to set the background, foreground, and other colours, timeout, default_icon, etc..
The following is self-understandable.
[urgency_low]
    background = "#222222"
    foreground = "#888888"
    timeout = 10
    # By default, `default_icon` is disabled. But if you set the default_icon option, you will have an icon in your notifications if they don't come up with.
    # default_icon = /path/to/icon

[urgency_normal]
    background = "#285577"
    foreground = "#ffffff"
    timeout = 10
    # Icon for notifications with normal urgency, uncomment to enable
    #default_icon = /path/to/icon

[urgency_critical]
    background = "#900000"
    foreground = "#ffffff"
    frame_color = "#ff0000"
    timeout = 0
    # Icon for notifications with critical urgency, uncomment to enable
    #default_icon = /path/to/icon
Conclusion
That's all folks. If you have any questions/suggestions, put them in the comment section below. Thanks for staying so long. To learn more, read man 5 dunst, man 1 dunst, man 1 dunstctl, and the file /etc/dunst/dunstrc. These documents and man pages contain a lot of information as I have read them while preparing this article. Thanks again.